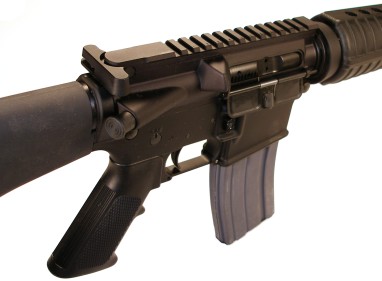
Most anyone who owns an AR15 develops a strong attachment. They are amazing little rifles. The AR15, and its variants, are the firearm equivalent of auto racing’s Chevy or Ford small block engines. If you like firearms, and you like to tinker with them, the AR15 offers virtually endless opportunities. There is the potential for do it yourself projects that: enhance aesthetics, improve accuracy and improve reliability. Some basic changes accomplish multiples of the above.
The AR15 is capable of exceptional long range accuracy, and even converts easily to a number cartridges; big bore medium range, as well as hard hitting, high velocity long range. Popular accessories, in no particular order, include: floating handguards, precision adjustment metallic sights, special purpose stocks and pistol grips, replacement and match grade barrels, any number and types of enhanced target acquisition accessories, and adjustable gas blocks. The best part is, many accessories can be installed by a person with a modest mechanical aptitude, a few inexpensive specialty tools and patience enough to read instructions and move with deliberation. I thought it might be useful to others to record one of my AR-15 projects, as I am a guy who is often referred to as “of modest mechanical aptitude”. Readers could learn from my mistakes, and they could… Nope, it’s just pretty much learn from my mistakes.
Preparation…books
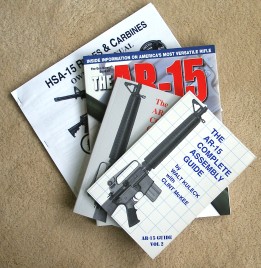
Yes, I got some….for lots of reasons. From the standpoint of assembly/disassembly procedure, insight offered keeps me from test prying when I can’t find a fastener, or spending hours trying to figure out if the tiny pin on the floor is “floor stock” or if it really did drop out of that autoloader I just turned on its side. In the case of the AR-15, a helpful book gave me a heads up on which threads got the Loc-Tite Red, which got the LocTite Blue and which got the anti-seize compound. Surprisingly, it does make a difference. Books provide a procedural check list of critical tasks, not unlike the repetition of rules we all apply to firearm safety. Following good written procedures saves me from my human condition where I could be prone to distractions or rationalizations, or experience temporary lapses in memory, and spontaneous adventures into wondering what was that gooey orange thing is I just picked out of my ear.
Books provide situational vocabulary, the kind that stops me from being embarrassed when I call a tech line and can’t get the person on the phone to convert my description “a large, bumpy flat thing” into an orderable part number. Proper nomenclature has also spared me the aggravation of surprise packages from UPS where the contents of the box has nothing to do with what my noggin thought it was ordering. Finally, books save me money. No more paying to replace damaged fasteners, flattened barrels, cracked stocks, ball pein hammered sights, or scope tubes that have curvature of the spine. Not that any of that has happened to me.
You’ll notice there are several books in the picture above. I try to buy several on a subject to protect myself from expert author bias. Some of the books I found most useful for this AR-15 project are: the High Standard manual that is packaged with the rifle, Patrick Sweeny’s The Gun Digest Book of the AR-15, Walt Kulick’s The AR-15 Complete Assembly Guide & The AR-15 Complete Owner’s Guide. Within this collection virtually every version and manufacturer of the AR-15 are covered and each book offers much more than the standard service and take down information. AGI offers an AR-15 Armorer’s Video Course. Sometimes it is more helpful to see a live demonstration of a flying spring ducking technique than to imagine the same from text and static imagery alone. The tape is about the price of a single book and is carried by Brownells.
The victim, or patient, depending upon perspective…
Quickly and briefly – The AR15 is a collection of big and small plastic, aluminum and steel parts, tied together with a central block, the receiver, which is generally fabricated from machined forged or cast aluminum. If you’ve carried one of these compact little rifles for more than a few feet, you might wonder how aluminum could be so heavy. A2 models have an integral sight/carry handle, A4 types are called flattops as illustrated below. The carry handle is more than a convenience and a place to hang a rear sight, it is intended to also make the receiver more rigid and less prone to flexing under the leveraged weight of the gun’s barrel. I prefer flattop versions of the AR because they lend themselves to mounting optical and other enhanced types of sighting devices. and I’ve seen no loss of accuracy in the absence of additional support from a handle. For almost the best of both worlds, a number of manufacturers make accessory detachable carry handles/sights for the flattop. I say almost because I don’t believe a bolt on brace will provide the same structural strength improvement as brace that is integral to a casting or forging. 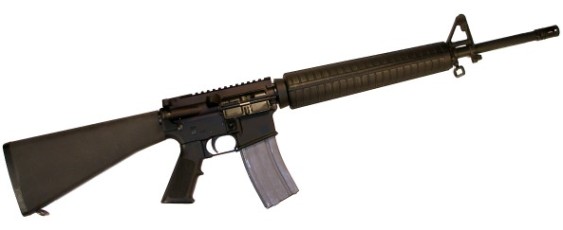
I’ve settled in with guns manufactured by High Standard as reviewed a while back on Real Guns. They are an outstanding MIL spec gun, very accurate, very reliable and they can utilize virtually all of the standard AR-15 accessories and bits and pieces. High Standard supplies firearms to the military, and the specs and detail roll over into their civilian products. Despite high quality fit and finish, like all AR’s, the design has the aesthetic appeal of a crowbar and half wrapped in high impact resistant plastic. My model of preference is a flat top, aka no carry handle on top. It would seem this configuration, with a Picatinny rail integral to the receiver, would make mounting a scope easy. Unfortunately, the stock’s comb angle and height is made for high metallic sights and it puts your head in a position to look over the scope rather than through it. There are lots of mount types available, including those that convert from a Picatinny mount to a Weaver style so an owner can utilize those tons of Weaver mounts that are on hand and/or readily available. The set up used on this rifle is was covered in detail in an earlier article. It has been used extensively and has proven to be comfortable in use and highly reliable.
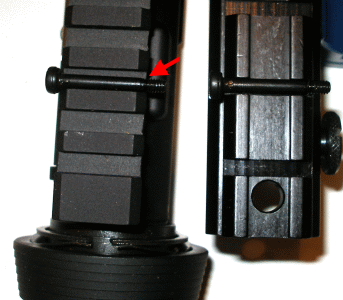 A note on Picatinny (1913 MIL SPEC) versus Weaver (far right) – They are two different mount standards. At 0.200″, the Picatinny fore/aft cross slot depth is 0.050″ greater than a Weaver slot. Consequently, Picatinny type accessory mounts will not fit into a Weaver slot, and a Weaver accessory mount will have 0.050″ fore/aft float and have to rely on side clamping alone for security. Pictures right, at the arrow, is a Weaver cross fastener laying in a Picatinny slot. The mount on the right is a Weaver type with the same fastener. Unless you like optics bouncing around under fire, I’d suggest not mixing the two standards outside of a legitimate mount adapter. Then again, I am the product of an east coast public school education, so what do I know ?
There are several other differences between the two standards. The active mount surface vertical height for the Picatinny is 0.200″, the Weaver 0.230″; the clamping surfaces are different heights. Finally, the Picatinny offers approximately three cross slots for mounting latitude where the Weaver provides a little more than one per inch. Both types measure 0.834″ across. If you’d like to read more on the subject, go to Google, enter “firearms” + “pissing contest” and I’m sure you’ll find the discussion.
The “Intent to install” accessory list…
The following are the items I am installing. Where possible, I’ve listed the source of purchase, as well as the supplier prices. My selection of suppliers is based upon price and availability, level of customer service and technical support and, finally, defective product return policy. Also looming large, where I have multiple choices, is the support and participation levels of the company in shooting related sports and organizations. You’ll see Brownells listed quite a bit. They are pretty much a supermarket for parts and tools and they are a mainstay in the industry. I’ve not encountered a situation where I couldn’t get a polite and informative response to a tech support or service question. Something I’ve consistently not found to be the case with companies like MidwayUSA. I also try to avoid a lot of small shops, unless they are sole source of an item, as there is a tendency of not noting inventory status, or order status and not answering email. Like I said earlier, it is important to support companies that support us.
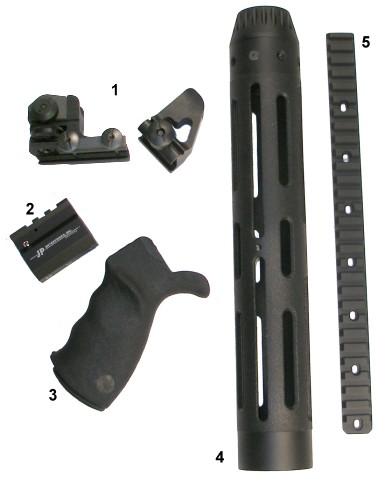 #1 is a quality set of DPMS mechanical sights that quick attach/detach to the flattop rail as well as to the adjustable gas block that is bring installed. Brownells – Detachable rear sight $72, Detachable front sight $54.
#2 is an adjustable gas block made by JP Enterprises and is an accommodation to my sometimes hardware challenging handloads. Like all autoloaders, AR’s can be sensitive to significant over or under pressure variation that respectively and subsequently result in beating the gun’s bolt assembly to death or cause the gun not to fully cycle. An adjustable gas block can remedy or at least minimize this problem. Brownells – $70
#3 is a Falcon Industries ERGO Sure Grip OverMolded pistol grip with end cap. I doubt it will improve performance, but it definitely looks better than the stock hollow bottom plastic piece. MidwayUSA $24.
#4 is a V-TAC/J P Enterprises modular rifle length floating handguard. It’s purpose is to keep the pressure of forearm hold and load bearing slings swivels and bipod mounts away from the barrel. The handguard is secured to the receiver and projects out over the barrel without contact. It also serves as a nifty mount for multiple position #5, tactical rails, that run partial and full length of the handguard and serve as a mount for just about anything that could be hung on the barrel of an AR-15. Brownells/JP Enterprises. $149
Disassembly. You can’t get there from here…
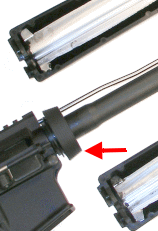
Common to all accessories being installed, a certain amount of disassembly is first required. The AR-15, for field stripping and cleaning, is relatively easy to disassemble. Like most service type rifles, I’d think it wouldn’t make a whole lot of sense for a soldier to need more than they routinely carry to be able to keep a firearm clean and in working order. I don’t know for sure, as I was in the Air Force where terms like cannon, hundreds of pounds and megatons described firepower. However, I did grow up in New Jersey. After checking the rifle for empty, I pulled the handguards. Procedures reference a buddy system where one person pulls down on the slip ring (see arrow – right) while the other person pulls the handguard apart onto half sections. It was no problem to put the butt of the rifle on the bench, pull down on the slip ring with one hand, and pull the handguards apart and off with the other. With the handguards off, the gas tube that runs from the gas block/front sight, through the slip ring and into the receiver was exposed. It’s pretty ugly under there. Reason enough to cover it all with a handguard.
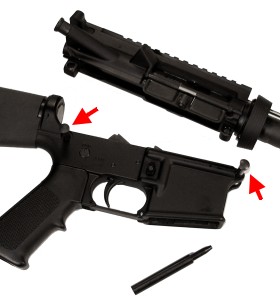 The next part to go was the flash suppressor because it would interfere with removal of the gas block/front sight assembly. The best approach to removing the suppressor, oddly enough, begins with separating the upper and lower assemblies. Because I have found myself working on the AR with some frequency, it decided it was worthwhile investing in some inexpensive specialized tools. For a few bucks disassembly/assembly was simplified and gun parts weren’t damaged in the process.
Separating the upper from the lower required only popping out two takedown pins (arrows). Use of a $2 DPMS Delrin takedown pin punch from MidwayUSA to push the pins out, made the task quick and preserved the pin’s finish. Brownells sells a pin pusher with a ball handle from Sporting Conversions, $8, that may be more convenient when away from the work bench.
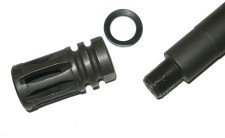 The best way to pull the flash suppressor is by locking the barrel in a vise. I set aside a set of aluminum vise jaws made for the AR-15 and, for this lighter weight task, clamped the barrel, gas tube up, in an oversize woodworking vise with soft pine jaws. A couple of taps on a 3/4″ open end wrench and the suppressor and crush washer came right off without damage to any of the parts. Over time, and across various manufacturers, suppressors have been pinned, silver soldered and timed with peel washers. It is good to check first before turning the barrel into a piece of twisted licorice.
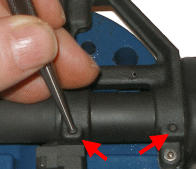 The front sight assembly was removed to make way for the new adjustable gas block. On a standard AR-15 type rifle, the front sight serves the dual purpose of sight and gas block, routing gas bled off through a port at the top of the barrel, through the body of the front sight and into the gas tube. The tapered pins that locate the front sight to the barrel (arrows) must be driven out, left to right (ejection port side). To prevent damage to the radius on the face of the pin, they are best dislodged with a tapered pin starter. Brownells, about $6. Once the pins were started out, a conventional flat faced pin punch was be used to drive them out the rest of the way.

With the pins removed, the assembly did not just slip off the barrel. To assure a secure sight mount, and a tight gas seal between the barrel’s gas port and sight frame, there is a very tight fit between the sight body and two slightly raised and polished diameters on the barrel (arrows). The diameter for a standard barrel setup is 0.750″. With the pins removed, light tapping with a small plastic faced hammer, alternating between top and bottom of the sight frame, removed the assembly, complete with gas tube, without putting a scratch on the barrel’s finish. The triangular piece of stamped steel that was impaled on the gas tube, the handguard cap, also now slipped over the muzzle. Since the gas tube is reused when installing the adjustable gas block, I tapped out the single roll pin that anchored the gas tube to the front sight and pulled it free. Mine was a little stubborn, so I wrapped a small piece of an old suede glove around the tube for grip and to protect the surface, then I lightly gripped the suede with a pair of pliers and carefully wiggled the piece out of the sight. If only the adjustable gas block was to be installed, this would have been the end of the line for disassembly. It was nice to find only the parts slated for removal, so far, were on the bench. Uniquely, the AR-15 works best as a complete assembly; no extra or left over parts.
Further disassembly…the part where the barrel fell off
To prep for the floating handguard installation the upper assembly, or receiver, needed to be stripped. Pulling back on the charging handle and bolt carrier freed the carrier from the receiver, probably a little more enthusiastically than anticipated. Fortunately, I still have good reflexes. Once clear of the gun, the charging handle was pulled back, lowered and removed.
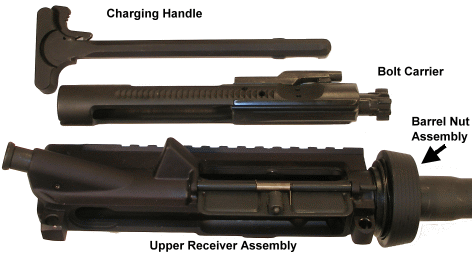
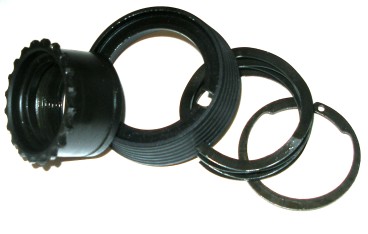 The standard AR-15 barrel nut assembly was removed in preparation for the V-TAC floating handguard installation. The “slip ring” that retains the standard armguard is actually a barrel nut assembly. It is comprised of a: barrel nut, delta ring (slip ring), weld spring, and an e-ring – as pictured left. Unlike the Remington 700 or Mauser bolt guns that require a barrel vice, 3 mules and a cutting torch to remove the barrel, the barrel nut is all that holds the AR-15 barrel in place. Scary, isn’t it?

Multi-tools, like the one pictured left, is the AR equivalent of a Swiss Army Knife. It is designed to facilitate disassembly/assembly of everything from the barrel nut mentioned above, or a suppressor, or a carbine style butt stock. This one is an AR-Stoner Multi-Tool, I believe I picked up from MidwayUSA, which worked fine for pulling the barrel in this project, but a number of the wrench slots are not true to size, making the tool less than useful for some intended purposes…like removing the suppressor. The sloppiness was of greater concern when tightening, torquing, a barrel nut. It took great pains to make sure everything was perfectly aligned to prevent damage to the parts, something that isn’t welcome at 80 ft/lbs of effort.
Most multi-tools, including the service tool, provide face lugs like a spanner, for pulling barrel nuts. They engage the recesses between cogs in the barrel nut without having to pull back and restrain the spring loaded delta ring. Brownells offers a variety of these, as well as a clone of the original compact MIL spec piece. In any event, a multi-tool is a good investment as a pipe wrench and duct taped barrel nut are not an approved procedure.
The AR’s receiver is quite fragile in comparison to almost any civilian based firearm…and most children’s toys. If you’ve worked with 1911 type guns you’ve probably gotten use to sticking some sort of support material inside of a slide or frame before pounding away on it or to hold the piece in a vise. The same is true of the AR. Companies like DPMS produce machined nylon blocks that closely conform to the inside of the AR receiver and have an stub that protrudes from the bottom. The formed block is inserted into the bottom of the receiver, locked in place at the takedown pin locations with an included set of detent pins, then the stub at the bottom is placed in a vise and the work piece is held tightly. Without this type of tool I could see where there might be a lot of crushed or deformed receivers. Brownells/Peace River makes an upper receiver action block that closely conforms to the outside of the receiver, A2 or A4 type, and allows you to put the whole assembly in a large bench vise. About $46, I believe.
The picture below is my receiver with the upper receiver block in place with the block anchored securely in a very large wood working vise. No damage at all to the receiver and only a light tug on the multi-tool to free the barrel nut. These blocks are available in many forms and configurations. I picked this one up from Brownells for about $42. By comparison, a replacement upper receiver runs about $120.


When it was all over, and the dust settled, this is what I had on the bench. With the barrel out and the receiver gutted, I took the time to clean everything out before beginning fitting the new material. The AR is a relatively simple assembly and, so far, relatively easy to work with. The locking lug surfaces that reside in the barrel extension are the key to the guns accuracy in the absence of a beefy receiver. The set up pulls the breech face into square with the bore.
J P Enterprises’ V-TAC Modular Hand Guard
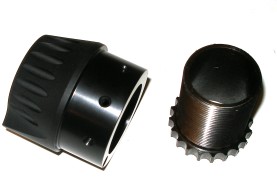 The parts are great, fit and finish; little pieces of mechanical art that enhance the rifle’s appearance and improve its accuracy. The product packaged instructions are a little lean for a novice. For someone with AR experience, I’m sure the task would be deemed easy. I would have liked to have had a diagram or an assembly schematic that might have reduced the anxiety associated with putting pieces together with Red LocTite. Ultimately, I resorted to using a novel two step approach of reading and paying attention to the included instruction to get to a proper installation.
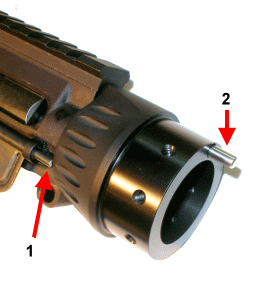
Please excuse the washed out images. Sometimes I flood the picture so more detail is visible. The parts are actually quite black, as above. #1 is the ejection port pivot pin. It is prevented from advancing rearward by a miniature c-clip, and forward by the barrel nut assembly. The problem encounter was, while the stock barrel nut is recessed and not flush with the face of the receiver, the receiver side of the J P Enterprise part, the receiver nut, is flush. Consequently, the ejection port cover pivot pin contacts the rear surface of the receiver nut before it contacts the receiver. I filed and stoned the pin until I had maybe 0.020″ clearance with all parts installed.
#2 is a Brownell’s barrel nut alignment gauge. This J P. Enterprises piece is partially retained with LocTite Red and its gas tube hole has to be in perfect alignment from the entry to the receiver nut, through the receiver and onto the bolt carrier.
I did not rush the assembly. Early years spent on rework, brought about by hasty efforts, has taught me to settle down and make sure I understand something before moving on. It was a dry run with the J P receiver nut that I detected the pivot pin problem when the part wouldn’t seat in alignment.
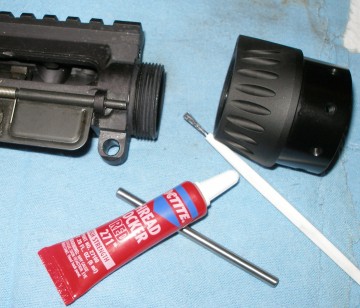 With all parts fitting correctly, I degreased the receiver and receiver nut threads, brushed on Red LocTite, screwed the pieces together, and aligned them with the Brownells tool. Red sets up in about 20 minutes, but cure time is actually 24 hours, so I parked the assembly on the bench and called it a night.
The cure period is important as the LocTite coated threads have to hold the receiver nut in place, and in gas port alignment, while the inner barrel retainer nut is cranked down. At the end of 24 hours, there was no problem in this regard, the receiver nut stayed firmly in place and alignment remained perfect even under duress. I sense this modular hand guard is a permanent installation.

With the upper receiver locked up on a nylon fixture in a vise, the barrel was slipped in, extender tab positioned at 12 o’clock, and the barrel retainer nut was prepped and started. If the receiver nut and red LocTite are the ying of this project, surly the barrel retainer nut and copper based anti seize compound are the yang. The red Loctite secured the receiver nut, preventing it from rotating as the barrel retainer nut was installed. Even is attempted disassembly, unless subjected to 500°F, that piece will be go nowhere. LocTite C5-A (seems I remember a really big aircraft with that designation) protects the assembly’s threads from galling when being heavily torqued on assembly and will stay in place to permit removal at some point in time. Anti seize compound can withstand temperatures of 1,500°F. Fitting the barrel retainer nut proved to be the most trying part of the project. I thought I could share some of that and maybe save someone else some grief.
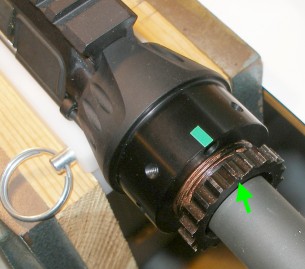
The book torque for the AR is 30 ft/lbs – 80 ft/lbs, as required to gain gas port alignment, however, it seems this is often exceeded. Some folks just crank the barrel nut down until they get alignment and skip the torque wrench altogether. When I was a young guy, I used a torque wrench for fear of snapping fasteners with my Herculean strength. As a… more mature guy, I use a torque wrench to make sure my perceived 100 ft/lbs isn’t 10 ft/lbs. The V-TAC instructions indicate 50 – 80 ft/lbs as correct for their assembly. At 40 ft/lbs the gas port in the receiver extender was effectively blocked by a cog on the barrel retainer nut – see picture, see index tape, see bright green arrow. 50…60…70…almost.. …80 ft/lbs and the alignment gauge passed right through.
 The first problem was determining a torque value. My torque wrench was connected to the ½” drive opening in the multi-tool, which essentially extended the distance from the center of the barrel retaining nut to the center of the torque wrenches drive head by 2″. As a torque wrench is moved away from center, leverage is increased, so the torque wrench setting must be reduced to torque to the spec level. I’m not sure what I said either, you might want to read it again and shoot me an email with a better explanation.
To get a good torque WRENCH setting you (1) identify the recommended torque value. Then you (2) measure the distance from the center of the torque grip to the center of the square drive head and multiply this dimension by the desired torque value. (3) Add the length of the offset from the center of the fastener to the center of the torque wrench drive head to the length of the torque wrench and divide the result of (2) by the result of (3). After actual measurement as indicated, torquing to 50 ft/lbs would require a wrench setting of 42 ft/lbs and 80 ft/lbs would come at 70 ft/lbs indicated. J P Enterprises wrote its instruction sheet with the understanding a standard armorer’s wrench would be used. That placed my torque wrench at just about the same distance from the barrel retainer nut center. So 80 ft/lbs it was, and that is a lot of torque. A wonderful technical exploration, and very satisfying conclusion, totally lacking in effective use of time. Still, sometimes it is good to fully understand why you are doing something, other than just following blindly.
A good case for the Brownells/Peace River wrap around upper receiver block was made while I was jumping up and down on the torque wrench. The Peace River tool approach surrounds the upper receiver and puts it low in the vise jaws for full support while being torqued. The nylon block type I used sticks in the receiver and is grasped at the bottom, below the receiver, by the vise. Consequently, the nylon block is unsupported above the vise jaws and will flex when the torque is cranked up. This twisting and flexing caused the barrel retainer nut to jump the jaws of the multi-tool on two occasions during the process, allowing me to accelerate from zero to good golly in about 2 seconds. The basic nylon block is good for most tasks. For heavy work I think the wrap around type would be better and the cost is about the same.
With the barrel retaining nut in place, I popped in the 7 countersunk, Allen head screws that secure the handguard tube to the receiver extension nut, after coating them with blue Loctite. This will facilitate future removal without the use of an acetylene torch. No too bad, so far. Even the original gas tube fit right through the port and into the bolt carrier.
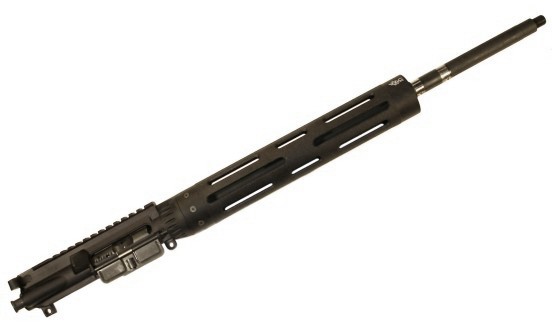
Overall, things are shaping up and the AR is looking much better and, hopefully, on its way to shooting better. I’m going to take a break here and finish up in the next update. I am installing the adjustable gas block and I have to make some decisions regarding permanence of installation. More on this later. So far, nothing overwhelming. Despite the verbosity of explanation, we are looking at only a few couple of hours of labor. The complete modular floating hand guard is $149. I will detail all of the cost of all of the changes made in the next and final segment.
Fast, Fast, Fast Relief ! Part I of II
Fast, Fast, Fast Relief ! Part II of II
Thanks,
Joe

Email Notification