When I left off at the conclusion of Part I, I was in the middle of a self congratulatory, one man high five, which is not nearly as rewarding as one might think. I was also searching for a bottle of green 609 LocTite…again, not as exciting as one might think. I had begun to suspect JP Enterprises was screwing with customers by calling out one each of every color of LocTite on the market but, on further review, each proved appropriate for the specific application.
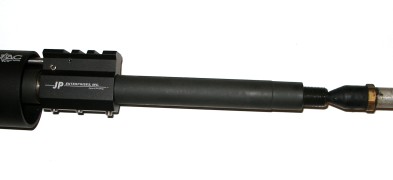
Installing the adjustable gas block, at least installing it correctly, takes a little patience. The first task is to locate the gas block port, directly over the barrel port. With the gun’s bolt closed, you slip the adjustable gas block and tube into approximate position and remove the gas adjustment screw. Then, while blowing compressed air into the gun’s muzzle, you move the gas block fore and aft in small increments until you hear and feel maximum air flow from the open adjustment port. You can double check yourself by bending a paperclip into an “L” at one end and probing the barrel port through the gas block port. Once located, you tighten the three set screws on the bottom of the gas block to mark proper position on the gun’s barrel, then remove them, and the gas block, so the barrel can be drilled. If you want to be really spiffy in your approach, you might coat the bottom side of the barrel with DyKem so the little screw tip scores are easy to find. Alignment should occur with the gas block 0.025″ forward of the barrel locating shoulder which, in fact, is exactly where my gun’s gas block located. 0.025″ doesn’t sound like much of an offset, but it is 25% of the port size and it makes a world of functional difference. More later.
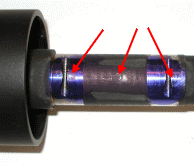
Loctite Green 609, a substance used for bonding concentric cylindrical parts, is used to join the gas block and barrel. The assembly is then anchored by the three gas block set screws. To improve that lock up, it is suggested one to three 0.100″ deep holes, 1/8″ in diameter, be drilled into the barrel as locating points for the tips of the set screws. The problem I encountered was that the outside screw tips came too close to the grooves in the barrel where the original assembly had been pinned. If I spot drilled to these outside points, tightening the set screws would pull the gas block into misalignment. So I drilled the center only, which I believe is more than sufficient.
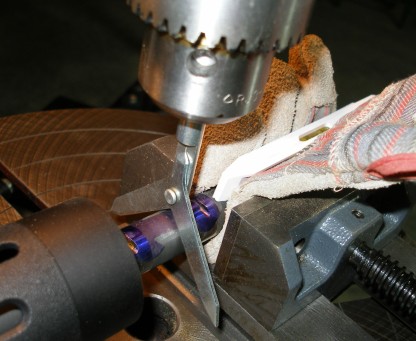
I bet you’re wondering, “Where does Joe get all this fancy equipment?”. That is my drilling glove, Aubuchon hardware I believe. It does a good job of protecting clamped surfaces and I have a spare when the first wears out. The round stock center finder did a great job of making sure the set screw locating hole and, subsequently the gas block, were located straight up and down. I believe that tool was $8 from MicroMark. The $1.95 pocket level gave assurance the drill bit aligned perpendicular to the barrel. It may not be pretty but this all works really well for the purpose.

The LocTite 609 was applied with a small modeler’s paint brush to the contact cylindrical surfaces on the block and the barrel, with the exception of the area around the ports to avoid an unintentional port obstruction. Contrary to the JP instructions, I did not use LocTite Red 271 on the set screws, but rather Permatex Blue 242. Intended for ¼” fasteners, it works well with smaller, stands up to modest loosening or adjustment without reapplication and permits use of standard drivers without heating for fastener removal…
Welcome to my world…

Gremlins I presume, but when the dust had settled the gas block was flush up against the aft barrel shoulder, the gas port was partially obstructed, and the gun would not reliably cycle at any adjustment setting. Parts secured with LocTite 609 need to be heated to 250°F before they will budge. With a propane torch in hand, and a Fluke infrared thermometer to stop me from melting the barrel, I heated the 609 and pulled the gas block forward until there was a 0.025″ gap at the shoulder. The need for this gap is clearly stated within the product instruction sheet. This is the gap left by removal of the standard forward hand guard retainer. Obstruct the hole; worst case, the gun won’t cycle, best case the range of adjustment is lost.
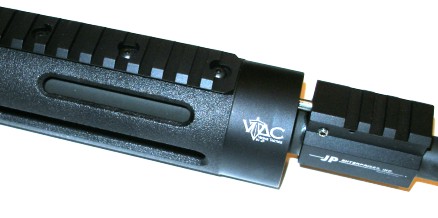
With the gas block properly installed and the gun operating reliably, I went on and installed a JP top rail that runs the length of the hard guard and terminates in perfect alignment at the flat top’s receiver rail. The JP part is firmly secured with 7 fasteners and will stay put until its intended removal. All parts are a good fit.
Gone is the coat hanger of a front sight, with no rear sight. Gone is the round plastic, barrel bearing front hand guard. Gone is about a quarter pound of weight. Added is the accuracy of a floating hand guard, the handload compensating adjustable gas block and the utility of the full length Picatinny rail in the event I want to hang a light, or my lunch over the barrel when I head for the woods. I am not sure why the rifle got smaller. I’m sure it can’t be my photography. One other note. The hand guard comes with two sling swivel buttons that fit into the slots on the guard. They are easy to install before or after the guard is mounted and they seem to stay put.

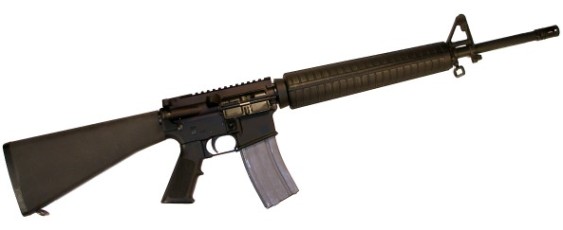
But why stop here….
The High Standard shot well in standard form, typically under an inch with handloads. With the changes in hand guard and gas block, the gun shoots consistently under an inch with almost anything. I suspect a more skilled shooter could do better. I started thinking about a replacement grip, if for no other reason than they look pretty spiffy and the stock part looks a little cheesy. I found the Falcon Industries Ergo Grip at Brownells and, after reading the description very carefully, realized it was a super gripper, a great gapper and a kick-ass capper. Having it on my AR would only further the illusion of my technical competence.
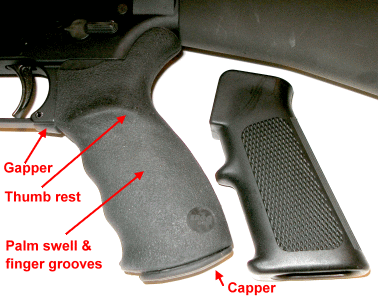
The right hand model has a distinct thumb rest. A small molded slip-in piece fills the gap between the grip and the rear of the trigger guard and a removable soft rubber cap fills the grip end to prevent insect infestation and provide a place for…stuff. I keep the gas block adjusting Allan wrench and small keychain screw driver in mine. Comes in handy. The grip feel is comfortable and steadying, and that is saying a lot for a gun that already points intuitively. Without the jokes, best $21 I spent on this project. Good quality part, adds comfort when shooting and improves aesthetics. Don’t lose the detent spring when you change out the grip.
Sights, even for my eyes…
I usually mount scopes on my rifles, then look through them with binoculars so I can see something…anything. Well, it isn’t that bad, but I often find myself shooting handguns and trying to decide if I want to put on glasses for a blurry target and crisp sight, or take off the glasses and reverse the situation. Consequently, I never give much thought to metallic sights on rifles. The front and rear Picatinny rail quick detachable sights from DPMS are absolutely terrific and have made open sight shooting, for me, a viable alternative. I know, they are no more than a flat top clone of the standard A2 set up, but they worked really well for me.
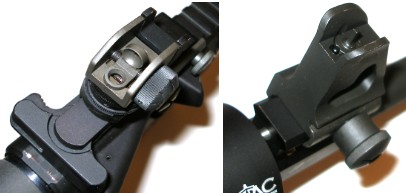
The set is basically standard A2 sights mounted for quick disconnect use on Picatinny rails. The front sight post is adjustable for elevation, the rear sight has a hinged and detented short range (0-200 meter 0.178″ aperture and a normal range (300-800 meter) 0.070″ aperture. Increments and adjustment procedures can be followed as stated in the M 15 rifle’s manual.
In use, the click adjustments are positive and consistent, although I can’t speak metric so I have to shoot and read the target to make adjustments. No different than any other open sight rifles I own. I know some folks scoff at military sights and similar, but I think these are one of a few sets of metallic sights I would use for deer hunting at ranges to 200 yards. In plinking, the large aperture made it easy to follow bouncing target and the small aperture made ½” branch clipping at a decent distance easy. I think this is the first time I had a quick detach scope and open sight set up that held settings when removed and reinstalled and well worth the $126 for the paired metallic sights.
Is there a point to all of this…..

 Okay, so what are the damages? $126 for the sights, $149 for the modular hand guard, $70 for the adjustable gas block and $24 for the grip set. Lemme see…$369 + $780 for the gun. That adds up to a pretty expensive .223 Remington and there are a lot of good bolt action rifles out there for less than half the cost. But I don’t think that is the whole story.
Counting myself, only one of our family members ever wants to shoot the 416 Weatherby, or any of the SIG autoloaders for that matter. Get family and friends together and it is the 22 autoloader pistols or a GP100 Ruger 357 Mag for the heavy hitters. People, for some strange reason, want to have fun with their recreational shooting. This little AR? Everyone wants a turn. Our eldest son brought his family up for a visit from Texas and the AR was a big hit, even bigger with the modifications. Family friends, infrequent male and female shooters, children learning firearm basics and/or marksmanship all like this compact firearm and seem to shoot it well. So for entertainment value, it ranks pretty high. While the standard cartridge is limited, power and range, there are other chambers within reach of most AR owners and changing over to rounds like the 50 Beowulf is easy, as covered elsewhere.
I did it myself…and it worked. No calls to gunsmiths to rebarrel or cut a chamber. No cluster of 5 springs and 6 pins falling on the floor or explode is assorted and sundry directions then a single guard screw is pulled. The AR is a logical arrangement of parts and easy to learn with a minimal dedication of time. In addition, lots of companies are making the guns and fancy accessories. I think I got more satisfaction out of tinkering with the AR than any number of recent projects. Great little guns, lots of fun parts – everybody ought to own at least one.
Fast, Fast, Fast Relief ! Part I of II
Fast, Fast, Fast Relief ! Part II of II
Thanks,
Joe

Email Notification