 It’s not that I don’t enjoy looking at $5,000 Ed Brown, Les Baer and Wilson Combat works of art, it’s just that I’m probably never going to own one. I’d be too tempted to shoot it, or maybe put it in a holster and ruin its finish. More to the point, until I become a member of Congress or a janitor at Goldman & Sachs, unbridled spending and these types of toys will remain out of my reach. What is “art” anyway: high grade materials and critically controlled processes, forged frames and slides and parts machined from bar stock? Does anyone really need a gun with incredible accuracy and reliability, one shaped to facilitate concealed carry, something to serve a competitive and/or collector’s bent and provide Michelangelo like aesthetic appeal?
Made in the Philippines…Welcome to my world
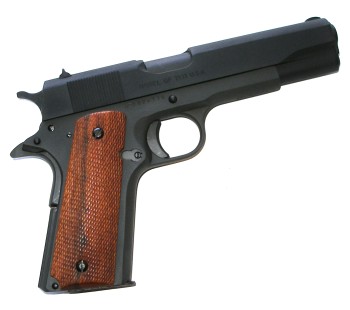
Inexpensive 1911 types, meaning those that can be purchased near the $400 mark, make great “Pay as you go” project guns. Some are better than others. The High Standard GI 1911, pictured above, is manufactured by ARMSCOR, Arms Corporation of the Philippines. These are the same folks that produce various basic and enhanced 1911 type pistols for companies such as: Charles Daly, High Standard, Rock Island Armory, STI International, and Tanfoglio. Metal parts are heat treated high quality ordnance steel. The lug contact areas; locking elements of the frame, slide and barrel, are precisely machined and additionally heat treated for durability and enhanced lockup. The frame, slide and most fire control parts are precision CNC machined from casting to insure long life and parts interchangeability. Is this all true? I don’t know. I’m like everyone else; all I can do is restate the manufacturer’s literature when it comes to this type of information. I can say that I have had direct experience with a number of these guns, and have probably gone through an accumulation of a thousand rounds or so without the slide or sights falling off, or without the frame looking as though it had been beaten by a ball pein hammer. I will say I am not a big fan of mold parting lines on hammers and other similar parts, but they are a fact of life with these firearms.
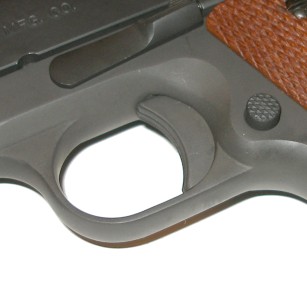 The GI 1911 is like a lot of other commercial “GI” pistols; sort of like this model, but a little bit like that. This one has an A1 type short trigger and scalloped frame behind the trigger guard, but an original M1911 type straight mainspring housing. The front sight is secured with an A1 wide tenon, the rear sight is secured via standard dovetail. The pistol has a Parkerized finish and checkered walnut grips.
Non-standard enhanced features are noted by the manufacturer as a lowered and flared ejection port and a beveled magazine well, however, I found numerous enhancements that are standards for improving reliability of operation. The gun has what qualifies as a long ejector, the barrel is already throated, the hood is beveled and the ramp is blended and polished.
Certainly not a bullseye gun or a competitive IPSC piece, as a bare bones recreational shooter, the GI 1911 performed with a certain level of… dignity. A two hand hold put five shots into three inches at 15 yards without much effort, and the gun cycled both 230 ball and 185 grain hollow points flawlessly. In short, it worked good enough to shoot rather than throw in a defensive situation, which isn’t all that bad of a place to start.
So that’s what that part does…
The Model 1911 isn’t a complicated gun, at least not by parts count and arrangement, however, almost all of its parts, especially the little ones, serve a useful purpose and must always be included in the assembly. What makes a 1911 pistol a little finicky is that proper parts fit is a finesse proposition and all of the pieces are tightly integrated. Correct parts fit makes for a good shooting and reliable pistol. A sloppy parts fit can result in a slide chasing hammer, a decorative but inoperative thumb safety, a lack of feed and eject reliability, and even a gun with unintentional full auto capability. Hey, how exciting is that?
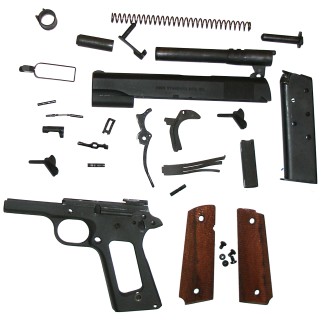 I like to have credible assembly / disassembly documentation on hand for a project gun. I’ll study the material, then disassemble and reassemble the subject gun until I am no longer intimidated by the pile of parts on the bench and the product of reassembled can pass an operational check. Learning the proper names of parts becomes essential for the times I have to interact with people who actually know what they are doing. Developing a basic understanding of each part’s function and their interaction with other parts tends to keep me out of trouble. Familiarization isn’t really a daunting task. Any person with a decent mechanical aptitude, and mostly non-injurious experience with common hand tools, can prepare, plan and study their way to the level of “Do it Yourself Wizard”. Can you spot the two extra parts in the picture?
 Good information is easy to find, bad information is even more abundant. Some sources of good information to have on hand for a 1911 project: AGI’s “Colt 1911 .45 Auto Pistols” video on DVD, Jerry Kuhnhausen’s The Colt .45 Automatic and The U.S. M1911 / M1911A1 Pistols & Commercial M1911 type pistols. The latter two by far the most useful and complete. Wilson Combat’s “Combat Customizing the 1911 Auto” four DVD set extends coverage to include more specialized accessories and assembly modification, the in-production commercials can be skipped, thanks to a decent DVD menu system. Another good book, more general in nature, but still covering the most popular M1911 projects is Patrick Sweeney’s Gunsmithing Pistols and Revolvers.
A Place to Begin – A Lightweight Trigger
Lightweight trigger, in this context, describes the physical weight of the actual trigger and not its effect on trigger pull. How light is a lightweight trigger? A typical steel piece weighs 0.4 ounces, a lightweight long trigger closer to 0.2 ounces. Triggers are generally the last major part removed when stripping a 1911 frame and the first part reinstalled. It was selected first in the project sequence because it would be the least effected by other future changes. There is nothing substantially wrong with the High Standard GI 1911 trigger, but there are a few reasons why installing an inexpensive lightweight replacement might be beneficial.

With hammer fully cocked and propped up by the sear, a nudge by the angled rear surface of the trigger bow on the disconnector will cause the hammer to fall. In an ideal world a trigger finger is the nudger but, in a less than ideal world, the nudger could be Newton. The trigger in a 1911 pistol floats horizontally within a frame channel. Its forward motion is limited by the end of the channel, it’s rearward motion inhibited initially by the disconnector. As is the case with all things at rest, including me in front of the TV during football season, the trigger tends to remain stationary even when things move around it. When the slide slams closed on a gripped gun, the frame and pinned fire control parts are driven forward, while the heavy stock trigger stays put. The disconnector, leading the pack of pinned parts, runs smack into the back of the trigger bow and, without an airbag in sight, can cause a dropped hammer. This condition is commonly referred to as “trigger bounce”. The effects of trigger bounce become more pronounced as sear-hammer contact surfaces are minimized and sear spring and mainspring rates are reduced.
 I have never personally seen or experienced a trigger bounce induced hammer fall with a 1911. Can it happen? The depth of contact of the sear against the hammer’s engagement ledge is frequently set at 0.018″ to 0.020″. Only the friction caused by this contact and spring loading keeps these two parts in place. When a hammer spring, sear spring and parts surfaces combine for a 4 lb+ trigger pull, the chance of an unintended hammer fall as the result of trigger bounce is slim to none. As pull lightens, the chances get progressively better. A lightweight trigger’s reduced mass adds a margin of safety.

Some lightweight triggers, aftermarket triggers, have a taller trigger body that takes up vertical slop and allows custom fit. The Ed Brown trigger I selected was dimensionally very close to the standard trigger, both close to the M1911 trigger drawing. The body height of the Ed Brown piece measured 0.924″, the High Standard piece 0.921″, the drawing dimension is 0.930″-0.010″. The Ed Brown trigger body thickness measured 0.246″, the High Standard 0.242″, the drawing 0.250″-0.010″. The Ed Brown bow height checked 0.224″ at its thickest point, a couple of thousandths taller than the High Standard; the drawing calls out 0.232″-004″ which identifies both parts as slightly undersize.
A good reason for installing an aftermarket trigger it to tailor its horizontal length to an individual shooter. The Ed Brown piece is 0.075″ longer than the High Standard part which makes for a much improved grip and controlled trigger squeeze. The lower surface of the Ed Brown trigger bow is raised or relieved along its bottom edge so that only the front and rear portions support the bow in the frame channel. This reduces bearing surface and therefore friction. The steel bow is plated for a smoother finish than the High Standard piece, further reducing friction. The Ed Brown trigger incorporates an overtravel adjustment, seen as a set screw and adjustment hole in the face of the trigger body, that also improves trigger control after the hammer drops.
A final benefit of lightweight triggers – they often look pretty nifty. The aluminum body and three holes suggest to everyone on the firing line you really know what you’re doing, even if this is a myth that can only be sustained until the first target check. The Ed Brown National Match Trigger sells for under $20 from sources like Brownells. There are other lightweight trigger systems like Castillo’s $100 Custom Actions stainless, aluminum and ball bearing guided wonders, but I think spending more than $20 for a good trigger flies in opposition to the notion of a low cost build.
It had to happen eventually…disassembly
Unfortunately, the standard trigger will not give up its home in the frame without a struggle; the gun will have to be disassembled for trigger removal and installation. I like to disassemble over a sheet of white construction paper so even the smallest parts are easy to spot. I also like to bag and tag all small parts in small ziplock bags with a noted Post-its that describes the contents, like “Frame” so I don’t forget what they are and which gun they came from. A digital camera that can capture the original position of assemblies can be very helpful when detail parts orientation may slip from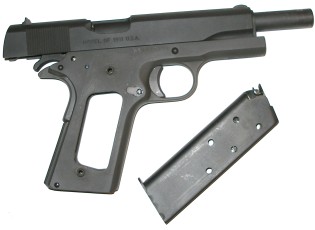 memory. The procedure outlined below applies to the GI 1911 and similar models that do not have a firing pin safety system. The recommended Kuhnhausen books cover disassembly of the this and all other models in great detail, going well beyond the brief outline of steps I’ve provided.
Depress the magazine button, pull the magazine, rack the slide and check the chamber for empty, then flick the slide stop down and ease the slide to battery (closed). Unless a Laparoscopic approach is being taken, remove the four grip screws and both grip panels and set them aside where they won’t get damaged.

I think it is better to remove the recoil spring plug and unload the recoil spring before removing the slide. Whenever I attempt to remove the slide as a complete assembly, from a gun with a short guide rod, the recoil spring jumps out like an angry Slinky.
Stand the gun on its butt on the table for support, depress the recoil spring plug and rotate the barrel bushing clockwise until it is clear of the plug. Rotated clockwise, the bushing will still be keyed to and retained by the slide,  but there will be enough clearance to permit removal of the plug. Ease the plug forward, gradually decompressing the spring. If done correctly, the assembly will look as pictured right. If done incorrectly, and the plug is not eased out, I would suggest checking the ceiling. If I didn’t mention it before, it is really a good idea to wear safety glasses. Don’t be concerned with the way safety glasses make you look. If you’ve come this far you may as well admit you are a gun geek and probably run around with one of those magnifying visors on your head to impress friends and family.
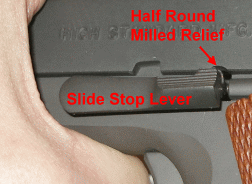
With the slide no longer under load, removal is easy. Cock the hammer so it isn’t working against the movement of the slide. Move the slide until the tip of the slide stop lever is centered in the half round milled relief in the slide. Push on the slide stop lever pin from the opposite side of the frame, lifting the slide stop, then remove the slide stop lever from the frame.
When the slide is properly aligned to the slide stop, this part will come out easily. Don’t pry on it with a screw driver or grab it with pliers. The resulting mark will tell the world you lack patience and skill. At this point the slide assembly will move forward and off of the frame.

After lifting the recoil spring and spring guide from the slide, release the barrel bushing from the slide by rotating it counter-clockwise. 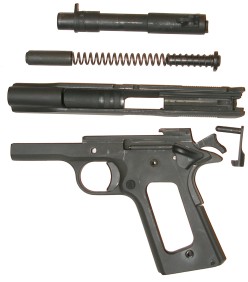 The barrel is then pulled forward and out. When the dust has settled, the work surface should look kind of like the picture right.
Top to bottom –
– Barrel and bushing
– Recoil spring plug, recoil spring, spring guide
– Slide assembly
– Frame
– Slide stop lever (behind frame)
As a general concept, machines are not meant to be abusively handled. Pulling the trigger and letting a hammer fall directly against the frame when the slide is removed will damage the gun. During assembly and disassembly, try to operate various parts of the firearm only where doing so facilitates either. If a hammer needs to be lowered, ease it down with your thumb. Don’t force anything, doing so can get expensive.
Frame Disassembly – Thumb Safety

The thumb safety should be removed next. If the mainspring housing is removed before the thumb safety, there is the chance of dislodging the sear spring, having the sear shift and then not being able to rotate the thumb safety into position for removal. That could be embarrassing and people, AKA friends, will laugh at you.
Thumb safety removal is easy. Pull the hammer back to full cock, rotate the thumb safety to half on/off while pulling firmly away from the frame. When the safety is properly oriented it will pull free of the frame. In addition to the thumb safety, the slide stop – safety lock plunger can be removed from the thumb safety side of the plunger tube. At this point, parts like the grip safety will move out of position, hang precariously, but they will not fall out.
Interesting, well, sort of interesting observation. The High Standard plunger spring does not have the typical mid position bend or offset that stops plungers from popping out without assistance. When the thumb safety is pulled the plunger will pop out of the plunger tube.
Frame Disassembly – Hammer
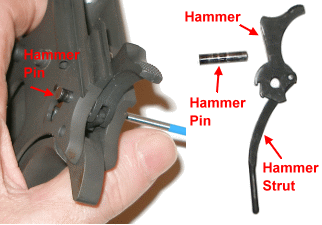
Pull the trigger while easing the hammer down so it is no longer spring loaded. The hammer pin can now be removed with light punch pressure from the right side of the pin. The hammer pin has a flared left side that prevents it from exiting the frame to the right, but it is countersunk to clear the thumb safety. The thumb safety prevents the pin from backing out in normal operation. For our purposes, the hammer strut can remain in place.
Hammers and other fire control pieces are fit to specific guns. They should never be mixed and matched amongst firearms.
Frame Disassembly – Main Spring Housing
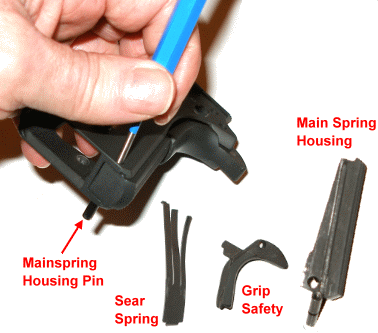
With the hammer removed and the strut no longer pressed against the mainspring cap, there is no external load on the mainspring housing so the mainspring housing pin can easily be pressed out, left to right. With the pin removed, the housing slips down and out from the grooves in the frame.
With the housing removed, the sear spring can be pulled from its locating groove in the frame and removed. The grip safety, no longer retained, will drop out. At this point, further disassembly of the mainspring housing is unnecessary. The High Standard mainspring housing is actually made of steel – a very nice touch where plastic is commonly used.
Frame Disassembly – Sear and Disconnect
![]() M1911 through Series 70 types have a very simple sear and disconnect arrangement. The 80 series has a trigger bar lever that unlocks a firing pin plunger when the trigger in pulled. Series 70 and 80 Gold Cup Colts have additional linkage to eliminate unintentional hammer drops from sear bounce. I prefer the basic pre 80 Series type triggers that don’t have to drive extraneous safety systems, which is consistent with the GI 1911.
M1911 through Series 70 types have a very simple sear and disconnect arrangement. The 80 series has a trigger bar lever that unlocks a firing pin plunger when the trigger in pulled. Series 70 and 80 Gold Cup Colts have additional linkage to eliminate unintentional hammer drops from sear bounce. I prefer the basic pre 80 Series type triggers that don’t have to drive extraneous safety systems, which is consistent with the GI 1911.
With all else out of the way, the sear and disconnector can be removed by pushing out the sear pin, tipping the frame, and letting the parts fall out in your hand. The sear and disconnector have some finely finished surfaces and relatively sharp edged engagement surfaces. They should be handled carefully to avoid damage. These are also matched pieces and should not be swapped between guns. I was disappointed with the fit and finish of these parts in the High Standard. I know this is a low end gun, but a 0.045″ engagement surface thickness makes for a truly lousy trigger. This problem, and a number of others are addressed in Part 2.
Frame Disassembly – Magazine Catch & Trigger
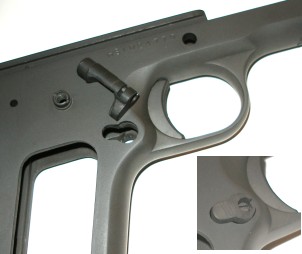
The last components to be removed for the purpose of this project are the magazine catch and the trigger. The magazine catch is a quick release assembly. The release button on the left side of the frame is depressed until it is approximately flush with the frame, then the catch lock (screw head) is rotated counterclockwise 90° which unlatched the assembly from the frame. The catch lock should turn easily. If a high level of resistance is felt while turning the catch, pressure applied to the magazine release should be moderated until the catch turns easily. With the magazine catch assembly removed, the trigger and trigger bow assembly can then be pushed to the rear and out of the frame.
Reassembly – Details, Details, Details…
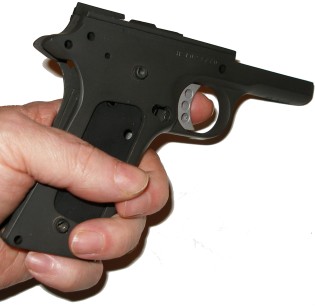
Installing a “drop in” trigger is like opening a door; you can break out the battering ram or fire ax and beat your way in, or you can try turning the doorknob first to see if it’s unlocked. The most basic approach is to place the trigger in the frame channel, insert a magazine, tip the frame slightly downward and see if the trigger will drop freely when depressed then released. If it does, the fitting part is done, and it is OK to move to the next step in the sequence. This is exactly what happened with the Ed Brown National Match trigger.
If the trigger hangs or drags, remove the gun’s magazine and retry. If the trigger moves freely, the bow is probably pinched inward and dragging on the gun’s magazine. There are checking fixtures that are used to locate out of flat areas on the bow and will reform whatever is out of shape. These cost approximately $25 from Brownells, item 080-710-045. Alternatively, the bow can be removed from the gun and slipped over the gun’s magazine to see where it is dragging since the inside surface of the bow should clear the magazine without contact.
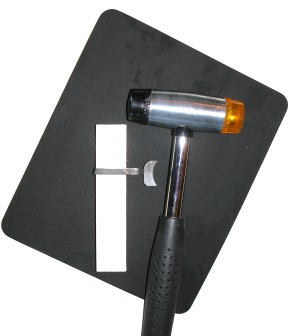 If there is a spot that drags on the magazine, I lay the trigger bow on a cushioned mat, misshaped side down, then I slip a 1/2″x1″x4″ block of 6-6 Nylon through the bow and rap it with a hammer. Then it’s recheck and repeat as needed. A while back I tried doing reforming with a piece of round rod, something that is typically recommended, but I always ended up with a wavy bow surface and the need to buy a replacement trigger.
If on the initial check removing the magazine didn’t allow the trigger to move freely, the problem could be roughness in the frame trigger channels, outward curvature of the bow or the upper or lower bow support surfaces oversized in comparison to the frame’s trigger channel. Best bet is to paint the outside of the bow with Dykem layout fluid, then work the trigger a few times in the frame. Any high spots will show up as bright spots through the blue.
Upper and lower edges can be stoned for clearance and to remove burred edges. Outward curves can be flattened with the same two methods noted earlier; forming in small increments with continual checking. If the trigger bow’s Dykem outer surface shows scratches, the irregular surface might be in the frame’s trigger channel. I have not seen  this problem with the High Standard cast frames, however, I have seen this on some forged / machined frames. Brownells makes an inexpensive trigger track stone that fits in into the grooves and will clean up any irregularities without creating divots where rough spots were removed. The track stone is ceramic, so the frame should be cleaned and degreased before use. Additionally, the stone is used water wet, so care must be taken to flush out all residue from the frame and then apply a protectively coating to protect the frame from oxidation.
As I mentioned previously, some triggers are intentionally manufactured oversize and have a taller trigger body that will not fit into the frame. Material should be removed in very small increments, equally from the top and bottom of the trigger body, to ensure the trigger will be centered vertically and will not bind the bow in the frame channel. The surfaces can be worked down with a fine and extra fine stone as necessary, while carefully keeping the surfaces parallel. Usually the material removed amounts to a few thousandths of an inch and the objective of the fit is to have virtually zero trigger rock top to bottom. Some trigger installation instructions suggest using a flat mill file to cut down material, but files of this type typically remove a lot of material fast and sometimes get me into trouble.
 Once the trigger is moving freely, but before it is more permanently reinstalled, the overtravel adjustment screw needs to be backed out until it is flush with the rear surface of the trigger body. These screws are not preset, just preinstalled so care must be taken that it does not interfere with the movement of the hammer or disconnector. It is important that once the adjustment is made, the screw stays put and does not move out of adjustment in normal use. The easiest way to accomplish this is to coat the screw with blue thread locker which will lock the screw where set, but still permit future adjustment. Yes, I know the tube in the picture is red in color but it is actually Blue Loctite 232. Red Loctite would make the setting permanent.
 Reassembly is pretty much the reverse of disassembly, but I thought a little clarification might help. It’s good to put a little Break Free or similar on the bare surfaces of these parts. Some are covered by other parts and hard to get to without flooding once they are installed.
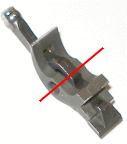
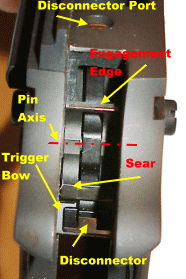
The easiest way to reinstall the sear and disconnector assembly is to pair and orient them as pictured left, then slip the disconnector into the frame’s disconnector port and rest the foot of the disconnector on the trigger bow. In alignment they should appear as pictured right. Once in this position, depress the trigger slightly to raise the disconnector pin hole into alignment with the sear pin hole, then insert the sear pin. The pin goes in from left to right. Next, the sear spring is installed, the mainspring housing only far enough to hold the sear spring tab in place in the frame, then the hammer, then the mainspring housing is pushed up into place and temporarily pinned without the grip safety in place.

Whenever any parts have been changed that effect trigger operation, even through the trigger itself has little bearing in this regard, it is good to check thumb safety function. Sometimes the little buggers drop right in and snap into position, but actually are inoperative. With the hammer in the full cocked position and the thumb safety rotated up to full safe, attempting to depress the trigger should result in the sear being blocked by the thumb safety’s sear stud. The absence of the grip safety allows observation of applicable parts. Rotating the safety down and depressing the hammer should result in the hammer dropping. If the slide is not in place, the hammer needs to be eased down when released.
Before the gun is buttoned up, but with the trigger, disconnector, sear and hammer in place and properly sprung by the main and sear springs, it’s a good time to adjust trigger overtravel. If the overtravel screw is adjusted too far in, the hammer safety notch ledge will strike the sear or the disconnector will drag. This could prevent the hammer from going full travel and possibly cause permanent damage the sear’s hammer engagement surface. Disconnector drag will interfere with motion of the hammer and movement of the disconnector. I crank the overtravel adjustment in until I can ease the hammer down and feel the sear contact the hammer safety notch, then I back out until it just clears, then back out a quarter turn more to make sure the disconnector doesn’t drag. This seems to work for me, however, each of the pieces of reference material noted earlier outlines a procedure and precautions.
Once the trigger overtravel is set, the thumb safety can be removed, the mainspring housing lowered, the grip safety installed, and the gun can be buttoned up for range checking. Standard procedure after any trigger work is accomplished is to load a single round and test fire. If that goes well, load two rounds and fire to check for slide chasing hammers and doubling. If that checks out, give yourself a gold star and enjoy the improved control of the new trigger.

My own GI 1911 is more comfortable to shoot, the trigger finger position and movement is more natural and there is less of a tendency for the barrel to pull right. All of the assembly and disassembly becomes easy after a time, so trial fit of parts and double checking work isn’t a big chore. Part II will detail the trigger job, without all of the lead in verbiage.
Building a Low Buck Shooter – Part I
Building a Low Buck Shooter – Part II
Building a Low Buck Shooter – Part III
Building a Low Buck Shooter – Part IV
Thanks,
Joe

Email Notification