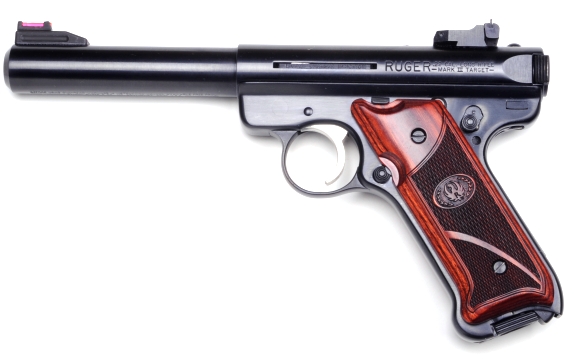
One of the most enjoyable and useful firearms, for those of us who like shooting and hunting, is the .22 LR autoloading pistol. Good recreational target models are modest in price, inexpensive to shoot and many have the potential to be highly accurate. They excel for small game hunting, refining and maintaining shooting skills and most can be configured to suit individual taste and applications.
There are many differences amongst various moderately priced brands and models; grip angles, component part materials, underlying design philosophy and overall quality of fit and finish. Combined, these differences manifest themselves in in a gun’s accuracy, reliability, quality of trigger function, and aesthetic appeal. Despite these tangible differences, price tags don’t express quality so researching and comparing products before buying is essential.
Good enough for today, but what about tomorrow?
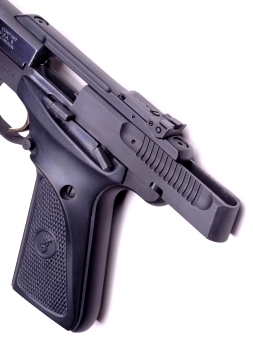
The potential for a high degree of accuracy begins a the gun’s core design. Almost all brands and models will deliver accuracy adequate for casual recreational shooting, A few of them significantly benefit from modest refinements.
The primary weakness in a number of moderately prices .22 LR pistols is a lack of assembly rigidity. Steel barrels may be secured to alloy or poly frames with a single screw. Steel slides might ride loosely on tracks, sandwiched between a gun’s frame and a fastener secured upper sight bridge made of light alloy. The complexity of the assembly, and loose part fit, makes it difficult to keep breech face and case head consistently in critical alignment. Additionally, as heat builds up from protracted shooting sessions, mixed steel and aluminum alloy parts expand at sharply different rates, causing dimensional changes within the assembly and fasteners to shoot loose. Again, none of this will get in the way of casual recreational shooting, but they will come into play when attempting to improve this type of gun’s accuracy.
Picking a project gun…
The Ruger .22 LR autoloader was Ruger’s first product, designed by Bill Ruger in 1946, the basic model has been in continual production since 1949. Over the years there have been lots of refinements and revisions to enhance the gun’s accuracy and reliability through to the Mark III version that was introduced in 2004.
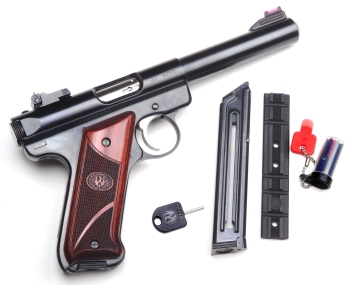 A Mark III Target 512 model was selected for this project. The gun has a 5½” bull barrel, micro adjustable rear sight with light pipe front sight and the receiver is drilled and tapped for a Weaver type scope mount base.
This Ruger is an all steel gun that features a very rigid one piece barrel and tubular receiver for optimal axial alignment. A close fitting internal cylindrical bolt travels within the receiver and carries the gun’s breech face – a circular receiver, aligning a circular bolt, aligning a circular cartridge to a circular chamber.
The grip angle is approximately 25° off of bore centerline as opposed to approximately 17° for a 1911 type pistol. As was the case made by Luger in the design of that pistol, the swept back grip is intended to improve balance in the hand and make for a more natural point. The Ruger, as received, contained keys for the gun’s internal lock, a spare magazine, a Weaver type scope base and a selection of quick change light pipes for the gun’s front site. The inserts vary in diameter and color to suit the individual shooter and circumstance.
Out of the box, with no more than a thorough cleaning, the Ruger was an easy gun to shoot. The sixth round misfired, however, there were no additional misfires over the next 300 rounds. With a sharp firing pin strike, I’d attribute the single misfire to ammo rather than to partial chambering or light firing pin strike. There were no failures to feed or eject and the micro adjustable sights and light pipe combo were actually much better than anticipated. I could shoot, generally, 2½” – 3″ five shot groups at 50 feet. My wife could shoot about ½” better…of course. I had difficulty with the trigger.
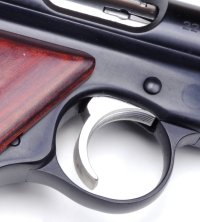
The trigger exhibited a good deal of pretravel or take up. There was a considerable amount of creep before breaking heavily at 4¼ – 4 ¾ lbs with significant overtravel to follow. Compounding the problem, the Ruger trigger pivot is located far forward of the trigger vertical centerline, causing the trigger to move upward in a tight arc as it was pulled. The effort felt at odds to my grip with the line of pull above the web of my hand, rather than a pull parallel to the guns bore as would be the case with a 1911 type pistol.
In the case of the Ruger, the gun felt unsteady in my hand and I found myself pulling shots as group spread out horizontally to the right. Additonally, for as pretty as the grips were, they were too slab sided and thing to offer a solid hold.
I don’t know exactly how to pronounce Volquartsen, but…
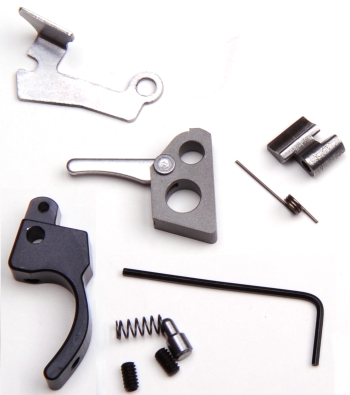 Volquartsen, a company with a long history of enhanced pieces for Ruger .22 LR firearms, makes a kit that promised to greatly improve the Mark III’s trigger function. It is listed asBrownells # 930-000-046 – Ruger Mk III Accurizing Kit and is priced at $110.00….or about what I spend for a 1911 hammer.
The kit includes:
- Target trigger
- Trigger Plunger
- Rebound Spring
- Target Hammer
- Sear
- Sear Spring
- Bolt Release
- Allen Wrench
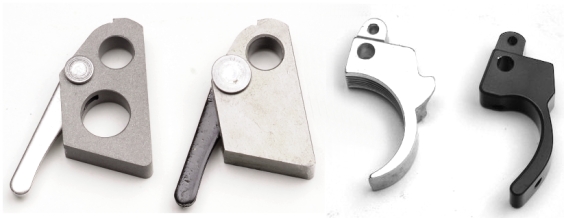
If you look closely at the new pieces, along side of the originals, there is quite a difference in the geometry of some of parts, with the target trigger and hammer the most notable.
The original Ruger parts are the center pieces below.
Preparation…
This is a drop in kit. You don’t have to be a gunsmith to install the parts and have them fit correctly, but the job does take a little focus and a lot of patience. I think the parts are of excellent quality, however, Volquartsen’s postage size documentation is a bit lacking. The instructions are not illustrated and rely on the customer cross referencing the Ruger owner’s manual for part identification. For the most part this is pretty straight forward, but not a reasonable approach while performing the various tasks. I just made an enlarged photocopy of the Ruger manual drawing and did my cross referencing before getting started, noting part nomenclature right on the drawing copy.
I’ve seen a lot of message board and web site references to the Ruger manual not properly detailing field stripping the Mark III. Most of the complaints are directed at the timing of inserting and removing the magazine to overcome the magazine disconnect at the appropriate time. Perhaps there was a revision to the manual, because I found no such problems following the manual. The points of removal and installation of the magazine to facilitate disassembly is clearly documented..
Disassembly…
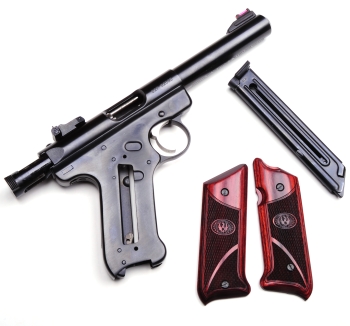 I like to begin disassembly by going to my happy place which is a verified empty chamber, magazine and nice grips removed. The Ruger’s disconnector will prevent operation necessary during disassembly and reassembly unless the magazine is installed, so the mag will have to be reinserted periodically. Grips are removed from all handguns I work on, especially nice grips, unless they also serve to retain small parts that can fall or spring out unexpectedly. Left in place, screwdrivers will eventually scratch grips, parts caught underneath them will dent them and any cleaner that is not suppose to adversely effect wood finish will strip them cleaner than…something intended to remove wood finish.

With the Mark III empty and magazine out, the mainspring housing is removed. The mainspring housing latch folds in and out like a pocket knife blade from a recess in the mainspring housing. I used a plastic coated paperclip that could loop under the latch and pull it out without damaging the gun’s finish. With the housing unlatched, it is rotated rearward and out as pictured above. Because the gun was new, the bolt stop pin that projects from the top of the gun’s receiver needed to be gently tapped to free it from the gun. Notice the very small hammer and plastic striking face. I used a tapered Delrin AR 15 takedown pin for a no mar punch and the same pin worked for pressing out most of the gun’s other pins. A better tool that is shaped to use hand pressure to remove pins is Brownells # 100-002-125. As an alternative, I make punches from non maring Delrin round and rectangular stock I purchase from Enco. The material is easy to machine or hand form into the perfect shape for the job.
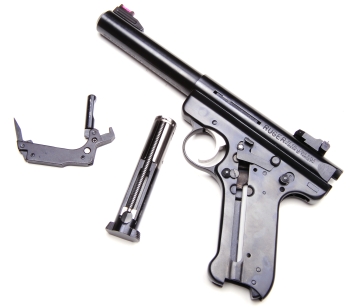 The empty magazine is next reinstalled so that the trigger can be actuated. The Ruger is tipped muzzle up, the trigger is depressed, then the bolt can be pulled out. The magazine is again removed after this step. One of the nice things about field stripping the Ruger is that it is not one of those guns where you remove one part and twenty others fall out on their own.
As pictured below, this is not a depiction of how the new hammer works, nor did I hit the Ruger and get it to burp up a smaller Ruger. With the bolt removed a SOFT PLASTIC mallet is used to tap the back of the receiver, which will disengage it from a tapered lug in the frame and allow its removal. The Mark III is completely field stripped at this point.
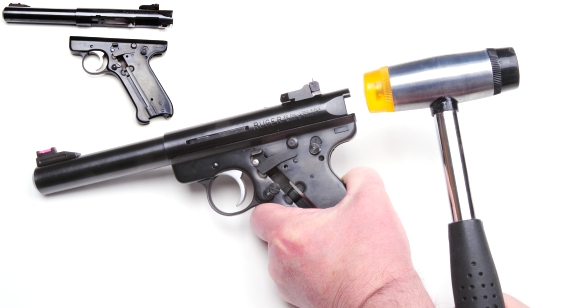
The process took twenty minutes the first time, eighteen of them studying the interaction of parts and watching for whatever might happen that was not on the disassembly script. Once I found there were no surprises, the next time the task was reduced to a two minute effort.
You wouldn’t think there were 8,276 parts in there…

I thought I would put this one up to show a general lay of the land for reference. It actually isn’t that bad in there…almost Glock like with predominately precision stampings and a few cast parts. Best bet? Before pushing any parts out, grab a digital camera and take some pictures… Yes, of the gun. They really come in handy when trying to remember if a spring tail went this way or that on reassembly or to determine of your wife is being a practical joker and put an extra spring or fastener on the bench.
The Ruger comes apart in clumps…

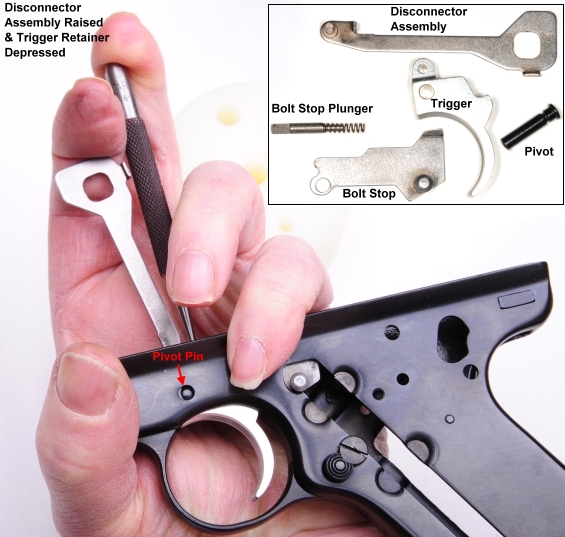
The hammer pivot pin, first step in detail disassembly, is drifted or pressed out from right to left…because it would be very difficult pulling the pin’s nail head though if you go left to right. As soon as the hammer pin is removed the bolt release will be free. By reaching in and rotating the hammer upward, it will come out as an assembly with the magazine disconnector and disconnector spring. Hold the halves together as they are located only by the slip fit bushing that connects them. After this, the safety can be removed. Be careful when lifting the safety from the frame as the safety detent is not secured in the safety other than by light friction and gravity, if the safety is right side up. Referring to the top down shot above, raise the disconnector assembly and remove the trigger plunger and its spring. If you don’t, they will eventually fall out when not anticipated. Boing.
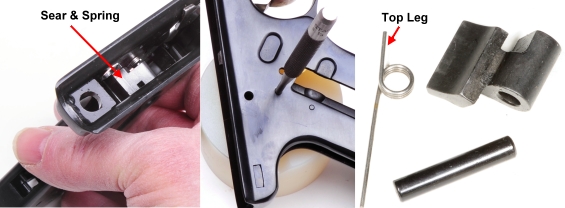
The next components to remove are the sear pin, sear and sear spring. The pin is removed right to left. I work over a bench block to make catching drifted pins easy and to support the firearm when tapping away. Brownells carries a 4″ block that is just about right for most disassembly, #080-000-493 which runs about $16 and last forever. The long punch will keep the parts in place until the frame can be lifted to vertical for part removal. If you do much work with firearms a set is a good investment. A long nose steel punch set, Starrett, works well # 827-525-860. The top leg of the spring is oriented to the right of the sear pin when installed. The Volquartsen instructions highlight this tidbit, so I assume there are a lot of cases of folks installing them backwards and upside down.
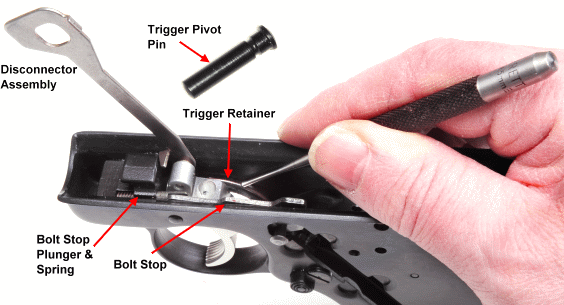
The trigger is held in place with a pivot pin. Because the pivot is free to rotate, it needs to be anchored laterally with a wire spring retainer that rides in the groove that is cut into the pivot pin. The pivot pin is removed left to right, however, the disconnector first needs to be raised out of the way and the retainer pushed down and away from the pivot pin, out of the pin groove, before this can happen. I just used a narrow punch to push the retainer down and another punch to start the pivot pin out. In order of piece part removal; the pivot pin is removed, the bolt stop is lifted out, the bolt stop plunger and plunger spring are removed, and then the trigger and disconnector are lifted out.
Next, visit your gunsmith. Just kidding…
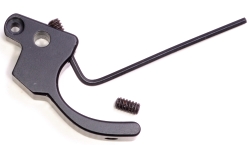 There are a couple of areas where a little patience and some thinking ahead can save a lot of time. As an example, the Volquartsen trigger is packaged in a plastic bag with two uninstalled set screws. One screw is for trigger pretravel adjustment, the other for overtravel, neither installation or adjustment are addressed within the instructions. If you do not install both before the trigger is installed, you will more than likely have to disassemble the gun a second time to install them.
The top screw, the pretravel adjustment should be installed Allen head down and started from the top side of the trigger. Because of the trigger’s contour, there are some partial threads on the trigger face side so, if you attempt to install from this direction, there is a good chance the threads could be damaged. The best bet is to run the screw down into the trigger until it is below the top surface. This way the adjustment screw will have no influence on the trigger pull until the gun is back together again and final adjustments are made. A small drop of Loctite 242 Blue will keep it as set, but allow future adjustment. The overtravel screw, Allen head to the trigger face, can be screwed in until flush with the trigger face. This will save a little quarter turn at a time adjusting after the gun is reassembled.
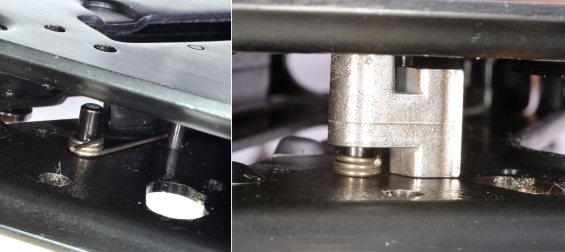
The orientation of the frame in the pictures above is muzzle side left, view top down. The sear is the first part that is reassembled into the frame. The easiest approach is to partially insert the sear pivot pin, left to right, into the frame, then slip the sear spring over it using a pair of non-magnetic tweezers. The short leg should be wound to the right side of the sear pivot pin and the long leg should be forward of the frame cross pin. For a functional check, the sear should rotate forward to rotate and tension the spring.

Next, the disconnector assembly is engaged in the top hole of the trigger and both are started in place. The trigger pivot pin is installed approximately two thirds of the way, leaving room to install the bolt stop and bolt stop plunger before the trigger pivot is fully installed. If the pivot pin is hard to start, you may have to depress the trigger retainer to move it out of the way. (See trigger removal above)
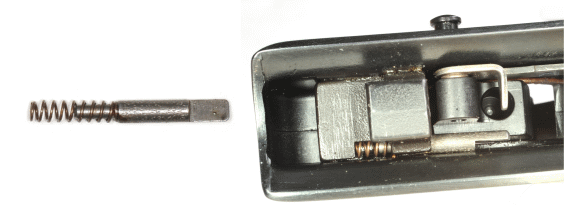
The bolt stop plunger and spring assembly are installed in the frame. The notch goes toward the left side of the frame to leave room for the bolt stop that will be installed next.
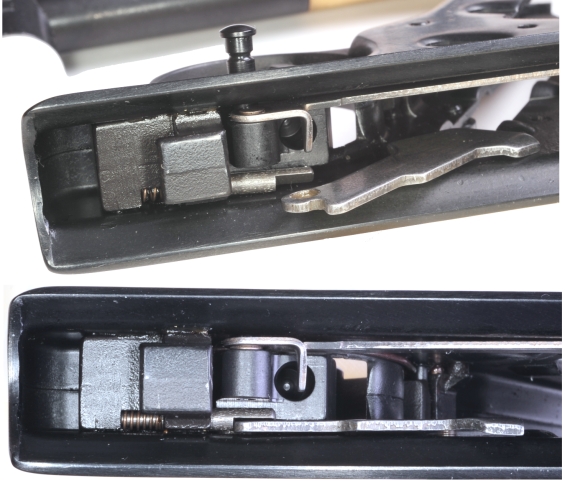
The stud on the bolt stop drops into the long slotted frame opening and the assembly is rotated down into the notch on the bolt stop plunger until the hole in the bolt stop aligns with the trigger pivot pin. Then the trigger pivot pin is pushed through into the left side of the frame until the trigger retainer clicks into place in the pivot pin.

The hammer pivot pin holds several assemblies in place on the frame including the bolt release, safety, hammer and disconnect assemblies. The safety is placed first after checking to make sure the safety detent is in place, the small spring and silver ball head pin embedded in the safety. The safety is laid in place in the frame and the sear is pulled forward until it engages the notch in the safety. While still holding the safety in place, place the bolt release in place on the frame, slipped under the bolt stop stud and insert the hammer pivot pin through the release, through the frame and barely through the safety. This should hold all of these pieces in place under loading from the sear spring.
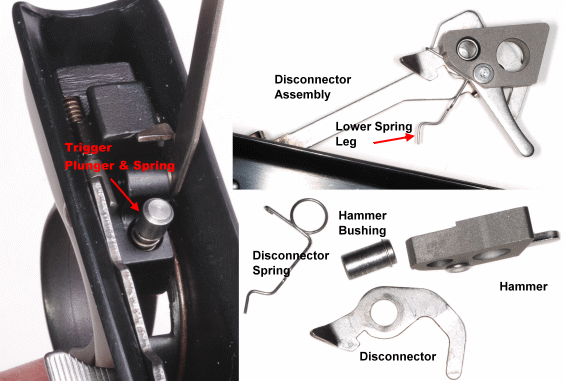
Raise the disconnector assembly and install the trigger plunger and spring in the recess at the top of the trigger. Assemble to hammer and disconnector pieces pictured in the lower frame until they look a lot like the frame above it…with the notations and insert the backside of the busing into the square opening of the disconnector as pictures.
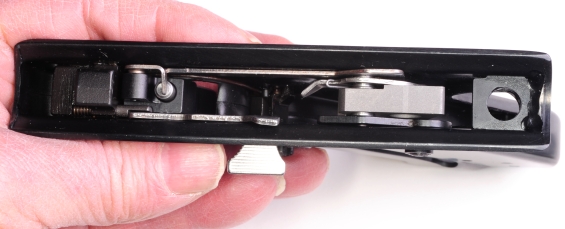
This step looks as though it would be complicated, but it is actually pretty easy. I would skip down and read the paragraph that follows, then come back to this point. You pull out the hammer pivot pin just nough to make room for the hammer, without removing support for the safety, then rotate the hammer assembly slightly forward as it is lowered between the safety and the right side of the frame. When the hole in the hammer is lined up with the hammer pivot pin, the pin is pressed the rest of the way in. The pin is retained laterally by the left grip panel.
If the hammer is correctly installed, the long flat of the hammer will be parallel to the top of the gun’s frame, a clearance notch will be on the left side. The detent spring will rest between the sear and the detent arm, the hammer strut will rest behind the frames cross pin. See picture below.
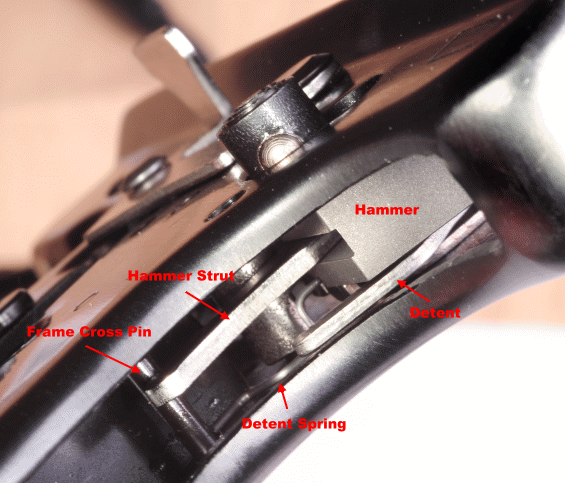
If the parts are installed correctly, as outlined in the Volquartsen instructions a quick check is; install an empty magazine and pull the trigger while pushing on the back of the hammer. The hammer should rotate forward. Remove the mag and go onto the rest of the assembly.
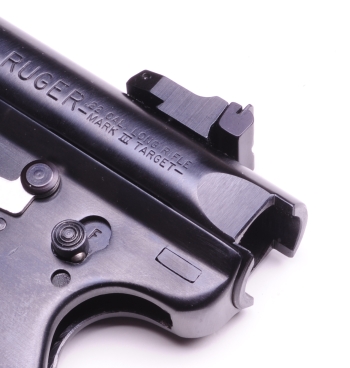
The Ruger manual details reassembly from this point well, so there is no need to duplicate the effort. A couple of suggestions.
New guns have a tight parts. When reinstalling the receiver it may be necessary to lightly tap the back of the grip frame just below the receiver with a soft plastic hammer until it protrudes slightly past the grip frame. It is possible to go too far aft and cause a misalignment that will interfer with the bolt stop pin. It may be useful to tap a little and fit check until the pin passes through cleanly. The hammer strut should drop into the oval recess on the front side of the mainspring housing and the housing should latch with a small amount of spring resistance. If there is a lot of resistance, something is wrong and the problem should be identified before proceeding.
Final touches…
I adjusted the Volquartsen trigger’s pretravel to approximately 0.075″. I set it by very gradually turning the adjustment in until there was no pretravel, then backed off until I had the 0.075″ noted. Overtravel was adjusted to the same dimension, 0.075″ past hammer fall. That is such a vast improvement over the stock trigger, I saw no need to make these adjustments tighter. A little Loctite blue secured both adjusters. The trigger felt so good, I added a set of Volquartsen Voltane Target Grips, Brownells #930-000-047.
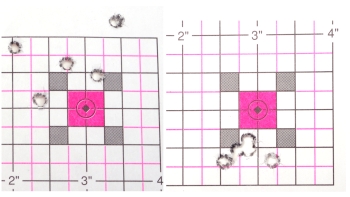
Left and right; typical group size respectively before and after. I think the improvement is dramatic. I am not that much of a pistol shot, but for fifty feet and with little experience with the Ruger, I think it shot pretty well. The new trigger pull was between 2 lbs 14 oz and just under 3 lbs. This was without polishing or clean up and with all new parts. Each of us who shot the gun initially took another turn with the gun and everyone’s shooting improved in a similar fashion.
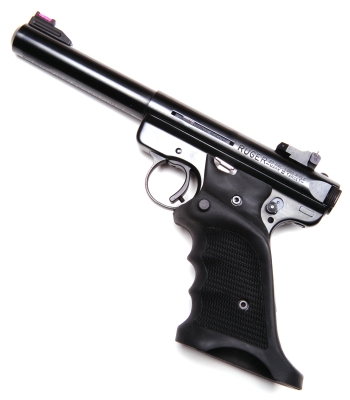 The change from the pendulum arc of the original trigger pull to the almost parallel pull of the new trigger made a huge difference in shooting stability, as did near elimination of pretravel and overtravel.
The grips made a major contribution to shooting comfort. With the middle finger held down a bit from the guard, the spread out finger grooves and full thumb rest, pointing the barrel was like pointing a finger and there was a lot less fatigue during extended shooting sessions. The original grips have the edge on looks, but not when it comes to function. The only thing I had to do was adjust the sights up with the new grips as they shifted point of impact downward 2″.
From a cost basis, that is probably the most rewarding $160 I’ve spent on accuracy improvement in a very long time.

Email Notification