

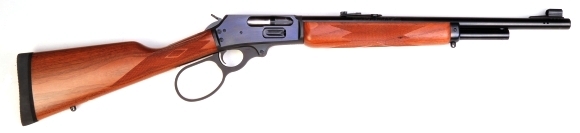
If there was ever a gun that cried out to be left alone it would be the Marlin Model 1895G. If it could speak, and not that I would admit to listening, it would probably explain that for over a hundred years it has been suitable for real hunters, trappers and assorted frontiersmen. Therefore, it should be good enough for today’s heated tree stand dwelling, stylish camo wearing, gadget bearing tenderfoot hunters. But the Marlin is not perfect. Case in point, the Marlin’s mail slot size finger lever.
I realized, when shooting one day, that only a couple of my fingers were being used to actuate the Marlin’s lever and if I put on a pair of gloves I could only grip the lever from the outside by grabbing the lever’s bottom rail. It seemed the problem could be remedied with the installation of a large loop finger lever and, after reviewing size and fit of a few, decided on the piece from Wild West Guns. This product’s loop is enlarged and contoured to properly fit a glove and ungloved hand, but not so much as to trigger memories of the old TV series, “The Rifleman”…Dun-dun, dun, dun-dun, dun. Anyway…
Installation…
The product packaging carries the notation “This product should be installed by a competent gunsmith…” However, installation is pretty straight forward for anyone with a less than anti mechanical skills and there is always the option of taking the gun and new lever to a gunsmith if the installation doesn’t shape up quite as anticipated.
As is the case any time firearms are being handled when shooting is not on the agenda, open the action, check the chamber and magazine to assure the gun is unloaded. Don’t keep live ammo in the work area.
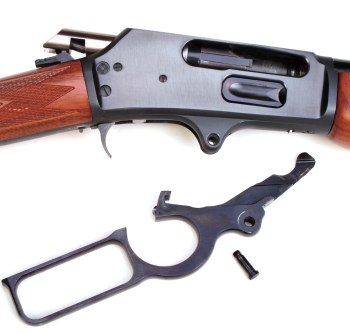
Open the lever to about the point where the gun’s hammer locks open and remove the finger lever screw and finger lever as pictured. There is no need to disassemble the gun any further.
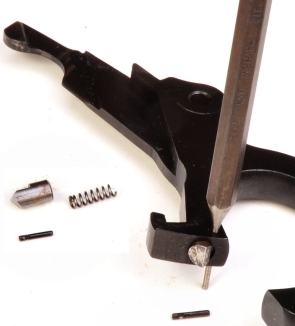
The Wild West Gun’s part does not include lever plunger components, so they must be transferred from the factory assembly. The spring loaded notched circumference plunger is retained in the slide by a small cross pin. A punch is used to drive the pin (R-L) out of the lever and to temporarily hold everything in place. Then, while pressing down on the plunger to prevent it from going airborne, the punch is withdrawn and pressure is eased off the plunger to remove the parts.
The hole size is a bit small, but a 1/16″ Mayhew steel punch, Brownells #587-475-062 works fine. The punch measures .590″ which is undersize for that fractional designation. To install the parts in the new lever, the spring is dropped in its plunger cavity and the plunger is started, notch side down. The plunger pin is started from the left side of the lever, the plunger is depressed with a handy thumb, then the pin is tapped into place with a small brass or plastic headed hammer.
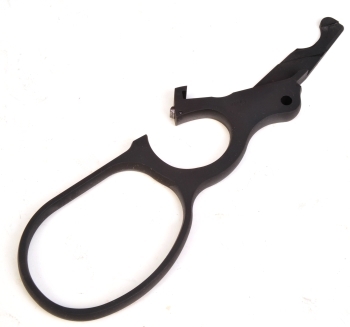
With the finger lever plunger moved over to the new piece, a trial installation is a good next step. 99% of the time the lever will go in and work without further fitting. If there are problems, they generally will be obvious. If the aft lever lug is too tall, the lever will not close and lock. If the front of the aft lever lug is too long the lever won’t close and lock. In both cases, the lever will not depress the gun’s locking bolt so the gun won’t fire. If the aft lever lug is way out of spec, short, it will not lift the gun’s locking bolt high enough to align the rear firing pin with the front firing pin; the firing pins will not drive forward on hammer strike. My point is, if the lever closes normally and locks into position, you’re in good shape. If it does not, or if there is noticeable roughness in movement, further fitting is required. Chances are, if anything is required, it will be light polishing of minor surfaces.
Now that’s a light weight lever gun….
You do not have to remove these parts from your gun to change the finger lever. This is only an illustration of how the parts interact with one another when operating as an assembly and where the various contact points exist.
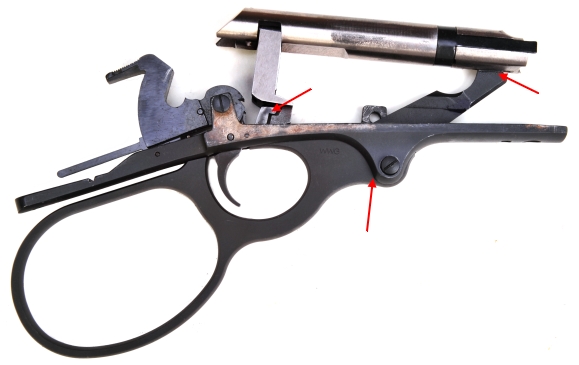
The aft arrow is pointing to the aft lever lug, engaged with the locking bolt. The locking bolt is…sort of, keyed into the aft notch of the breech bolt. The middle arrow is where contact between the lever and trigger guard plate occurs and the forward arrow is where the front lever lug engages a slot in the lower side of the breech bolt. The Wild West Guns’ lever is a little beefier than the factory piece, so a too tight fit or roughness at the lever screw, at sides of the aft lug or on the face of the leading lug is possible. Any of this can be cleaned up with a decent stone, 400 grit or finer, polishing rather than measureable material removal.
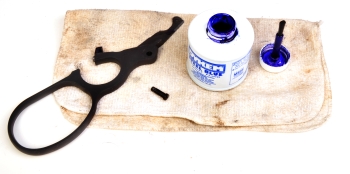
DyKem, Brownells #262-100-004 is a bright blue 0.0002″ layout fluid that is excellent for tracking the sources of scrapes and rubs and high/low spots when stoning. Prussian Blue, #100-001-581 is a non-drying oil based product that is used to check uniformity of contact, or area of first contact. The first, where scratched through, shows as a bright line. The second transfers from a surface to all contact surfaces. Sticky stuff.
 In this case, DyKem was placed on the forward lever lug and on the sides of the aft lug and sides of the lever immediately surrounding the finger lever screw. Prussian Blue was placed on the top and front of the aft lever lug.
In all cases, the roughness stemmed from high edges, not quite burrs and the required stoning was so little even the finish at these points was not completely removed. No work was required to fit lug to locking bolt or to get the lever to close and lock. The lever was a close fitting part right out of the box.
This is literally a ten minute job. I wanted to play with fit so I could illustrate some of the fitting that might be done, so the job was extended to twenty minutes. This lever is Brownells # 981-000-006, blue steel Model 1895 Guide Gun – straight stock. The price for the part is $149. The piece is also available for the Model 1894, in both straight and pistol grip versions, as well as in stainless steel – all carry the same price. Brownells also offers a similar part, same price and finish options from DRC Custom # 981-000-006 for anyone wanting a slightly different lever contour at a size between the factory and Wild West Guns size parts.
Keeping up appearances…
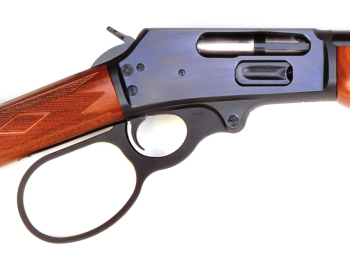
The Wild West Guns’ part looks like it belongs on the Marlin. The fit and finish is consistent with the factory look, right down to the matte blue lever parked against the factory matte black trigger guard plate.
As noted above, installation is a modest time investment and the completed assembly does provide enhanced function, particularly in cold hunting weather where gloves might be worn. Aside from function, it gives an enhances look to the little carbine.
Email Notification