
OK, this is the part of the Remington Unplugged project where a rifle is bored, chamber and barrel threaded using only a rusty cork screw and a tablespoon of Skippy peanut butter. Actually, this is the part where a barrel is installed on the Remington Model 700 short action and the short chambered barrel is manually reamed to specification. Hopefully, the end result will be properly functioning barreled action. Pictured above are the some of the basic parts and tools required to complete this task… or at least they represent a best guess at this point in time: barrel, action, recoil lug locator. recoil lug, barrel thread paste, Go and No Go Gauge, chamber reamer and reamer extension with T handle.
Barrel selection…
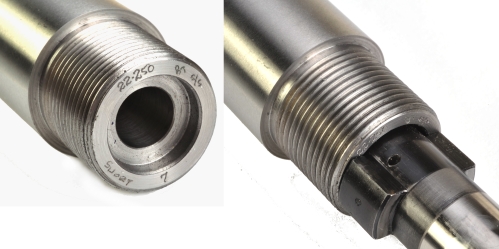
There are lots of options when it comes to barrels, even with the qualification that the barrel has been pre-threaded, follows a factory profile and has been chambered to within 0.010″ of proper headspace. This case the selection was Brownells #801-000-029 .22-250 8 Twist #7 SS Rem 700 Barrel… which is very much a short chambered Shilen barrel, 26″ long, with a #7 match contour, made of 416 stainless steel and with an 8″ twist. The barrel tapers from 1.225″ at the shank to 0.900″ at the target crowned muzzle. The fast twist facilitates shooting long, heavy 0.224″ bullets with long range accuracy and consistency. The finished assembly fits any stock intended for use with a Model 700 action with a heavy varmint or target contour barrel.
Assuring that a lug can’t cant…
There are a number of recoil lugs available for the Model 700. Some are of greater thickness and width for greater resistance to recoil, some are planar ground, and some have a tapered lug face to facilitate stock removal. Some lugs are meant to be pinned in position and not just retained between the barrel and action. Increasing lug thickness requires moving the barrel shoulder forward by a corresponding amount. Since this is a “no lathe” project, and because a change seemed unnecessary, the 0.189″ factory piece was selected rather than the 0.229″ piece pictured below.
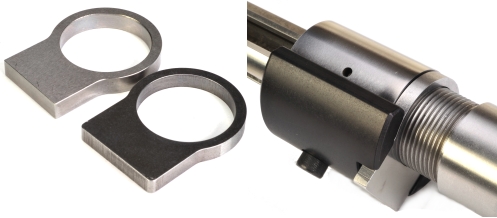
Picture above right, the black piece of steel fastened under the action, is a Kleinendorst Remington Model 700 Barrel Tool, Brownells # 488-004-700. Its purpose is to hold the recoil lug in proper orientation to the action while the barrel is being cranked down into place. One note on this piece, either remove the guide as soon as the barrel is installed and before cutting the chamber, or make sure the fastener that holds the guide in place doesn’t protrude through and interfere with bolt lug movement. It’s amazing how wisdom is often the product of many mistakes.
Tools of possible mass destruction…
The barrel, as noted previously, is short chambered, meaning there is approximately 0.010″ more depth to be cut. This is done so that the bulk of the work, the lathe work, is already accomplished and only modest hand reaming is required to set proper headspace. There are a number of alternatives here in terms of manufacturer and configuration, however, the selection in this case is a Manson Precision finisher, Brownells # 513-050-130 which is a fixed pilot finisher, the least expensive, and ideal for this type of work. It is made of M7 steel with six flutes for clean and fast cutting. An alternative, and a few bucks less costly, is a Clymer reamer, Brownells # 184-050-130.
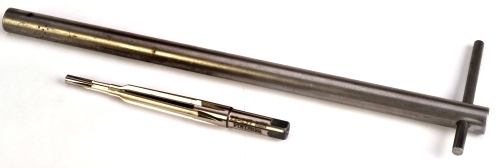
Pictured above the reamer is a square drive T handle made by Clymer. Twelve inches long, it passes through the back of the action with lots of room to work. The T handle drives the reamer along its longitudinal axis for uniform concentric loading. Brownells # 184-054-650. There are also pull through reamers, however, there was nothing available for this particular application so that method will have to wait for next time.
Good chamber – Not good chamber gauges
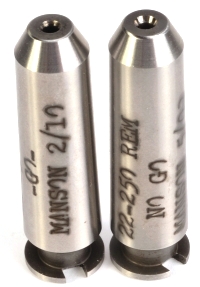 There has to be a way to tell the guy cranking on the chamber reamer when to stop, other than the reamer reaching the barrel’s muzzle. This task goes to a Go and No Go Gauge set. The Go gauge reflects a SAAMI minimum headspace measurement, the No Go slightly longer. The idea is to hand ream just until the bolt can close on the Go Gauge, but not so far as to allow the bolt to close on the No Go gauge.
The 22-250 Remington headspaces on its shoulder, the point on the shoulder that prevents the cartridge from advancing further into the gun’s chamber. In more quantified terms it is the distance from the breech face to a point in the chamber where the shoulder diameter is 0.347″. The headspace length is 1.5749 minimum to 1.5849″ maximum or a spec range of 0.010″. Using a COL gauge for reference, there is a 0.006″ difference between the Go and No Go gauges. There is another gauge, a field gauge, that is used for checking to see if a firearm’s chamber is longer than maximum specification and unsafe for use. Here we are working to conclude with a chamber that is greater than minimum, less than maximum and approximately mid spec.
Barrel Glue…
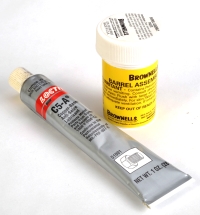 No, not really. Stainless steel has a tendency to gall, or cold or compression weld… which makes for a sticky situation when it comes time to remove a stainless steel barrel. In this case there will eventually be multiple barrels, which means frequent barrel installation and removal. The best way to head off a problem in this area is to use assembly paste or anti seize compound on the barrel/receiver threads, Brownells #’s 083-050-100 barrel assembly paste and # 532-000-012 LocTite C5-A Anti Seize lubricant, respectively.
Either compound will also serve to lubricate the barrel threads for consistent tightening on installation. The issue of torque values and the effects of thread lube on torque values is covered more extensively in later text.
A few moderately priced tools can make life easy…
For anyone working on military surplus firearms, assembling firearms or installing new barrels as we are doing here, owning a barrel vise makes a lot of sense. It is relatively inexpensive, adaptable to virtually any firearm by simply changing barrel bushing and it can help save time and improve the quality of work. The one pictured below is Brownells #080-860-900.
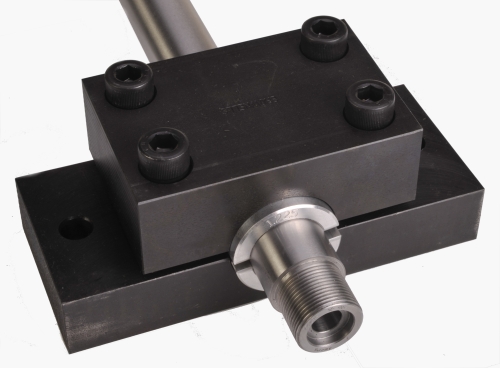
In this case the vise has been configured with a #10 aluminum barrel bushing, seen as a split ring around the barrel above. The inside radius of the bushing follows the contour of the 1.225″ barrel, which assures uniform surface contact. However, by making the combined bushing halves less than full circumference, a gap is left that permits clamping. The aluminum bushings are non-marring. When using steel bushings there is a need to wrap the barrel at the point of contact with a soft material to protect the barrel’s surface from the bushing.
Torque and other mysteries of life…
An action wrench that is great for breaking loose stubborn action-barrel assemblies without causing damage to parts or person. Brownells # 080-800-900 is the basic action wrench handle and there are adapter heads available under separate numbers that allow this set up to be used on many types of rifles. For this project, where barrels and actions are frequently disassembled, the parts aren’t rusted together and no one has applied epoxy glue to the assembly, a tool like Surgeon rifle’s bolt raceway wrench (pictured above) is a good fit. The wrench keys into the action’s raceway, very close to the load being placed on parts, so there is little chance of damage and the least amount of effort is required. Brownells #100-003-675.

A note on using the Surgeon or any similar action wrench. The setting on a torque wrench is predicated on the fastener being under the center of the wrench’s square drive and a known distance from the center of the drive to the center of the wrench’s handle. When an extension is added, a piece that locates the fastener farther out from the wrenches square drive, mechanical advantage is added to the wrench and the applied torque will be greater than the wrench’s setting. The example below assumes the extension is a straight projection from the handle and not set at an offset or angle to the handle. As an example:
– Desired torque = 100 ft/Lbs
– Length from center of handle to center of square drive = 14″
– The desired torque multiplied by the length = 1,400
– The length of the adapter, plus the length of the wrench = 16″
– Dividing 1,400 Ft/Lbs by 16 = 88 Ft/Lbs, the wrench reading to achieve 100 Ft/Lbs
of torque with the 2″ adapter in place.Getting started. Decadence is where you find it…
The trigger was removed from the action to save it from a metal chip bath or from being damaged in handling during the chambering process. Additionally, the bolt needed to be disassembled to the extent that the firing pin assembly and ejector were removed. The extractor can remain in place. The idea is that nothing should interfere with the go and no-go gauges when they are resting on the bolt face. Additionally, mainspring resistance needs to be eliminated so as not to interfere with the feel of closing the bolt against the gauges when checking chamber reaming progress.
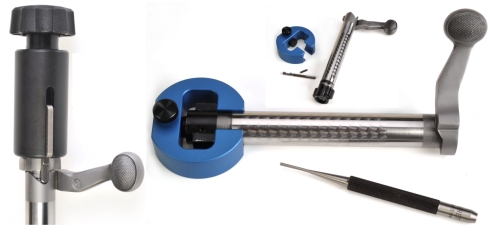
While there is no tool above that can’t be replaced with the edge of a workbench or the rebound stop of a pair of eyeglasses, the addition of these handy tools make life easier and virtually eliminates the need to crawl around on the floor in search of teeny, tiny almost irreplaceable parts or pulling firing pins out of ceiling tile. Above left, Sinclair firing pin removal tool, Brownells #988-000-004. Above right, Ejector Compressor Tool Brownells # 988-000-005.
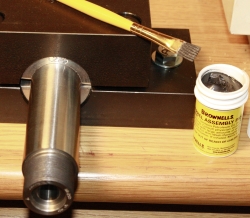
The barrel vise is mounted on an ancient two inch thick oak credenza that also serves as the base for a lathe; lots of weight. The barrel is clamped in the vise so that the barrel threads clear the front of the bench and won’t get in the way of tools or fixtures.
There is nothing as much fun as fitting an action to a barrel than, perhaps, being able to remove it at a future date. As noted previously, torque and time seems to make stainless parts forget where one part ends and another begins, As a preventative measure, Brownells Barrel Assembly Paste is brushed on sparingly. The thin coat prevents galling and serves as a lubricant to assure uniform resistance to torque on installation.
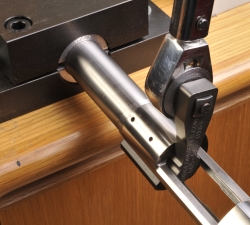
The recoil lug slips over the barrel tenon and the action is screwed onto the barrel by hand until the barrel, lug and action made a lug sandwich. For reference, it is a good idea to pencil mark an index mark across barrel and recoil lug.
Left, the recoil lug tool is in place on the action, the Surgeon action wrench is seated in the action’s bolt ways and the torque wrench is inserted into the action wrench. Everything is inline from torque wrench handle to action wrench for accurate torque application, and the torque wrench is located on the barrel side of the action wrench to keep the force being applied as close to resistance as possible.
As a consensus, and with reasonable substantiation of position, it is suggested that a Remington Model 700 action should be torqued to somewhere between 35 and 300 ft/lbs, with and without lube and, since stainless steel does and does not gall, anti seize compound should and should not be used. Required torque for dry threads is about double the requirement of lubed threads. Subsequently, when someone says “Torque to 100 ft/lbs” the statement does not provide enough information to accomplish the task.
Some very qualified folks suggest hand tightening the assembly, then cranking in another 1/10th to 1/8th more rotation for final tightening, ignoring torque value all together… which may be the most realistic approach of all. Without taking into consideration the type of barrel/action material, and coefficient of friction, torque values are somewhat meaningless. What is needed here is adequate axial clamping force to secure the barrel so it will not come lose in use and so that the union of parts will not be overly susceptible to the effects of barrel vibration when the rifle is discharged.
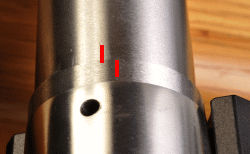
In this case, 100 ft/lbs of torque was selected, using Brownells Barrel Assembly Paste on clean threads as the only lubricant. The result is approximately 5,000 pounds of axial tension on the threads which shifts the index mark at the barrel and recoil lug by just over 0.100″ Why 100 ft/lbs? Because this value, historically, has yielded the tightest and most consistent group sizes and allowed for relatively easy future barrel removal. When the rifle is completed, it may make sense to accuracy check the rifle with the barrel installed to different torque values.
No stress here…
With the barrel torqued in place and any potential chamber distortion… distorted, a check is made with the Go gauge to make sure the chamber is indeed short and requires further cutting. At this point, the action’s bolt could not close on the No-Go Gauge, the Go gauge or a sized, or new unsized cartridge cases.
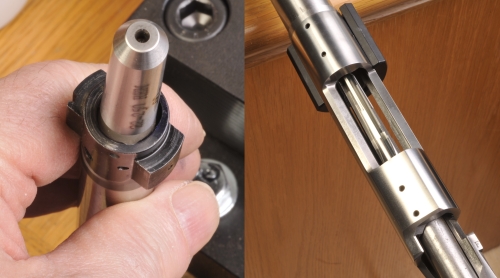
A couple of points worth noting. The rim of the Go gauge must be under the extractor claw on the bolt face and there most be no foreign… or domestic for that matter, material between the gauge and bolt face. The chamber area being worked has to be kept free of metal cuttings that may get in the way of the gauge and lead to an erroneous reading. An air compressor, or cans of compressed air, work well for this type of clean up. Cutting oil is good and a product like Brownells Do-Drill is perfect for this application, Brownells # 083-007-016. The reamer is shown, connected to a T handle.
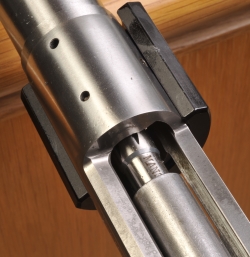 It takes a bit of finesse to get the reamer all the way homed in the chamber as the reamer’s pilot is a very tight bore fit. Attempting to insert the reamer with the T-handle in place makes alignment more difficult and having the reamer fully seated is imperative. Subsequently, each time a cut is made, the reamer is inserted in the chamber by hand, carefully jiggled into place, then the drive handle is attached.
The reamer is turned only clockwise, even when it is being withdrawn from the chamber. Only very light pressure is placed on the reamer so that there is no sensation of binding, just a smooth uniform cut. No more than a couple of continuous revolutions should be made before the reamer is withdrawn and cleaned and the chamber is gauged.
Know when to hold ’em, know when to…
After three sets of the noted two revolution cycles, the bolt closed on the Go Gauge, closed on new brass and sized brass, but did not close on the No Gauge. Neato.
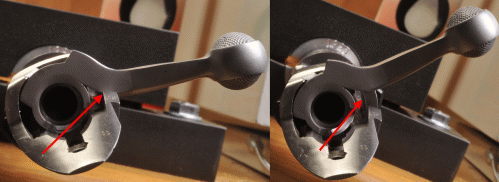
It pays to have patience and to remove metal a very little bit at a time. There is only a 0.006″ difference between these two gauges, so it wouldn’t take much to overrun the first gauge and end up with too much headspace. This process isn’t complicated, but it does require care. It is so easy to remove expensive metal, but so hard to put it back on in a meaningful way.
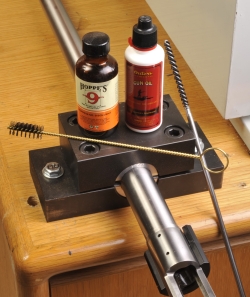
Finally, the chamber and bore should be scrubbed and checked with a bore light to make sure there are no burrs, rough spots in the chamber wall or gunk in the bore. At this point the trigger is reinstalled and the bolt reassembled. A mechanical ops check is in order, but live fire, in the absence of a test fixture can wait for the next project phase.
For all the words and pictures, installing the barrel and finishing the short chamber took an hour; forty five minutes of checking, double checking and other forms of worrying, fifteen minutes of actual work. A second barrel for another project was done immediately afterward, a 338 Remington Ultra Mag, and that job only took fifteen minutes to complete. Like everything else, efficiency comes with proficiency.
Couldn’t do it then, but I can do it now…
These little projects really pique my interest in firearms and many of the craft skills learned are transferable to other situations. The gadgets and tools and are fun to master and, it seems, eventually there are savings to be gained on future similar projects.

So far, the project rifle’s action has been trued, the barrel is installed and the chamber is cut to specification. There is now exists the foundation for a fast twist, 26″ barrel 22-250 Remington, something that isn’t easy to find in retail outlets and something that would have been very costly to have done by an outside shop. Seems like a good time to locate a stock and some bottom metal, or this is going to be a very uncomfortable firearm to shoot.
A Remington Rifle Build – Unplugged Part I
A Remington Rifle Build – Unplugged Part II
A Remington Rifle Build – Unplugged Part III
A Remington Rifle Build – Unplugged Part IV
A Remington Rifle Build – Unplugged Part V
A Remington Rifle Build – Unplugged Part VI

Email Notification