 My Uncle Pete, aka “Popeye”, once told me that if it weren’t for ignorance, we’d be too afraid to try anything new. And that philosophy has guided me throughout my life; trying new things to overcome a substantial amount of ignorance. Thanks Uncle Peter.
There are many things around the Real Guns® shop that need to be marked on a routine basis: tools, gauges, fixtures and newly installed barrels, just to name a few. Metal stamp marking is tedious at best and damaging at its worst. Rotary tool engraving looks amateurish and a quick notation with a Sharpie is not as widely accepted a method for permanent marking as one might think. So I started scouring the universe to find out what everyone knew, but didn’t tell me.
What is this thing called, love? Electrochemical etching…
If you’ve ever purchased a knife, drill bit or saw blade that is marked with typically black text and/or graphic, that seems impervious to solvents or mild abrasives, the items were probably electrochemically etched or marked. Electrochemically etched marking also shows up on air gun barrels, typically in white, and on the bolt body of a Mossberg 4×4, in black. The process is straight forward and can be accomplished inexpensively at home or in a small shop. No I am not suggesting it would be expensive if done in a large shop or a phone booth (what’s that?), I am just intimating that electrochemical etching, in a basic form, is not costly.
The basic process involves passing a small amount of electrical current through an electrolyte, typically a saline solution, and onto a metal surface that is to be etched. A stencil controls the active etching area to form desired alphanumeric characters and/or a graphic design. Predictably, but dependant upon: the type of electrolyte selected, the type of material being etched and the selection of AC or DC current, the etched area will be plated with a highly corrosive resistant clear, black, blue, brown, purple, or white colored oxide.
After quite a bit of research reading product sales literature and manuals, and industry related white papers, it became obvious that a good deal of the equipment sold online was more hobbyist oriented and built with prototype packaging and components. Another segment of online supply was very high end and more suited for automated higher volume factory production. Then we found IMG, International Marking Group, which offered a range of products that ranged from a very basic model, the $325 SS-211 to an automated volume marker model, the $1995 SSA-1001. After some discussion with IMG regarding our application, modest volume and highly unskilled operators, IMG recommended their $595 Model SS-651.
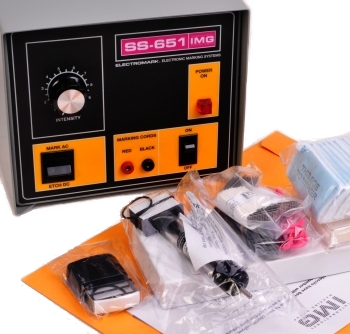
The IMG SS-651 power unit
Beginning with virtually no electrochemical etching experience, I thought jumping in to get some hands on experience would be the best approach. So I had a .577 NE Holland & Holland double rifle pulled from inventory with the intention of etching my initials into the gun’s grip cap. I tossed the H&H in the trunk of my Ferrari and drove to my country home to do the actual etching work and to check on the servants. Oh, no, that wasn’t me, that was the Obamas’ most recent vacation. I was actually in the shop at 6AM, working to put gas in the truck and pay my bills and taxes. So I launched my electrochemical education with a piece of scrap metal to avoid turning a firearm into the same.
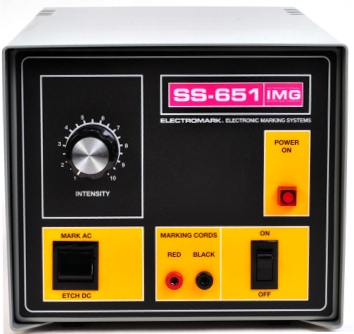 At the core of the SS-651 kit is a power unit that converts 110Volts AC to 5-32 Volts AC or DC. DC current, when applied to most steel, will leave a frosty white or clear etch, while AC current will generally leave a jet black mark.
The SS-651 has a very simple panel layout: power switch and power indicator light, a rheostat to control output voltage, an AC or DC selector switch and two banana clip receptacles to hold contact cord sets. Heavier duty units intended to provide deep etch, 0.001″ to 0.010″, have the added features of pulsating power and built in timers.
Checking this particular unit, with the intensity adjustment set on #1, produced 24 Volts DC and 26.9 AC. Cranked up to #10 on the intensity scale yielded 29.4 Volts DC and 32.8 VAC. Which means… Well, I have no idea at this point. I do know that typical etch for this application is 0.0003″ – 0.0005″ deep and the oxide layer is 0.0001″ – 0.0003″.
Photographic Stencils
There are stencils that can be created with a specialized dot matrix printer or a typewriter, if you have access to museum displays… or my basement, “These are going on eBay” shelves, but the quality alphanumeric and graphic art will require a photographic stencil. Similar type stencils are used for glass etching and for screen printing and they can be made quite easily without a big expenditure. Design is done on a computer in line art form, printed out on a laser or inkjet printer, used as a mask and laid over photosensitive material that is exposed to light. The exposed film is placed in a developer, then pulled and rinsed under water to remove all of the light blocked surfaces and chemically neutralized to make the artwork permanent.
If you are like me and don’t have the time, talent or inclination, there are many services that will make them for you. Usually there is a one time set up or original art charge, then a more minor charge to produce them. IMG supplied the stencils shown below; $10/sheet with an artwork charge of $40/sheet applied to the first order. With care, stencils can last for hundreds, if not thousands of uses. Pictured below, the power unit, connecting cords, blue stencils and hand marker.
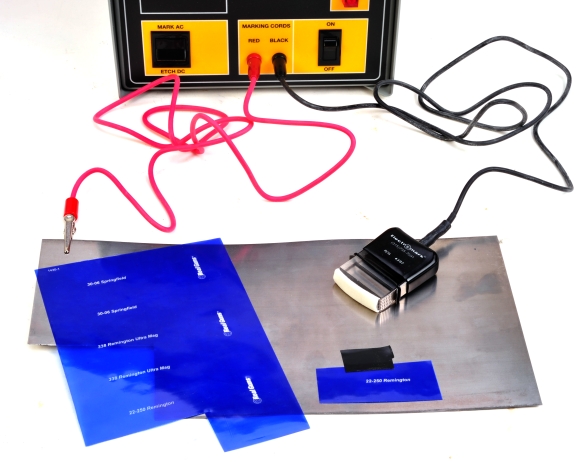
I practiced on a piece of 0.030″ shim stock… just in case I got in over my head. The red lead grounds the unit to the work, the black connects to the handheld marker. The pad on the end of the handheld marker is saturated with saline electrolyte, then the pad on the marker is pressed over the active area on the stencil for only a few seconds. Then the marker is removed from the work, the stencil lifted and the and the area is wiped with a neutralizer. Oh, yeah, the electrolyte and neutralizer…
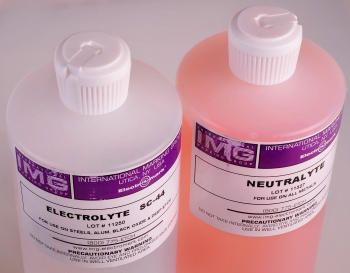
There are many types of electrolytes to optimize the results on certain types of metals or to get differing mark and etch results. SC-44 was selected because we were working primarily with aluminum, 400 series stainless steel and black oxide treated steel.
The “SC” connotation means “self cleaning”; this electrolyte controls the amount of oxides created, which helps prevent stencil cleaning. SC-44 is a saline solution. Neutralyte neutralizes the corrosive action of the electrolyte just by wiping the surface with a pad saturated with Neutralyte.
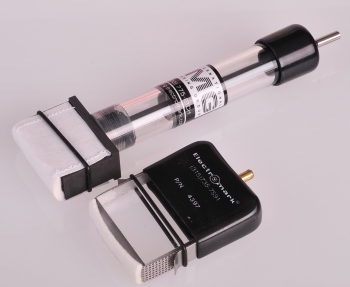
The SS-651 is supplied with two types of markers; the hand marker in the foreground and the carbon marking cartridge.
The hand marker is compact and works best with flat or gradual radius surfaces. The marker cartridge has a reservoir to hold electrolyte to make volume tasks easier and a carbon conductor which is appropriate for deeper etching when desired. The hand marker was used exclusively for our application.
There are also bench blocks for production work and contour blocks for sharply round surfaces.
Stop me, please, before…

The kit came with a handbook and detailed instructions, but I opted to use the one page getting started sheet that was in the package. I powered the unit on, set it to DC for etch versus black mark, set intensity to three on a scale of one to ten, taped the stencil down on one side, dipped the marker in SC-44 so it was uniformly wet and pressed it against the stencil for eight seconds.
The imprint was totally legible, but there was bloom; the letters were a little fatter than anticipated and just a tiny bit fuzzy around the curves.
I have no idea where I came up with eight seconds as there was not one single instruction or reference that suggests that number. Actually three seconds is recommended in this setting. It just seemed like insufficient time for a process that I have never worked with to do its jobs because, after all, the number eight has symmetry and the number three is an oddball freak.
![]()
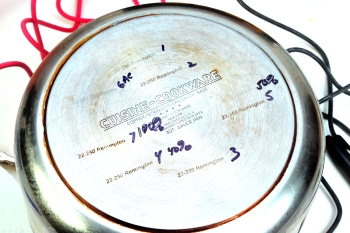 Then I switched the unit from DC etch to AC mark and got this “22-250 Remington” mark . The mottled effect is the metal stock, and not caused by the process. I wanted a clear etch that blended with stainless and not a black mark.
Then, for some inexplicable reason, I decided I would test on the bottom of a stainless pan, ignoring the rough finish, the hard tempered steel and, eventually, the neutralizer contaminated marker. Yikes!
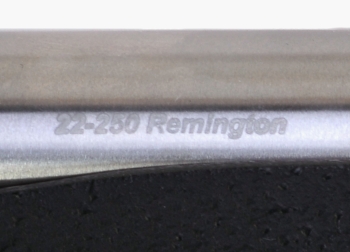
After cleaning up the equipment and changing over to a gun barrel, I switched back to DC for a clear etch and got this mark with three seconds of dwell time.
The mark is legible, the font is right, the mark is subtle as it should be and it is long lasting. While the appearance is light, it would take some abrasive work to remove the 0.0003″ etch. Most of all, once I was familiar with the process it was a five minute set up and a three second effort. I’m going to practice and see if I can use this to apply a little artistry.

Email Notification