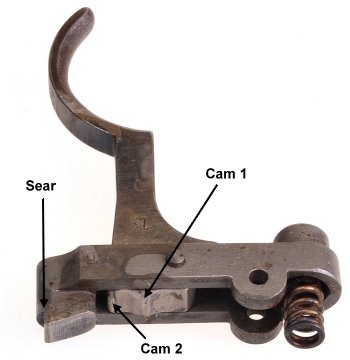
The Yugoslavian M24/47 Mauser, like just about every other military Mauser, has a two stage trigger. The cam 1 surface takes half the slack out of the trigger pull and reduces engagement with the gun’s sear engagement ledge. Cam 2 continues movement until the cocking piece is released. It is a simple and reliable design, however, it is a two stage trigger with a long pull, quite a bit of creep and it is non-adjustable.
Competent gunsmiths have been reworking military Mauser triggers successfully for a very long time. Some approaches focus on cleaning up the sear and cocking piece sear engagement ledge. Some approaches remove the first cam and reshape the second cam’s contour as a conversion to single stage trigger. Neither are casual reworks and neither results in an adjustable trigger.
Timney, not Timmy
Note: Any and all of the work identified below was accomplished on a barreled action and not a complete firearm. At no time was ammunition present in the work area and the assembly was checked for empty before each step that required dimensional or functional checks.
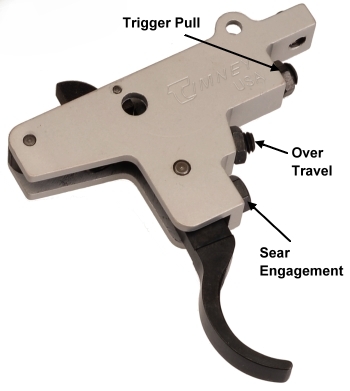
Timney offers a number of single stage replacement triggers for both military and civilian firearms. In comparison to the Mauser’s original trigger, pull is shorter, there is no creep and, properly adjusted, trigger pull is lighter and there is virtually no over travel. The Sportsman trigger is adjustable for pull weight between 2 – 4 lbs, trigger over travel and sear engagement.
The Sportsman trigger for the Mauser M24/47 is Brownells # 883-100-298 M98-FN-SP. Pictured is Brownells # 883-100-398 M98-K-SP. It is the Sportsman trigger for use on Kar 98K models with a small 1.750″ trigger guard.
The “K” trigger has a flattened radius that shifts it forward in the trigger guard by approximately 0.250″. I selected this one because it fit in with forward project plans. Regardless choice, both require modest rework of inletting for proper fit and clearance.
The Mauser Two Step

I tried really hard, but even I can’t make this sound more complicated than it is. The Mauser trigger is removed by pressing upward to compress the sear spring and tapping out the sear pivot pin before easing the assembly off the receiver.

Installation, when things go right, is about as easy. The installation screw at the front of the trigger is backed out so it will not contact the bottom of the receiver. The trigger is positioned over the receiver’s mount lug with the trigger sear passing through the slot in the receiver’s cocking piece track and the mount pin is pressed into place. The installation screw is then tightened against the bottom of the receiver to secure the assembly.
After installation, trigger pull checked at 2.5 lbs, which is too light for me for a hunting rifle. A quick turn on the pull adjustment yielded an increase to 3.5 lbs, which is perfect for me. The trigger pull was short and very clean with no sign of creep or mushiness.
A couple of precautionary checks
It took fifteen minutes to remove and replace the trigger and to perform an operational and safety check. However, because there are so many varieties of Model 98 Mausers, manufactured in numerous countries, all with different tooling, and over a very long period of time, dimensions and revisions sometimes differ. When differences show up, they can create minor and not so minor issues to address.
If the trigger mount pin boss contacts the receiver before the pin hole aligns, the boss may have to be contoured to gain sufficient clearance. Some Mauser’s have a step on the underside of the receiver just forward of the trigger mount lug that may have to be shaved to clear the trigger. Some Mausers have a sear spring locating hole in the underside of the receiver that will not allow the installation screw to be tightened. The hole must be tapped and plugged.
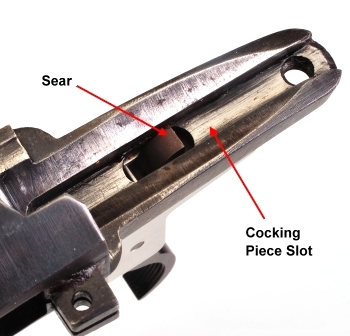
The original sear projects between 0.110″ and 0.120″ above the cocking piece slot in the receiver. This height assures proper cocking piece ledge to sear engagement. Too high will cause the sear to drag on the cocking piece, too low could cause an accidental discharge as a result of insufficient engagement. In the case of too much height, the trigger sear height can be reduced by milling or grinding. Where the projection is too low, the trigger sear can be built up or an extra high sear is available from Timney.
Due to Mauser manufacturing inconsistencies, the sear slot in the receiver may be too short and cause the sear to hang up or drag. The slot can be opened up for additional clearance with a Dremel or milling machine.
The easiest way to check the degree of engagement between the trigger sear and the cocking piece is to coat the face of the sear with Prussian Blue, insert and cycle the bolt then remove and measure the blue patch on the cocking piece. This particular combination measures 0.086″, uniform across the face and with enough of a gap under the cocking piece to prevent it from dragging on the sear.

Functional check…
1) Bolt cycled, safety off, trigger pulled – cocking piece released.
2) Bolt cycled, safety full right, trigger pulled – cocking piece held, bolt locked.
3) Safety moved straight up, trigger pulled – cocking piece held, bolt unlocked.
4) Safety rotated to off – cocking piece not released till trigger pull
Beyond drop in work parts…
I think assembly upgrades of this type can crossover from tasks a gun owner with decent mechanical skills can accomplish successfully, to tasks that require the talents of a skilled gunsmith. Perhaps that line of delineation is the point where one or more of the operational checks fail and rechecking part installation instructions does not resolve the problem.
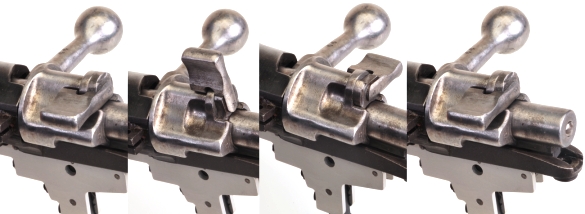
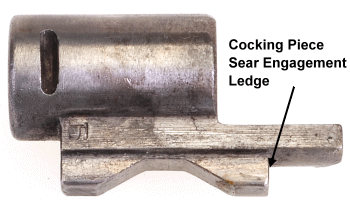 Installing a new trigger can introduce a change in dimensions between several related assemblies and that change might be just enough to cause a malfunction. Usually the problem resides with the relationship between the cocking piece and the sear.
Too slight of an engagement between the cocking piece’s sear engagement ledge and the trigger sear could result in a jolt to the gun causing the cocking piece to be released.
Place the gun on safe, then pull the trigger. If the cocking piece advances and then releases when the safety is disengaged, the cocking piece may be too long and might prevent the sear from resetting. The solution would be to remove material from the engagement ledge until there is a 0.020″ gap between it and the sear when the gun is cocked and the safety is engaged. Of course removing material from hardened surfaces typically creates a need for re-hardening.
My approach has been to only change parts and make modifications where the end product can be validated with a very finite set of pass-fail tests. If the corrective action, when a test failure occurs, is beyond my skill level, I put my ego in check, put the parts in a box and head down to the the gunsmith for a professional solution.

Email Notification