
A recent defensive shotgun project began with a $290 Weatherby PA-08™ TR shotgun. At 39″ and with an 18.5″ barrel it is very light and compact and its five shot capacity, matte black finish and durable synthetic stock are just right for my purposes. The only problem was that, as a bare bones gun, it was not set up to accept popular defensive accessory systems.
An opportunity to optimize…
By adding a Weatherby magazine cap mounted accessory rail, a Brownells #100-005-925WB Streamlight TRL-1s Weapon Light was mounted on the Weatherby. The addition of a Brownells #100-008-462WB Battery Door/Switch Assembly and Brownells #100-010-589WB TLR Remote Switch allowed control of the light without removing a hand from the pump’s forearm.

The PA-08™ TR has a grooved receiver and a ramped front sight, which is sufficient for most shotgun applications. An adjustable sighting system would make the gun more flexible and suitable for use with slugs. Unfortunately, in original form, the gun’s receiver is not drilled and tapped for sight bases or rails. Fortunately, there were scores of Picatinny rails laying around and lots of circular sharp objects that could make holes.
Don’t be so thin skinned…
Before breaking out the sledge hammer and chisel, there were a couple of things to consider. Pump shotguns, as a general rule, have much thinner receiver tops than firearms chambered for high pressure centerfire cartridges. At the risk of starting a philosophical food fight, if an 8-40 fastener is planned to secure a mount base on steel, calculated minimum threaded depth of the hole should be 0.128″. This would yield 5 full threads of engagement. Rule of thumb says, 0.164″, the diameter of the screw. If the fastener is steel and the material being threaded is aluminum, the thread depth should be approximately double.
Measurement of shotgun receiver mount hole depth to accommodate 8-40 fasteners, as produced by three major manufacturers, ranged from 0.190″ to 0.270″. The Weatherby receiver would yield an aft hole depth of 0.220″ and a forward hole depth of 0.120″; 9 threads and 5 treads respectively. Weatherby does not sell this product for use with a receiver mounted scope and I would not modify one for that purpose. My application is much more limited and it serves to illustrate drilling and tapping a shotgun for a receiver mounted rail. So, with skilled machinists and gunsmiths angrily waving torches and pitchforks and headed to my home, I decided to mount the rail as it was going to carry only a 0.9 oz Burris FastFire red dot, rather than a traditional scope. The Fast Fire II, with Picatinny mount, is Brownells #118-000-019WB.
What’s rounder, an orange?
It seemed that since the Weatherby receiver had no commitment to a base hole pattern, it would be OK to select a popular pattern that would offer the greatest number of base options, but there was a bit more to consider. Picatinny rails are typically secured using fasteners primarily as a clamping devices. In this case, fasteners clamp the surface of a rail to the surface of the receiver to form a frictional bond… as opposed to a fictional Bond. The greater the surface area that joins the rail and receiver, the less lateral stress and strain is placed directly on the fasteners.
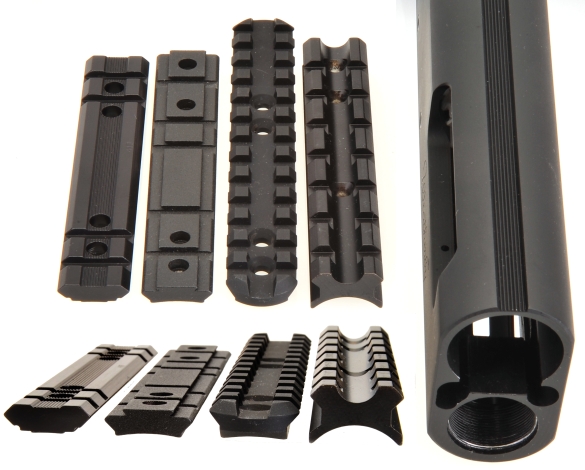
Pictured above, left to right, tactical rails for the: Mossberg 500/835 Weaver, Ruger 10/22, Mossberg 835 Picatinny, and Ruger Mark III Picatinny. Notice the different bottom radii, with the exception of the first flat piece which is intended to fit into the longitudinal receiver groove on the Mossberg 500/835. I went with the Mesa Tactical Mossberg Picatinny rail, Brownells# 100-004-034WB. It is a close match for the Weatherby receiver radius, it fits a popular shotgun hole spacing and because it has the wider 1913 Picatinny cross slots and more mount locations.
Since scrap aluminum is only worth a buck and a half per pound…
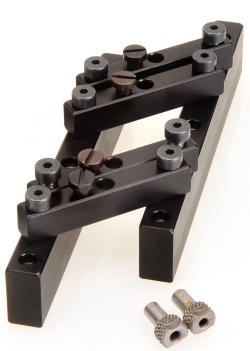 While the notion of using the holes in the Picatinny rail as a drill template was tempting, the probability of that process concluding with properly spaced and perpendicular holes was remote. The purchase of a Williams scope mount drill fixture, Brownells# 962-368-980WB, was a cost effective way to do the job correctly and it could be used for many other types of firearms.
The fixture has two side rails with matching hole spacing: .500″, 0.605″ and 0.860″. Typically enough combinations for a full set of base holes to be drilled with a single set up, however, occasionally the fixture must be shifted to drill a full set.
The sides of the fixture remain parallel because they are connected with cross bars located at adjacent holes. Shifting either side bar backward or forward changes the space between the bars, allowing them to close on the sides of a receiver, however, the locations of the drill bushings are always centered and maintain constant spacing. The two hardened drill bushings included with the fixture, #28 and #31, respectively accommodate tap drills for 8-40 and 6-48 holes.
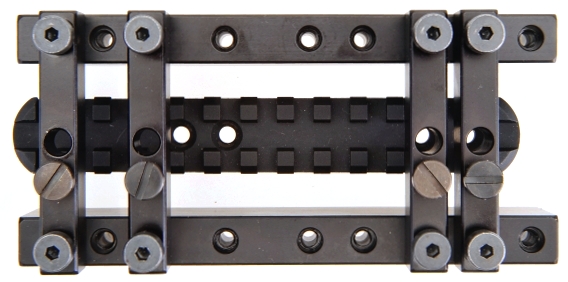
Below, the fixture overlaying a Picatinny rail that has Mossberg 500 hole spacing. Both hole sets on the rail are 0.500″ on center, but no fixture hole selection was a match to permit a all holes to be drilled without moving the fixture. In this case, two holes needed to be drilled before the fixture was moved and then the final two holes were drilled.
Below, this is what the Williams fixture looks like clamped on the gun’s receiver and ready for the first hole to be drilled. The white sheet of paper between the fixture and the sides of the receiver protect the gun’s finish. The fixture can be used with any parallel sided receiver, flat, round or hex, 0.630″ to 1.440″ in width. The Weatherby actually measured 1.449″, but this wasn’t an issue. All cross bar fasteners need to be tight to the side bars to assure all of the surfaces with be straight and square to the receiver.
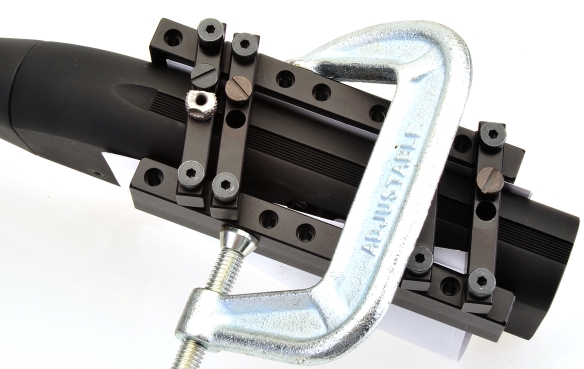
Little pressure is required to hold the fixture securely in place so there is little risk of damaging a receiver from compression. That said, if you’re one of those folks who uses an extension bar to tighten everything, the industry standard is a reduction of one gauge size for for every fifty foot pounds of applied torque. 50 ft/lbs will get you to a 16 gauge and 100 ft/lbs will get you to a 20 gauge.
OK, drilling and tapping
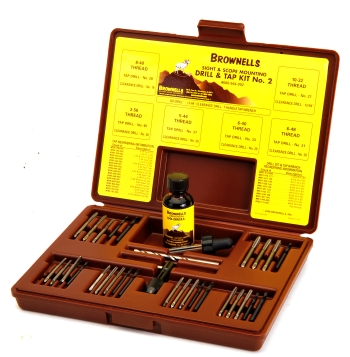
Brownells #080-564-002WB Drill and Tap Kit No. 2 covers many of the sizes that are generally encountered when mounting sights and scope bases: 3-56, 5-44, 6-40, 6-48, 8-40, and 10-32. The set also includes a T handle, a bottle of Do-Drill and an organizer to keep everything in order.
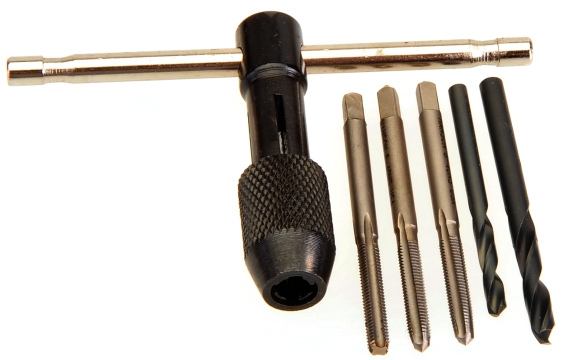
As seen below, in 8-40 size, each set includes bottom, plug and taper taps, as well as tap and clearance drills for each. Bottom taps have very little lead and are therefore used primarily to finish tap blind holes. Plug taps have a little more lead and cut aggressively. Taper taps are used where a careful, gradual start is desired to avoid tap breakage or malformed threads in soft material. Tap drills are undersize to so enough material is left to form threads. Clearance drills make through holes as large as the full diameter of a fastener.
But enough procrastinating…
The selected Picatinny rail was supplied with 8-40 fasteners, larger than the typical rifle base 6-48 fasteners. In this case, a taper tap was selected because it would be easy to start and the threading process would be more controlled and gradual in the aluminum receiver. The gun’s buttstock and trigger assembly were left in place to keep the receiver sides as rigid as possible. The magazine tube, barrel and bolt were removed to keep crud out of those assemblies. Paper towels were packed into the receiver to minimize contamination and everything was disassembled and cleaned when the job was completed.
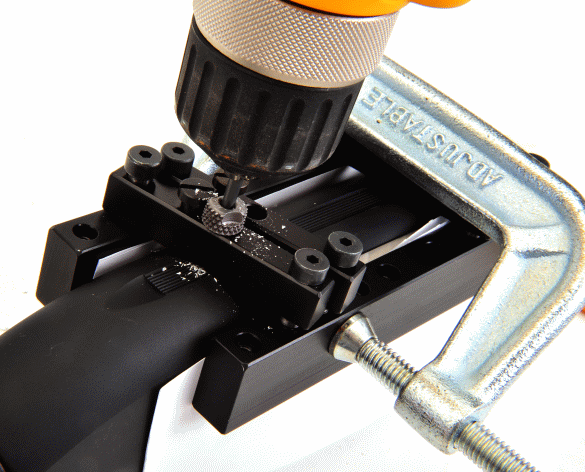
The holes were hand drilled. After years of snapping bits while working with drill presses and mills, it finally dawned on me that they don’t like to be dug into metal and spun around while bent from chuck – guide bushing misalignment. So now I use a hand drill, watch the lateral loading and let the bushing do the centering. The tight fit of the bushing prevented the aluminum chips from climbing out of the drill bit flutes, so the drill needed to be lifted a couple of times for clearing and to keep the cut clean. After both aft holes were drilled, the fixture was removed and the holes were tapped.
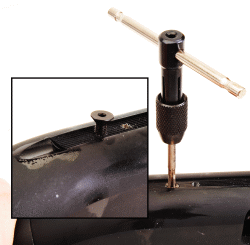
A drop of Do-Drill prevented the aluminum from galling and reduced required effort. Eyeball alignment and light pressure started the tap, speed was slow; quarter turn in and half turn out to clear chips. It’s easy to tell when a taper tap has gone far enough through a hole as an absence of required effort means the tap is inserted to a point of parallel cutting surfaces. After each hole was tapped, a fastener was inserted to make sure the threads were clean and fully formed.
Since the hole spacing necessitated moving the fixture before the second set of holes could be drilled and tapped, the plan was to drill and tap the first two holes, use them to anchor the Picatinny rail in its proper position, then use the forward hole locations in the rail and close fitting punch to mark the next positions.
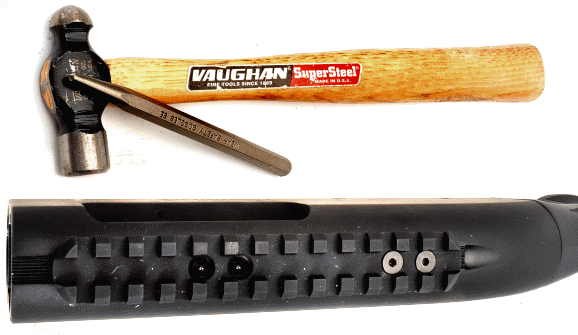
The tapered tip centered the punch and the same eye that seems to find alignment with buckhorn and peep sights seemed to find alignment here as after drilling and tapping, all four fasteners went into place with level heads and uniform clearance in the countersunk holes.
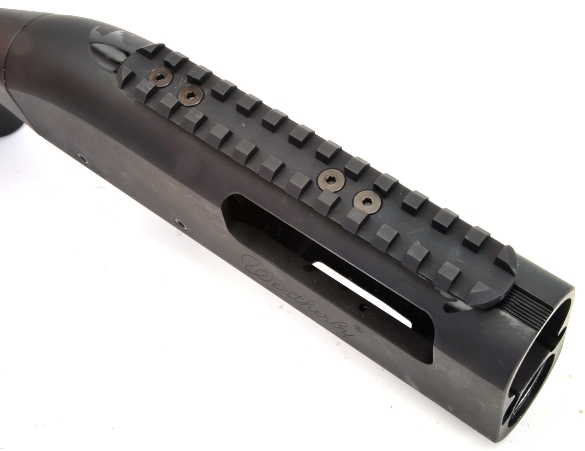
Finished
The finished shotgun with weapon light and red dot reflex systems securely in place. The only thing required after the holes were tapped was to trim fastener length to assure bolt and hammer clearance inside the receiver.

The task took a couple of hours between rounding up parts, head scratching and doing the actual work. This would probably take a skilled gunsmith fifteen minutes. The difference is the satisfaction of knowing I did the work myself and I was more of a determining factor in how my guns are set up and how they look.

Email Notification