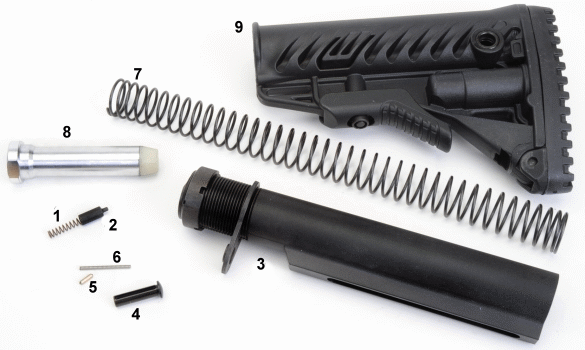
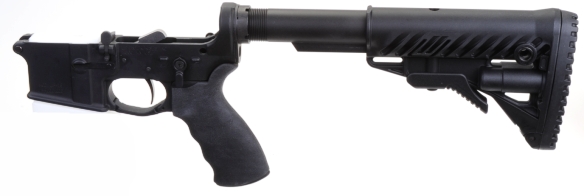
At the conclusion of the last installment, assembly was completed with the exception of the butt stock and a muzzle brake and/or flash suppressor. A simple helical design VLTOR Weapon Systems flash suppressor was selected, Brownells # 100-003-114 $60 and, as pictured below, a Mako Group 6 position GLR-16BTK Stock Kit, Brownells # 100-008-060 $108.

In order of… at least my order of installation: 1. buffer retainer spring, 2. buffer retainer 3. six position extension tube, 4. rear takedown pin, 5. takedown pin detent, 6. takedown pin detent spring, 7. recoil buffer spring, 8. buffer assembly, 9. butt stock

Yes, I do know my nails should be trimmed, but then they would use their utility as backup common screw drivers. The buffer retainer spring is dropped into the lower receiver spring well and it is topped with the buffer retainer. The extension tube is screwed into the receiver (left) until it traps the retainer (right). The pin should depress and return freely.

The receiver was flipped over on the receiver block… probably why it is called the Flipper. The rear takedown pin is slipped into place, detent track to the rear, the takedown pin detent is inserted in the receiver well, the takedown pin detent spring follows.

Above, left to right, the takedown pin detent assembly is compressed behind the receiver plate (part of the extension tube assembly) with the dimple facing the receiver. The lock nut is tightened against the plate and then the buffer spring and buffer assembly are pushed into place behind the buffer retainer. The torque spec for the nut is 40 in-lbs. Brownell instructions call for cold staking the receiver plate to the indentations in the lock nut. I use Loctite Blue, sparingly, as the stuff will find its way between what should be moving parts.

With the 6 position stock installed; it slips over the extension tube and is held in shooting position with a spring loaded, catch operated detent. Next, the pivot and takedown pins were pulled aside, the upper was lowered into pivot pin alignment, the upper was rotated into the lower and the rear takedown pin was pressed all the way into place, and the completed firearm was mechanical ops and safety checked. Next, live fire check out and recorded performance.
Your Perfect Rifle… Some Assembly Required Part 1
Your Perfect Rifle… Some Assembly Required Part 2
Your Perfect Rifle… Some Assembly Required Part 3
Your Perfect Rifle… Some Assembly Required Part 4
Your Perfect Rifle… Some Assembly Required Part 5
Your Perfect Rifle… Some Assembly Required Part 6
Your Perfect Rifle… Some Assembly Required Part 7
Your Perfect Rifle… Some Assembly Required Part 8

Email Notification