 I’ve always been very fortunate to have a wife who shares in some of my interests, so activities like reloading are all the more enjoyable. My wife likes firearms, and the target shooting aspect of the sport. She was right in the middle of it all when we decided to try reloading. Actually, she just called me to tell me she was able to track down a set of .357 SIG dies I personally hadn’t been able to locate – show off.
This past week, I mentioned it took 4 hours to get all of the equipment out of the boxes, read all of the instructions, get installed and set up, and start cranking out ammo. After reloading a couple of boxes, we had enough experience with the process to run at a rate of few hundred completed rounds per hour. This was without rushing, accomplishing all precautionary checks, and refining the process as we went along.
It’s an easy deal, as long as care is taken to follow all of the safety rules and guidelines, and without departing from the technical manuals produced by recognized component suppliers and ammo companies. There is no data within this article that may be successfully used to determine correct loads for any cartridge. Information appearing here is only to be used as a general reference toward understanding the various tasks encountered while reloading. Actual reloading cannot be accomplished without proper manuals and materials. The following is for task familiarization only –
 The basic components required for reloading remain virtually unchanged, regardless the metallic cartridge type. 1) the case that holds all of the other parts together, typically made of brass. 2) Primers that fire on impact when struck by the firing pin, igniting the powder charge. 3) Smokeless powder. In this case, these are small discs of “Unique” type powder by Alliant. Powder varies by composition and shape, which controls the rate at which the specific type of powder burns. Powders are normally typed as fast or slow. 4) The bullet, or projectile, the part that accelerates through, and leaves the barrel. This .40 caliber bullet weighs approximately 155 grains (7000 grains to the pound). It is a hollow point, a type bullet made to expand in diameter on impact, while retaining it’s full weight. 5) The parts when correctly assembled into a completed round.
The load illustrated here should push this bullet to 1200 fps, without pressure in the gun’s chamber rising above 32,000 pounds per square inch. The bullet will generate approximately 495 foot pounds of kinetic, or striking energy where the bullet leaves the muzzle of the gun. If you’d like to do some calculations on your own, the basic energy formula is KE=((velocity x velocity)/450400) x (bullet weight in grains). There are only a few general steps to reloading a pistol round. Thought I’d take a minute to outline them.
Start with cleaning and cleanliness. Materials must not be handled with contaminants such as any form of oil on your hands. Oil can saturate powder and primers, causing erratic ammo performance and misfires. Spilled powder should not be placed back into hoppers or cases. Reloading unclean cases can cause permanent damage to dies, or cause them to become stuck while forming cases. Excessive oil on the press can contaminate work in progress.
Start with brass you have first hand knowledge of. Always track how many times cases have been fired, and inspect each case before you even start the cleaning process. Personally, I’d never buy “once fired brass” unless I knew it really was once fired and had not been previously assembled into high pressure test loads or shoveled off of a target range floor. I’ve heard references to reloading the same case anywhere from 10 times to 50 times. I think you can reload a case as long as it holds dimensions, tightly seats primers and bullets, and the case does not show signs of fracturing or pressure rings and abnormal case head distortion. I do think, however, you need to know what type of use the case has been subjected to.
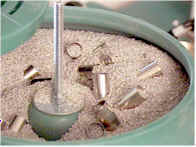 Tumblers and vibratory cleaners are used to clean fired cartridge cases. Tumblers can use both dry and wet processes, vibratory cleaners use mostly dry material for cleaning. Wet solutions are usually a strong commercial detergent, dry may be either composed of walnut husks or ground corn cob. A small amount of polishing compound may be added to dry substances to provide a smooth polished finished to the newly cleaned cases. I use the dry process for a couple of reasons. First, dry is less expensive for large capacity equipment. Secondly, my grandson likes to play “quicksand” and by tossing empties into the corn cob, and watching them disappear beneath the surface.
I think it is important to clean just enough to get rid of rough spots and heavy staining, and not let cases run around in a cleaner until the case walls are worn thin, or case mouths begin to have problems locating correctly in chambers, or rims become rounded and cartridges begin to not extract correctly when fired. Read the instructions that come with you cleaner or cleaning material and don’t let cases clean overnight. Polishing compound wears away and slows in it’s polishing action. It is sold in small packets and fresh material can be added back into cleaning compounds.
Couple of closing notes on case cleaning. It’s case cleaning, not bullet, primer or finished round cleaning. Never place loaded rounds in a tumbler. Beyond the obvious safety hazard of bouncing around a pile of loaded ammo, it will break down the composition of the smokeless powder and cause erratic chamber pressures and, subsequently, poor ammo performance. Don’t tumble bullets, they are precisely sized and finished, and you will not improve on the manufacturer’s intended finished state. Don’t tumble primers. I’ll tell you why, if you’ll first contact me and tell me why you would. Wet clean cases only after fired primer removal, and make sure they are completely dry before starting to reload. Make sure dry compound has been completely removed from clean cases before proceeding.
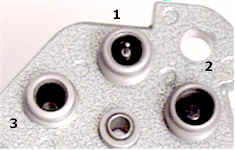 Well, buy a three die pistol set and eventually you’ll end up with a die plate with three dies in it. This picture of the business end of a die plate for the Ammo Master press was taken upside down and backwards, in dying cockroach fashion, for ease of illustration. The numbers indicate the sequence each die is used during the reloading process.
The die in station 1 is a depriming, resizing die. It’s job is to knock out the dead primer while straightening the case, making sure it is not deformed from it’s first firing. Die 2 will expand the case neck slightly, in preparation for seating a new bullet, and press a new primer into place. The last die, after the newly primed case is charged with powder, will seat a new bullet and crimp the case, in some fashion, to hold the newly assembled round together.
 If you look closely, you can see the brass case located in station 1 of the press shell plate, directly under the die. An easy pull down
  on the operating handle will pull the case up into the die, and the small pin punch inside of the die, will pass through the open case, pushing out the spent primer. The inside of the die is shaped in the exact dimensions of new ammo, so the walls of the die will press the expanded used case back into factory new tolerances.
Return the handle to the up position, and the shell plate will automatically rotate or “index” the deprimed and sized case to the next die 2 position, where a new primer will be automatically inserted. Position 1 will be left empty, ready for another case to enter the process. Eventually, new cases will be inserted into the shell plate, until all stations are filled in carousel fashion. At that point, each up or down stroke of the handle will complete several operations, and a loaded round will fall into the completed ammo bin each time the handle is pulled down. I won’t run through each step in detail, this is only familiarization information, but the general sequence of progressive press operation looks a little like this, when the press is loaded and all stations filled for rotation –
Every time the handle is pulled down:
Station 1 – Old primer removed and case resized
Station 2 – Case mouth expanded
Station 3 – Powder is dispensed to the case
Station 4 – Checker die verifies powder has been dispensed
Station 5 – Bullet is seated in primed and charged case
Every time the handle is pushed up:
The shell plate rotates all cases to the next position
A completed round is kicked off, opening a position on the press
Station 1 – An empty case is placed on the press
Station 2 – A fresh primer is pressed into a case
Station 3 – Case returns down, after receiving a powder charge
Station 4 – Case returns down, after being powder level checked
Station 5 – A bullet is manually inserted in the open case
Confusing ? Not really, or I wouldn’t be reloading. You may just be struggling with my ever present need to explain everything in the most convoluted terms. As an example, if this is a three die set, how can there be steps 4 and 5 in the process ? There are are only three dies in a set that are specifically made for the cartridge I am reloading, however, there are 5 stations locating equipment on the press. The press holds other general purpose dies and accessories that may be used to generally reload any cartridge. As an example, the powder measure is not cartridge specific, is not a die, but occupies station 3 on the press so it will dispense powder into a case, within the proper sequence of assembling ammo.
Powder checkers dies are not cartridge specific, but they typically occupy station 4 on the press, immediately after the powder measure dispenses powder, and just before station 5, where a bullet will be seated over the powder charge. There are many special dies that occupy a press’s accessory stations, such as: bullet extractors, forming dies, trimming dies, specialty priming and decapping dies, etc., but these are all beyond the scope of this article and not necessary to load cartridges in this particular instance.
With all of this whirling activity and steps taking place in rapid fashion, there are some areas that require particular care and concentration. A full reloading press has a very distinct feel, you can actually feel brass being shaped and, particularly, primers being fully seated. Even the transient motion of the handle has a sort of clunky, but repetitive resistance as the shell plate indexes to the next position. If you ever feel significantly actuating pressure changes, stop, and don’t resume reloading until you’ve accurately determined what caused the change. Where to start looking ?
Stuff will happen particularly when you first start reloading, haven’t developed full experience in setting up, and tend to lack confidence and operate the press with jerky incomplete motions. Little return springs drop off primer shuttles, preventing correct primer feed and hanging the shell plate. Powder makes it to the press and gets under the rotating shell plate. Depriming pins get bent and don’t make it through the flash hole. Partial strokes cause the press to mis-index and become misaligned with dies. Powder measure actuator shafts move out of position and bind in the actuator linkage. In any and all cases, the press will distinctly balk, jam, or bind. You just need to have patience, examine the press and the process, until the specific culprit can be found.
After a while, when more experience is accumulated, problems will of course develop less. You’ll also develop a better feel for routine service and adjustments that will need to be monitored or made. Check off items like: verifying dies are secured and properly adjusted, mechanical stops that control primer seating depth are secured and properly adjusted, the area under the shell plates is clean and powder has not accumulated, nor have misplaced dead primers and other debris. Powder measures would be cleaned thoroughly when changing over to different types of powder, then operated through a bunch of cycles to coat the interior parts of the measure and insure consistent metering.
While reloading, and everything is moving along smoothly, keep an eye on the primer shuttle and make sure it is feeding. It’s a pain disassembling incorrectly assembled ammo with powder leaking out of the back of the case through an empty primer pocket. Keep an eye on the powder measure, and make sure the dispensing stroke is complete and done as smoothly as possible. Check the powder level die to make sure rounds on their way to the bullet seating die do not have irregular powder levels. As a minimum, check case charges every 10th round to verify the powder measure is working correctly. Don’t let the powder hopper run down to near empty. If you find yourself working with powder that will not meter consistently, or experience powder throws that deviate by more than .1 grain, use the scale to measure every load until you can sort out the problem.
If you screw up and don’t detect a high primer until the round ends up in the finished bin, do not, DO NOT, put the round back in the priming station and attempt to finish seating a primer in a loaded round. Alternatively, place a large funnel-shaped skylight in your ceiling to catch the potential soaring debris, and don’t forget to sign that blank check, just before you mail it to me. In fact, ammo with partially seated primers should not be disassembled with an inertial puller, but rather a press mounted collet or chuck type bullet puller.
In an effort to control static discharge at the press, I grounded my press and several components to the house ground. I also wear an ankle ground strap connected to the press while working, and I spray the carpeted floor area with anti-static compound. Seems to cut down on powder metering problems, and I feel better without carpet friction sparks jumping to the press. I don’t keep liquids on the bench, or any type of food, while reloading. Side note, and a good reason not to snack while reloading – lead is poison and accumulates in your body. Handling bullets with exposed lead areas isn’t exactly a significant toxic exposure, particularly if you wash your hands after working around the press. But lead on your fingers and snacking on a bag of chips is probably an unnecessary exposure. Besides, the oil could contaminate primers and powder.
Inspect each and every round coming off the press for obvious problems like missing primers or a crushed case. Spot check overall cartridge length to specs in the manual, and spot weigh finished rounds in a check for missing powder. All these things infrequently happen, but they happen.
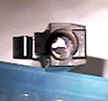
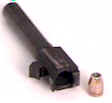 What you’re looking at, to your left, is the rear of a barrel for a Model 229 SIG, chambered for the .40 S & W. That little blotchy round piece in the middle is the base, or back of a .40 caliber bullet. It is lodged just forward of the chamber, driven there by a cartridge with a primer, but no powder charge.
If this had been an undetected reloading error, and the shooter had cleared the fired case, and chambered a new round by manually working the slide, there would now be a fully loaded round behind a major obstruction in the barrel. If we moved on and pulled the trigger on this newly chambered round, the bullet would rush forward, encounter the bullet that was previously lodged in the barrel, and the gun would explode, or at least burst the barrel. This problem should have been detected at numerous points in the reloading – shooting process.
The reloader should have noticed powder was not being thrown at the powder measure. The powder checker station would have given a no/low powder indication or, depending on the brand of press and your specific setup, locked the press or sounded an audible alarm. The reloader should have noticed the absence of powder when they were placing a new bullet in the case prior to seating. The absence of powder may have been detected in spot scale check for powder metering, or weighing finished ammo. The no powder condition may have shown up when just shaking finished cases, listening for the presence of powder.
If an error gets past the reloading bench, and out into the field or range, it’s pretty easy to detect in an autoloader pistol or rifle. You’ll hear a muted pop rather than the typical sound of the discharge, and the primer charge will not create enough energy to cycle the action, eject the empty and chamber a fresh round. At that point, if your brain is not on auto pilot, you’ll check the bore for an obstruction, before you manually clear and cycle load the firearm. If you are using a manually load, a single shot or a revolver, you just have to rely on the absence of a normal report to detect the condition and the absence of a hole in that piece of downrange paper. I would use reloads for practice shooting and target shooting where the purpose was to keep cost down, or to optimize accuracy. I would never use reloads as defense rounds, or the only ammo on an expensive hunting trip to a far away location, or in pursuit of dangerous game.
These comments are not being made to diminish the value of reloading, but rather as a statement of cost benefits under some very specific conditions. And this does not only apply to reloads. Based on what seems like documented failures of certain well know brands of handgun defense ammo I’ve read about in related newsgroups, I would never purchase this ammo. Who cares if it carried + ratings if it fails to fire 1% of the time and, worse, the manufacturer seems to feel this is acceptable performance ? In over 40 years of shooting rifles and handguns of various types, I have never has a single incidence of factory ammo being defective in firing.
I can’t stress enough, how important it is to follow safety rules and maintain concentration while reloading, or doing anything else with firearms, for that matter. If you’re feeling distracted, have too many interruptions, take a break, work on the house, do anything else until you’re mind is really back into the activity.
Document your work, keep a log or notebook and keep precise records. Don’t start with the heavy loads, work up to them and select the ones that offer the best accuracy, reliability and cost. Top pressure loads are frequently not the best, they cost more to load and they beat the crap out of firearms. The best loads in my SIG, so far, are at the moderate end of the spectrum in powder charges. The .45 seems to work best with lighter bullets, but heavier powder charges. Manuals will give you lots of options and room to experiment, just keep track so you will be able to duplicate good results, and avoid those loads that perform poorly.
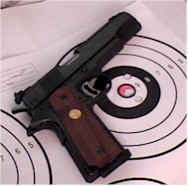 Is reloading worth the effort ? That one is easy. The ammo in this article cost me about $4.50 to produce, versus about $35.00 per box for the same basic load from a commercial supplier. Maybe more important are the shooting results. This is my 15 year old, unaltered .45 caliber Colt Gold Cup. It has fired thousands of rounds of just about everything, from lightly charged Remingtontarget loads to Cor-Bon P+ hollow points. The gun still has the original collet type barrel bushing, and no hand fitting or blueprinting of the gun has been done, outside of Colt.
The 5 shot group next to the gun is less than 1.4″ at the widest point, and those 3 shots in the red measured about .300″ on centers. At 50′, with a two handed hold, I shot the first two in the white, settled down and shot the next three. Trust me, I’m not that good of a shot. With factory ammo, even loads the gun likes, I can’t typically hit better than 2.5″. I was able to get these results with 185 grain Speer Gold Dots, over 8.2 grains of Unique, using CCI 300 primers.
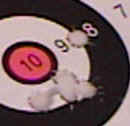 Was this a fluke ? Guess not. The group in the picture to the right was actually smaller, overall about 1.2″ center to center at the widest point and 4 shots on about .750″ centers. In fact, I was able to shoot groups like this all afternoon. Even as max loads for the bullet weight, the recoil was modest compared to shooting 230 grain ammo all day. Muzzle jump was minimal, low flash, and not even that loud. I’m only a paper puncher, when it comes to handguns, but even I know that 1000+ fps 185 grain hollow point isn’t exactly something to sneeze at as practice ammo for a favorite personal protection load.
So what’s so good about this ? After shooting the same .45 for 15 years, I was able to get some of the tightest groups with ammo I loaded myself. I didn’t have to pay Winchester, or Remington, or any other company, 3 times the price of conventional commercial loads to get the most accurate rounds. I also didn’t have to show up with funky looking blue bullets, or weird nickel-plated cases, or price tags on ammo boxes I wouldn’t want anyone else to see. Try it, you’ll like it.
| More on “How to talk yourself into reloading” – |
| How to talk yourself into reloading Part I |
| How to talk yourself into reloading Part II |
| How to talk yourself into reloading Part III |
Thanks
Joe

Email Notification