 Cartridge brass is pretty remarkable. Factory ammo is routinely exposed to pressures above 70,000 psi, at chamber temperatures high enough to erode the throat of a stainless steel barrel, while the brass receives only partial support from a chamber / breech face sandwich. For those of us who handload, that empty factory brass will be stuffed full of powder, clamped on to a bullet, and subjected to the same torture again, and again, and…..
Brass is relatively expensive, in fact, it is expensive enough that reloading would have few economic incentives if brass would only see use once or twice before being retired. Retirement comes at the moment the case exhibits any form of structural failure; slits, cracks, oversized primer pockets, and interior radial ridges (boy, say that last one fast five times). The attempted focus of this article, is to offer a couple of easy ways to extend the useful life of a cartridge case.
Brass, the mystery metal
If you remove the letter “r” from brass you have “bass”. And what is a bass, one of nature’s spiny-finned percoids, or maybe one of those giant vertical violins that were so prevalent in early Elvis movies? Hell, flip the word “bass” around, and you’ve spelled the name of a very safe Swedish automobile, at least to the degree of accuracy it deserves. See where I’m going with this? Brass is truly a mysterious metal. Brass is derived from bronze, an early copper – tin alloy produced by the Sumerians around 3500 BC. It is my interpretation that the Sumerians with their supply of brass, got together with the Chinese with their gun powder, and invented the .257 Weatherby Magnum cartridge. Roughly 5447 years later, Roy created a rifle to utilize this cartridge. I didn’t meant to bore you with these details, but it’s important to have a solid understanding of the history of firearms.
“Machinery’s Handbook – #26”, identifies the brass used for ammunition production, under the heading Wrought Coppers, oddly enough as “Cartridge Brass”. Cartridge brass alloy is 70% copper and 30% zinc. “cartridge brass” sounds pretty special, until further reference reveals its use for; locks, plumbing, screws, light fixtures, etc. While the material itself isn’t all that unique, the manner in which it is processed into a cartridge case is.
Brass becomes soft and malleable when heated, but hardened when worked, “worked” as in dimensionally stressed. A familiar example of work hardening to material failure would be holding either end of an unfolded paperclip between your hands, then repeatedly bending until it snaps. At the onset of the bending, the paperclip wire is malleable but, after constant flexing, it work hardens and becomes brittle, eventually snapping. Cartridge casings are subject to similar stresses, with similar results.
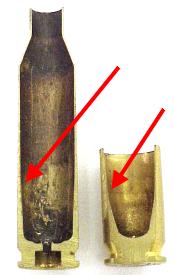 The rear portion of a cartridge case, or case head and web area is thick and is hardened when “worked” during manufacture. A cartridge case is formed from a flat brass disk that is drawn into a cup, the cup is drawn into a tube, then the tube is die formed to finished shape, inclusive of: case head, extractor groove, rim, and headstamp. At the rear portion of the case, this hardening is good and will help the case withstand the highest pressure, where the case is least supported by the chamber.
The forward part of the case needs to remain soft, so it will balloon outward when fired, sealing the chamber, and preventing gases from escaping rearward around the case. To keep this hardened case head, while maintaining a soft forward case body, the upper portion of the case is subjected to heat treatment, or annealing, several times during the manufacturing process. During this heat treatment, the lower case is kept cool by being immersed in water.
Brass cases I have personally killed
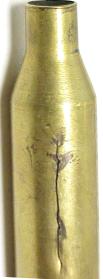 The picture to the right is probably an extreme, but clear, example of the effects of work hardening and early case failure. This case began life as a component of a standard velocity Remington factory round, and saw its first active duty when fired in a Browning lever action rifle. It was then prepped, squeezed through a full length small base resizing die to about the size of a .22 short, packed full of IMR 7828, closed up with a 105 grain bullet, and fired in the same gun. The case performed admirably on both occasions.
Then the case, with 19 more of its close relatives, was run through the same process again; full length resizing in a small base die, loaded it up again with 105 grain bullet, same powder charge, etc. These were fired from the same gun, only this time the ejected cases were covered in soot at the case mouth and shoulder, and about a third of them had these longitudinal splits. The work hardened brass cracked when it became brittle, and the soot was a sign of the forward portion of the case losing it’s malleability, and not being able to properly seal the chamber. Clearly an example of why it is a good idea to check handloaded cases as ejected.
There were a few corrective actions that were required. The first was to stop using a small base die, and thereby ignoring everything I had read about a lever and pump gun’s low extraction leverage, and the critical need to undersized brass to insure reliable operation. This change had no effect on reliability, nor did it increased effort required to cycle the rifle. The second step was to incorporate a process to make the brass malleable again, and the third corrective step was to minimize dimensional changed to the brass to reduce material stress. The result of all of those changes is brass that can be safely reloaded 35 – 40 times, as opposed to the original 3 – 4 times.
Annealing
 There are numerous techniques for annealing brass, but they are all designed to soften the upper part of the case, while retaining material hardness at the case head. This is what my work area normally looks like when I am annealing brass; away from all combustible materials, in the presence of a fresh fire extinguisher, and in dim room light. The trick is to hit transformation temperature, the point where the stress is removed from the material and the grain becomes small and uniform. This stage is typically signified by the case neck glowing a dull red, as viewed in dim room light, while not transferring a significant amount of that heat to the case head. Do not attempt this in bright room light as the case will form a small molten puddle before you can see the red coloration.
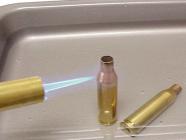 The most common way to accomplish this task is to put an inch of water in a tray, stand the cartridge case base down in the tray, heat the case neck with a propane torch until the neck barely glows dull red, then quickly tip it over in the water for rapid cooling. The only negative aspect of this approach is an inability to uniformly distribute heat around the neck and shoulders. perhaps causing uneven material softness. I may also be too critical in this area and couldn’t really know unless I could measure pressure required to pull a bullet from a loaded round, in comparison to other annealing methods.
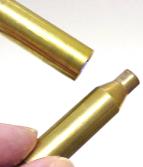 A second way of annealing cases is to hold the lower portion of the case between an unprotected thumb and forefinger, rotating the case while heating the neck area to a dull red. The benefit is the ability to more uniformly heat the case neck, and the presence of a threshold for pain that will insure the case head area does not overheat. When the case reaches temperature, it is immediately dropped into a pan full of water and quenched. Annealing is done with the primer removed so that water, in either process, can fill the case through the flash hole. If you use this hand holding technique, be careful not to tip the open case mouth into the flame where it can push very hot air through the flash hole, and into the palm of your unsuspecting hand.
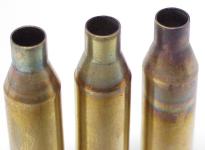 Annealing will discolor the case. Actually it will flame blue, oxidize, the brass. The first two cases, let to right, are probably okay from a coverage and temperature standpoint, but the case on the far right is not. When the material is over temped, the brass takes on frosted or a crystallized appearance, and the blue discoloration may run well below the case shoulder.
This locally overheated brass can be recovered by a second annealing process. If for some reason the case head sees this type of heat, you need to toss the case, soft case heads are dangerous and will not hold up to chamber pressure. How often do cases need to be annealed ? Probably every other reload for good case longevity. If you have an outside gas grill, there may be a potential to combine cooking burgers and annealing.
Headspace
 A firearm’s headspace is the distance between the closed breech face and the point in the firearm’s chamber that prevents forward motion of the cartridge. The headspace dimension for a non-belted bottle neck cartridge begins at the base and extends to the datum line, the intersecting line of reference that is located approximately half way up the case shoulder. The placement of the datum line is actually fixed by a diameter indicated on a chamber drawing. In general, this is stated as the point along the shoulder with a diameter of….. An easy way to reduce work hardening of brass, and to maintain its ductile form, is to minimize the difference between chamber and cartridge headspace dimensions, the amount the brass will be stretched under chamber pressure.
Brass casings have a manufacturing dimensional tolerance, as do firearm chambers. Sometimes these tolerances stack up at the extreme opposite ends of the spectrum. As an example, a .25-05 chamber has a minimum headspace length of 2.0487″, a maximum of 2.0587″, for an in spec range that covers .010″. Factory ammo will typically be dimensioned to .002″ – .003″ below the 2.0487″ minimum to insure the cartridge will easily chamber in the shortest in spec chamber, and will frequently go even shorter. As a result, it is very possible to have a combination of rifle cartridge that is within design tolerances, and have brass that will need to expand by .013″ to fill the chamber when the round is fired.
If you install RCBS dies in an RCBS press, following the instructions packaged with the die set; ram up, die screwed down until it contacts the shell holder, back off ram, screw in die 1/8 to 1/4 turn more – the press will full length size cases to roughly .002″ – .003″ under minimum headspace, just like the ammo factories. These factory cartridge and reloading dimension are interesting, only in that .006″ is typically the limit for space between the breech face and the cartridge when a custom rifle is assembled. A .025″ gap is probably large enough to consistently cause a case head separation.
Cartridge Case Gages
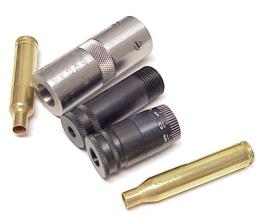 The first step toward getting a close match between a gun’s chamber and handloaded ammo, is to have some way to compare the two, and adjust accordingly. This is typically accomplished with a cartridge case gage.
To illustrate use, I selected two different types of gages. The Wilson gage, chrome, is a mechanical comparator and drop gage providing relative measurement. The RCBS Precision Mic is also a mechanical comparator, but is capable of absolute measurement. Both gages will accomplish the objective of matching ammo to a specific chamber.
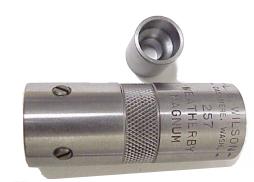 The Wilson gage for rifle cartridges is available in two forms. The first is a simple non-adjustable drop gage that is used for go / no-go checking of cases. It does not easily facilitate die adjustment to match a gun’s chamber, it would serve as a safety check to make sure cases coming out of a sizing die are within cartridge specification.
A second type of Wilson gage is adjustable and designed for use with belted magnums, in this case, a .257 Weatherby Magnum. The gage consists of steel cylinder machined to closely hold the cartridge case, and a steel insert that matches the contour of the neck and shoulder area of the case. I purchased my Wilson gage from Sinclair International for $22 +S&H, they had it in inventory and it arrived within a few days. Sinclair runs a very customer oriented operation.
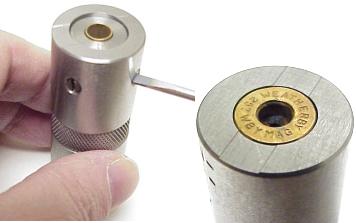 In use, the insert is slipped into the gage, until it rests approximately 1/8″ below the top surface of the gage body. The steel insert is located by two fiber tipped set screws. These screws are tightened lightly against the insert to prevent incidental movement, while still allowing it to slide under light direct pressure.
Next, a fired case from the chamber of the gun that will be seeing the handloads is inserted into the gauge so it is flush with the base of the gage. I did this by standing the case on a flat hard surface and sliding the gage over the case. I had to rocking the gage gently as belt reached the gage surface, so the case wouldn’t abruptly pop into the gage and incorrectly position the insert. After the set screws are tightened without moving the gage from the level surface, the gage is calibrated to the gun’s chamber.
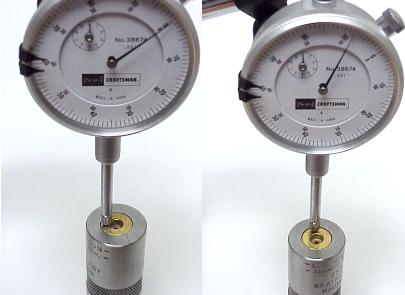 I was able to take comparative measurements from the gage using a dial indicator. Both unfired new brass and loaded factory ammo, came in .008″ undersize compared to brass fired in my gun’s chamber.
With the gage adjusted to my rifle’s chamber, I was able to set my sizing die to produce cases to match, rather than following standard die installation with resulting short brass.
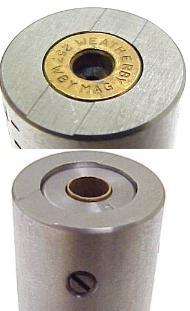 There are a couple of other features of the Wilson gage I should mention. On the base end of the gage, a channel is machined across the surface. The channel is a couple of thousandths deep, and is used as a reference point when setting up a sizing die, where a little more room is desired between the chamber and case. The sizing die is adjusted until the cartridge case is flush with the channel surface rather than the raised surface. I used the raised surface and found no interference when closing the bolt over a sized case.
The other end of the gage may be used to check case length; the case mouth should never protrude over the upper most surface of the gage. The machined groove serves as an reference for “trim to” length. Personally, I can think of much better tools to use for this purpose, tools that would be much more precise.
Overall, the gage is well made, easy to use and has become a routine fixture in my reloading process. I just wish Wilson would make them for a greater variety of cartridges. I did pick up a .378 WM gage I believe will work with my .338-378 WM and .358-378RG, but I am not certain of this, at this time.
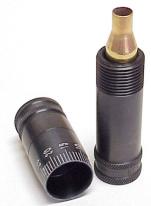 The RCBS cartridge gage is actually a part of Precision Mic set. One part of the set determines the maximum overall cartridge length for a specific rifle by checking chamber and throat length, the other part of the set measures cartridge case headspace. Unlike the Wilson gage, the RCBS gage provides actual measurement.
A fired case from the applicable firearm is dropped case head down into the body, a headspace nut that looks a lot like a micrometer thimble is dropped over the case neck and screwed onto the gage body until very slight contact with the case shoulder is felt. The thimble is read for the actual case headspace; zero is the minimum spec, in the case of the .25-06, 2.0487″.
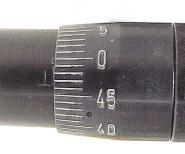 With results very much as seen with the Wilson gage, unfired factory brass came in short of zero by about .0035″. At the time of this writing, I had no fired brass from the gun’s chamber available for comparison, but I was able to set my sizing die up for a routine first pass over the new brass without being concerned with pushing the shoulder farther back. When I have my first fired brass, I will check the measurement, and transfer that dimension to my sizing die setting. RCBS recommends bumping the shoulders back an additional .001″-.002″ to insure easy chambering of handloads.
My only gripe with the RCBS gage is that it isn’t available for a more broad selection of cartridges. I use these for my .223, .243, 7mm RM, and now .25-06 loads. It’s use has had made a dramatic improvement in brass life and, to some degree, improved the accuracy of my handloads.
Other solutions
I believe the optimal solution is a custom die set for a rifle, they are available through most major suppliers of reloading dies. They can be made from dimensions taken from a few empties, or even a chamber cast. I have done this on two occasions with good results, and at not unreasonable prices. I’m not a neck sizing fan, I like to make sure the case shoulder is in the right place, and I don’t shoot the type of rifles that respond to the neck only sizing process with sub 1/4 MOA accuracy and consistency. Maybe this would be an area worth further investigation ?
Roll crimps are really tough on cases, taper crimps are pretty harmless. Roll crimps actually swage the brass into a cannelure, both thinning and work hardening the case brass. Tumbling work hardens brass, as does any form of impact cleaning. I think scheduled annealing and properly setting case headspace would offer the most measurable improvements.
Thanks
Joe

Email Notification