 Sorry I’m about a week over deadline. I was just never able to convince the folks at Midway USA that three weeks for shipment isn’t quite the same as second day air, used or refurb repacked scopes shouldn’t be shipped to customers as new items, and product with missing parts can be difficult to use.
I’ve have been working, even got some things done on a few forward projects. The quiet solitude of no loud UPS trucks presented the opportunity for me to wrap up some loose ends from previous articles. I thought I’d quickly run through the latter before I move on to the Contender information.
Mec-Gar sights for the P229 & PT Night Sights
I wanted to try a set of adjustable sights on the SIG P229 in place of the Trijicon’s I had recently installed. After sorting through several brand, info I’ve already covered, I finally settled on a set of Mec-Gar MGS series sights with a part number specifically for the P229.
 Aesthetically, a really nice set of sights. Very small, well made, and very visible and precise adjustments. Unfortunately, apparently not on a P229 slide.
The slide has previously been home to standard combat sights, three dot sights and Trijicon sights. Because the adjustable sights were too high to clear the bridge of the Sight Pusher fixture, I handed them over to the local gunsmith for installation. I received a phone call in a couple of days, advising that the sight base would not clear the crown of the slide and the sights could not be installed. It appears the dovetail on the Mec-Gar unit was just cut too shallow.
They were returned to Mec-Gar for replacement and I will try a new set as soon as I receive them. I hope it works out, I really liked the sights.
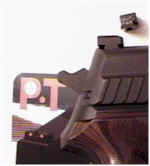 In the interim, a set of PT Night Sights made by Innovative Weaponry were installed. They are available in a lot of color dot and bar variations, but I selected a green on green 3 dot system. For about $20 less, they seem to have a nicer profile than the more expensive set, the markings are just as clean and they are just as bright in low light situations. Guess they’ll be my new fixed sight choice for the time being. Details and direct ordering at the site.
Why do I go through so many sets of sights ? As long as I can live under the delusion that a subtle change in sight types or markings will actually improve my shooting skills, the dream is still alive. I’m sure, before I run out of new sight choices, handgun aiming systems will be tied to the satellite GPS and I may never have to face reality.
The 40 S&W y2k time bomb ?
I had picked up a few special editions of some of the handgun magazines, the type that select the key articles that were published over the span of a year, and roll them into one special issue. I noticed there is one article that keeps showing up, warning everyone of unsupported chambers in .40 S&W auto pistols.
Actually, the article is suppose to represent favorite handloads for popular pistols. Within the story, the .357 SIG is described as a new round that barely out performs a .38 Super, since the .357 is only a 150 fps faster, and therefore has a dubious future. The SIG is also labeled as “not for the novice”. After full coverage of excited rounds, such as the .38 special and .357 magnum, the article stops providing handloading data and morphs into a warning label for what’s identified as another new round, the 40 S&W.
Within the warning, the suggestion is made that everyone who owns firearm chambered for the .40, call the manufacturer to see if their product has a safe, fully supporting chamber. Sure, I can hear that response, “Yes sir, that’s correct, none of our production guns have safe chamber designs, virtual bombs, every one of them”.
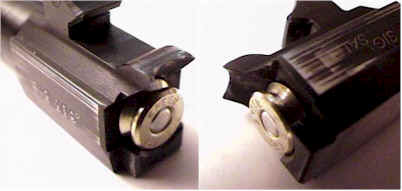
This is the chamber end of a SIG barrel. If the case had any more support, the firing pin couldn’t reach the primer. Both the .357 SIG and .40 S&W (same case head) are supported in the same manner. I dragged out .45 auto pistols, both standard, and modified to varying degrees, several with polished feed ramps. The moderately worked .45’s had a max of maybe .030″ exposed case immediate above the center line of the ramp, well within the generally accepted limits of .090″.
Of course the .45 auto has a working pressure about equal to a bicycle tire, but the 10mm and .38 Supers that operate at 32,000+ cup were cut the same. There is, of course, the general problem of first semester gunsmiths in training screwing up what started out as a good gun, and cutting too far into the barrel when trying to clean up the ramp to chamber transition angle.
I’m starting to think ammo manufacturers are behind a grand plot designed to scare people into not reloading, through the use of negative article propaganda, thereby driving customers to buy these silver tipped, slippery bullet, nickel plated wonders they are now selling for 3X the normal price of a box of ammo.
I load both the .357 SIG and the .40 S&W all the time. I am a handloading novice, if there ever was one, and they are both as easy to reload as the .45 auto. Be interested to hear from anyone who has experienced case or pistol failure using factory, or less than over maximum handloads.
General
The .338-378 die set from CH4D arrived yesterday. Sure, it was nice to get the dies back, and I appreciate the knowledge and experience that solved what turned out to be a simple problem, but it was even more enjoyable to learn something new about African hunting and double rifles. Thank you for the time, the interesting stories and the quality customer support.
The Lilja Precision Rifle Barrel web site is useful for a lot of reasons. I thought the site was in Finland, it is in Montana. The site is filled with really great articles on barrels, rifling, long range shooting – it’s great. Plus, these guys can make a 46″ barrel in .264 caliber. I have no idea why I’d want one, but still….. I guess it’s nice to see a firearms associated company spend the time and effort to make a commitment to Internet users, and openly share information.
I’m looking for information on the .338 Bullberry. I tried Fred, a couple of times, but apparently he’s not elaborating, but then again, neither is anyone else. Bullberry described the round as like a .35 Remington, but not made from a .35 Remington. Maybe like .30/30 derivative, only without reloading dies or loading data. But barrels are available. Right now, there are probably 2,000 Silhouette shooters and experienced Contender users with insight into this mystery.
Currently I’m working at a desk with a vibrating case cleaner running a few feet away, which really use to drive me crazy. The key to successful coexistence with case cleaners, children, grandchildren and anything else that fills the air with noise, while remaining beyond control, is a just lot of years of shooting firearms. Actually, the period preceding the popularity of ear protection probably helped the most.
The Contender
This installment will cover installing optical sights and handload prep. The next will be Contender .223 Remington loads and comparisons. There may be a third Contender article, depending upon how some information comes together.
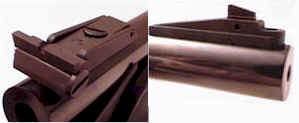 The Contender Super 14 barrel, chambered for the .223 Remington cartridge, is equipped with adjustable metallic sights. For most handgun applications, including amateur long range competitive situations, where metallic only type sights are permitted, these sights would be excellent. They are heavy duty, and offer a wide range of adjustment.
Metallic sights may not be the best sighting solution for the flat shooting .223, unless of course, you’re one of those people with owl like eyesight, and you don’t mind a front blade that’s bigger than the target. The following is a quick comparison between a .44 Mag load that might be used for longer distance shooting, and a typical .223 Remington load –
| .44 Mag |
.223 Rem |
|
| Diameter “ | .429 | .224 |
| Weight Grains | 240 | 55 |
| Ballistic Coefficient | .206 | .255 |
| Barrel Length | 14″ | 14″ |
| Muzzle Velocity fps | 1,750 | 3,000 |
| Zero Yards | 100 | 100 |
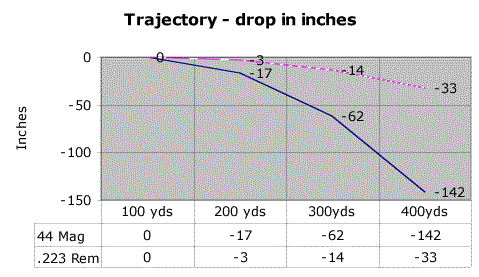 I could have pushed out the zero sight adjustment yards, used a more typical .44 bullet with a significantly lower ballistic coefficient, and the difference between the two rounds would be even more dramatic. The point is, even in this short pistol barrel, the little .223 centerfire round’s potential is in the area of higher bullet velocities, subsequent flatter trajectory, and potential for long distance shooting.
With a zero sight adjustment at 300 yards, the .223 would still be within a critical 6″ strike area from 0 – 350 yards and, at 350 yards it would have the same retained energy the .44 Mag could only hold onto for 150 yards. Having open sights on a Contender chambered for the .223 Remington, when it’s not a rules requirement, is analogous to putting open sights on a 7 mm STW – you could do it, but I’m not sure why anyone would.
Thompson Center Contender Super 14″ barrels, come from the factory drilled and tapped for both metallic and optical sights. The rear metallic sight needs to be removed from the barrel to gain access to base mount holes, if you decide to install a scope. Not a big deal, but the process requires removing a press fit roll pin from the sight assembly, rather than only removing screws.
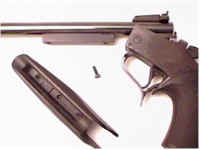 A good place to start the process is removing the barrel from the action. While not absolutely necessary, removal makes working on the sights a lot easier. There is a small cross slot screw that anchors the forearm to the barrel. This screw is removed for disassembly.
With the forearm removed, the hinge pin that anchors the barrel is accessible. It is located in the side of the receiver, vertically midway between the rear sights and the front of the trigger guard. With the action in the open position, the pin can be pressed out with only light finger pressure.
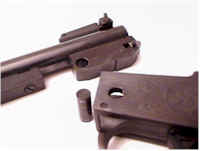 Here’s a little closer shot of the hinge pin pressed from the action. Like most pins in firearms, it is removed by pushing right to left. With the pin removed, the barrel easily separates from the action.
The T/C is a really simple assembly, but also really beefy. The little .223 Remington generates over 52,000 cup, and there are many barrels available for still heavier cartridges.
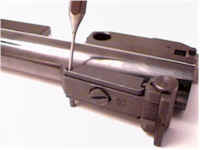 The screws that secure the rear sight to the barrel are located under the elevation adjustment assembly. This assembly is held in place with a pressure fit roll pin. A punch matching the OD of the pin is used to lightly tap the pin, from right to left, out of the sight assembly.
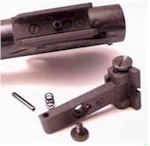 It’s a little difficult to see in this photo, but with the elevation adjustment assembly removed, you have access to the two screws securing the sight base to the barrel. These can now be removed. If they have been in place for some time, you may want to use some form of penetrating oil before cranking away on them – they are small, fragile parts.
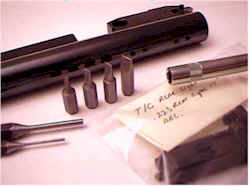 Gunsmithing driver bits are very handy. They have less taper than a standard screw driver bit, they come in many sizes insuring a tight fit, and they won’t chew up screw heads when a lot of pressure is applied.
It’s also good to have a few roll pin punches, or at least punches with non-tapered extended tips. Around 5 sizes would cover most popular size pins.
I keep a lot of small plastic zip lock bags around. I always try to reassemble small parts to the largest possible assembly, then I put a tag in each bag so I won’t have to guess at their origin when I run across them in the future. I also jot down assembly notes on the tags like, “Install pin, left to right”.
No, I don’t keep my car under a cover in the driveway, or have all the parts on my bench in little clear jars with name tags. I just hate taking a bag full of parts to the gunsmith when I can’t remember how an assembly went together, or to replace missing parts. A clean barrel with four open mount holes, the barrel is ready for the scope mount base to be installed.
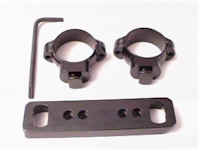 Even though I selected a Burris scope, I picked up a set of Leupold mounts and rings. I like the Torx® fasteners used on the Leupold mounting systems. Also Leupold always has a “no problem” fit, and they don’t seem to shoot loose on heavy recoiling firearms. Besides, I had a bunch of extra fasteners, a ring installer tool and a set of Torx® drivers.
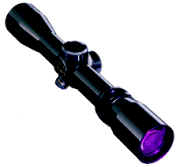 I looked at scopes in ranges from 1.5X-4X through 3X-9X and settled on the 2X-7X range. I wanted a variable to cover different shooting conditions and the 2X-7X didn’t give up much in the way of reduced eye relief, or field of view, to the lower magnification scopes. Also, the larger objective of the 2X-7X offered a brighter image.
The next step up to a 3X-9X dropped field of view dramatically and shortened eye relief. 9X is also just a little too much for me. There wasn’t enough of a difference for price to be a factor in the selection.
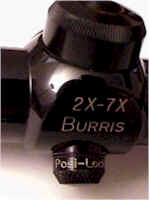 The Burris scope is equipped with “Posi-Lock”, a Burris feature that locks up the optics after adjustment, so they won’t get hammered out of shape from recoil. The Posi-Lock cap clears the mount base with room to spare, so it wasn’t necessary to look for a notched base, or use offset or raised rings for additional clearance.
I hadn’t had any prior experience with Burris scopes, but they seem well made, they were thoughtful enough to include lens caps, and the lenses are clear with decent contrast. I’m looking forward to the range portion of the project.
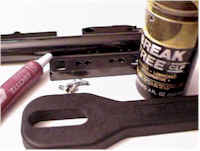 I rounded up the usual parts and tools, with the exception I had to lose the blue Loctite, at least for now. Torx fasteners are suppose to be used without any form of thread locker, but should receive a light coat of oil to make sure they tighten correctly.
I used stainless Torx fasteners on the base because they would not be visible, would be more corrosion resistant, and that’s all I had them in my small parts bin.
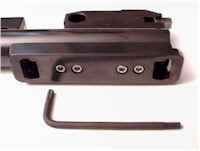 The mount went on flush and solid. I actually started with fasteners that were approximately 3 threads too long and worked them down on the bench grinder. I ended up with about 7 – 8 full threads in contact.
Like any other one piece base, start all of the fasteners before cranking anything down, There is not much slack for alignment.
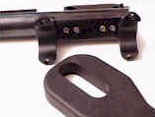 The rings twist into the base easily with the use of a ring installer wrench – the wrench being a buck’s worth of fiber filled plastic in a $15 plastic package. The wrench provides enough turning leverage for small adjustments to be easily made when aligning the rings perpendicular to the barrel.
With the rings close to final position, the scope was laid in place to check for any minor misalignment. Not a good idea to crank the rings down until you’re sure these are straight.
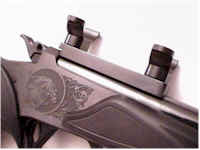 At this point, all that remained was to place the scope and rings, set the distance from the scope ocular to eye position, tighten everything down, and bore sight the scope.
That’s when I discovered I couldn’t use my Super Duper 20 year old El Cheapo Bushnell TruScope Pocket Size Bore Sighter. The standard arbor only covers .243 – .308, or .338 with a little tape.
Bore sighting is pretty much essential, unless you have unlimited ammo and don’t mind spending a lot of time test firing a gun to get a new scope set up. Yes I know a lot of people just peer through a barrel and adjust the scope to the same image. It’s just that I’ve never been able to get within a couple of feet with that method,when something is really out of whack. Trying to make adjustments, bounce your head around between bore and scope and hope you don’t bump the bench, the rifle, the rest or the bags is way too much athletic coordination for me.
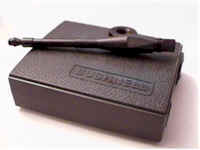 A bore sighter doesn’t have to be much. This model is about the size of a pack of cigarettes, if anyone remembers what they are.A lot of the newer models use fixed sized arbors, made in increments equal to all of the commonly found caliber’s. I suppose they are a little more solid, and maybe a little more accurate.
My Bushnell $25 wonder could always get me within a few inches at 100 yards, a point where many things other than bore / sight alignment effect point of impact. If anything of interest develops when I get the new unit, I’ll cover it in the next Contender article.
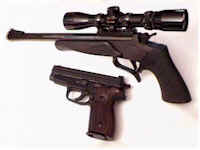 With the scope in place, and everything back together, it became obvious how easily the Contender could be setup for concealed carry. Should be able to palm the T/C and hide the SIG behind it.
Personally, I think it makes a nice solid piece of hardware and can probably be useful as a weapon, even when empty.
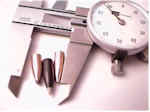 I selected 50 grain bullets for all of my handloads, rather than some of the much heavier match type and really long boat tails, because of the Contender’s rifling twist of 1:12. There are many rifle barrels of recent production that are 1:8 and tighter. Unfortunately, some of the bullets I selected appear to be relatively long and may present a problem of inaccuracy resulting from bullet instability.
Three different bullets, of different construction, with same general purpose. I had originally included my favorite bullet manufacturer, Sierra, but for some unknown reason their 50 grain .224 Blitz bullets were on a 13 week minimum backorder.
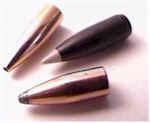 The Nosler/Winchester “Supreme Hunting Bullet” (center) was the most dramatic in appearance. Hype aside, they are basically Nosler’s polycarbonate Ballistic Tip Hunter’s, a long ogive boattail, in a special tapered jacket, coated with Winchester’s friction reducing black Lubalox®. At .887″, they were the longest of the three bullets, theoretically requiring a 1:10.5 rifling twist for best long range stability.
The Hornady .224 SX, a classic flat based, soft point spitzer measured shortest in length at .650″. This particular rendition of a .224 bullet is made for extreme, rapid expansion on varmints. This length bullet calculates out to a 1:14 rifling twist requirement and is uncoated.
The Speer hollow point TNT is a flat based spire point designed for small varmint hunting. It has a thin jacket and designed to fragment on impact within a velocity range of 1,800 – 3,400 fps. At .690″ in length, recommended rifling twist is 1:13.
The method for calculating rifle twist based on bullet selection can be found at https://www.recguns.com/VIIIB6.html, which in summary form is –
T = (150 * D2)
L
T is the twist rate required (number of inches for one revolution)
D is the bullet diameter
L is the bullet length
You can, of course, identify the maximum bullet length for a given rifling twist by applying the formula –
L = (150 * D2)
T
The number 150 is a constant that works well at velocities in the vicinity of 1500 fps or greater. At 2800 fps the constant can be changed to 180. This is a simplification of the 70 year old Greenhill formula and you will find it restated, with minor variations, on many web pages.
If I apply these rules, I should be using a 1:9 twist, based on a 1″ bullet length and velocity above 2,800 fps. If I used only shorter bullets, .750″ or smaller, a twist of 1:12 would be optimal. On the Berger Bullets Site, a producer of exceptional quality bullets, almost all of the 50 – 70 grain range .224 bullets carry a recommendation of 1:14 or 1:12. Of course, these bullets may be of shorter length than some of the other manufacturers’ products.
If you want to explore this issue, https://www.riflebarrels.com/imbal.htm offers some solid information on bullet imbalance and twist rates. The article also helps to define the elements that determine the brackets twist rates exist within. Unfortunately, somewhere around the phrase “radius of gyration” my nose began to bleed, and I thought I’d just wait, put everything together, and see how it all works out.
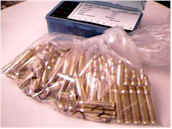 When you buy brass in bulk, it isn’t exactly packed for long term storage. Here’s a pile of .223 unprimed cases before being cleaned and put away in a decent storage box.
Bulk brass is available with and without primers installed, but because I would be putting together loads with small rifle magnum and bench rest primers, I went for unprimed.
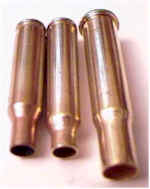 These are not giant cases. Here the .223 is sandwiched between a .222 and a .30/30 case, two other rounds the Contender is chambered for. Compared to the .222, the .223 is about .060″ longer, has a shorter neck, sharper shoulder and picks up maybe a couple of grains of capacity. Seems like an awful lot of work to get essentially the same level of performance. Our government at work.
Bulk brass is not perfect brass. Cases have small dings, bent case mouths, discoloration and a pink cast at the neck from annealing. They are also not polished. My point is they are cheap but, with the exception of decapping, will need all the effort you would have to apply to reloading fired cases starting with cleaning, deburring and sizing.
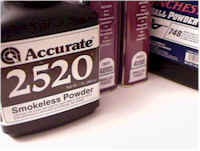 It’s like you can never have enough powder around. I really need to start reloading cases around the same capacity, with similar bullet weights. In this case it’s powder that will work in a rifle case, but burn as completely as possible in a shorter pistol barrel.
Some day, this unique (not the brand) powder, will find a home those1,000 or so APS mounted CCI small magnum rifle primers.
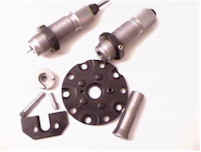 Oh, I’m sorry. Did it sound like I was whining about associated reloading costs ? In that case, I won’t mention $26 for a shell plate, $25 for a 2 die rifle set $6 for a shell holder, $5 for a trimmer holder, $5 for a trimmer pilot, $10 for an inside neck reamer, and $11 for a bullet puller collet. So it cost about an even 12 grand to set up for each new cartridge.
Did you notice a shell plate, with no moving parts and half the mass, actually cost more than a set of dies ? Lets see, dies can be purchased from more than one source, but RCBS shell plates for the Ammo Master can only be bought from one… Oh, I get it.
So that’s it for this segment. Hopefully, next time, I’ll have some range data and a useful conclusion or two. If all goes well with these Contender projects, we’ll just go on to that full length ramped .44 Mag shot shell barrel and choke, and go skeet shooting for poker chips.
| More “Revisiting the Thompson Contender”: |
| Revisiting the Thompson Center Contender |
| Revisiting the Thompson Center Contender II |
| Revisiting the Thompson Center Contender III |
Thanks
Joe

Email Notification