When I was growing up, a buddy of mine was nicknamed Turret Head. I’m not sure of the name’s origins, but I do know this article has nothing to do with that bit of life time nostalgia.
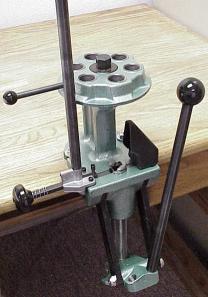 Every piece of reloading equipment has its share of compromises. The Ammo Master, while potentially fast, is a little imprecise in assembly, and sometimes awkward to use in auto progressive configuration. The Rock Chucker, while very sturdy and capable of high quality production, is a little slow, and short on capacity for very long cartridges.
RCBS dropped the progressive version of the Ammo Master, retained the Rock Chucker, and added the Pro 2000 press. They also added the rarely mentioned Pro 2000’s ugly cousin, the Turret Press. Yup, the caps are correct, the product’s formal name is “Turret Press”. Care to guess which product the RCBS marketing team favors ?
I assume the Pro 2000 replaces the Ammo Master progressive model, but I’m not sure where exactly the turret model fits into the RCBS line up. The Pro 2000 is a manually indexed press; fixed multiple die stations and rotating shell plate. It functions not unlike the older Ammo Master Progressive in manual mode, only the Pro 2000 is based on a more substantial frame. The Ammo Master has a longer stroke, which helps when working with big Weatherby cartridges, and it will handle the larger 1 1/4″ diameter .50 BMG dies, when set up as a single stage press.
In reviewing produce specs, I was hard pressed to see the advantages of the Pro 2000. In my mind, the Pro 2000 represents a step back from automation and, like most progressive, offers little latitude in helping the reloader efficiently integrate off press steps into the assembly sequence, particularly when a press mounted powder measure is in place. At $350, the Pro 2000 is expensive, but it does come with….uh, no accessories, not even an initial shell plate. The Turret Press, on the other hand, if you can find a source for one, is about $119, inclusive of freight – only 20 bucks more than a single stage Rock Chucker. I picked mine up at Midway USA, as a non-cataloged item. Based on features, and current budget cash flow, the Turret Press became my very special model of choice.
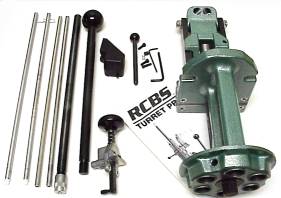 If you have been loading with a Rock Chucker, you’d be able to slide in the Turret Press and keep right on reloading. Both of these RCBS models use the same dies, the same shell holders and even the same bench mount hole patterns.
The Turret Press comes complete with an elaborate priming system, however, if you are an APS fan like I am, you can leave all of this glop off the press. The result is an incredibly clean looking, easy to use, piece of equipment, with no assemblies or parts to obstruct the operator’s vision.
The booklet packed with the Turret Press indicates a handloader could increase his or her production rate over the Rock Chucker, from 50 to 200 rounds per hour. Comparatively, I don’t know what RCBS had in mind for a production rate on the Pro 2000. In fact, I’m not too sure about the 200 rounds per hour capability of the Turret Press. I don’t think any of this equipment is optimal for very high volume production, however, I don’t think there is any other equipment that offers as much in the way of practical production rates and versatility for the handloader.
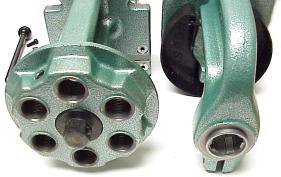 Here’s the Turret Press shown along side the single stage Rock Chucker. The Rock Chucker maintains the cartridge case in a fixed position, and dies must be changed as the cartridge assembly progresses. The Turret Press fixes the position of the cartridge but the Turret Head, holding all of the required dies, is manually rotated to bring the appropriate die into alignment with the in-process cartridge.
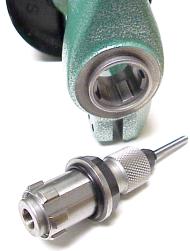 One drawback of the Turret Press, which may not be seen widely as a problem, is that the turret head is tapped for 7/8″ dies. The Rock Chucker is tapped to 1 1/4″, then fitted with a reducing bushing to adapt to standard 7/8″ dies. The 1 1/4″ hole allows the Rock Chucker to hold oversized dies, and to use the Hornady Lock-N-Load quick change bushing system.
I am genuinely fond of Hornady Lock-N-Load quick change bushings, especially since I have gone through the trouble and expense of installing them on every single die set I own. The lose of these nifty assemblies will require the purchase of additional turret heads, which will allow me to pre install my die sets for quick cartridge change over capability. This also means it will be impossible to swap dies between presses unless I remove all of the Lock-N-Load bushings. I feel a classified ad coming on, I’m just not sure for which material.
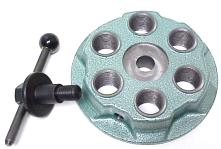 In a more objective review, an accessory turret head runs about $25. If the hole size in the turret were the required 1 1/4″, filling them with Lock-N-Load adapter bushings would cost $52, and each die would require a quick change bushing, $18 for six. Lemme see, $52+…. I’d have to spend about $60 to save $25.
The little bar through the turret head bolt is the, the turret pin, it serves to remove the turret head bolt, and as a lever to rotate the turret head when the press is in service. It takes about 20 seconds to change a die loaded turret. Based on the number of die locations in the turret head, I’ll probably end up leaving the Rock Chucker in place on my bench with a universal decapping die. This will free up one turret press die location, and allow me to preinstall three rifle two die sets, or two handgun cartridge three die sets, in each turret head. Then again, maybe I’ll leave the universal decap die in place and go with one rifle and one pistol set, maybe I can…. So much entertainment value.
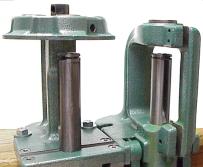 The Turret Press and Rock Chucker have, respectively, a 4″ and 3″ stroke. With an overall length of 3.70″ for .378 Weatherby Magnum based cartridges, and a similar length for the Ultra Mag line up, this increased stoke presents more than a theoretical advantage. The Turret Press also has no frontal obstructions, so there is a good deal of overall accessibility during cartridge assembly. The Rock Chucker, with it’s one piece bridged frame may be a little more solid and capable of more critical die/cartridge alignment. At this point, I don’t know.
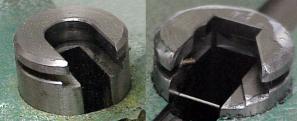 The ram ends of the (left) Chucker and the (right) Turret Press are a bit different; this is where the shell holder is retained by the ram, a point subjected to a good deal of stress. At first look, I was a little concerned that the retaining surface area had been reduced on the Turret Press, but then it dawned on me that this is where the hardened ram surface grips the hardened shell holder, not where the shell holder grips the soft brass case. I’m sure, in the face of a lot of force being exerted on the ram on a down stroke, the case rim would give out long before the shell holder or ram would fracture. The angle cut makes shell holder changes easier, and the cut was probably intended to help align the primer dispenser shuttle bar.
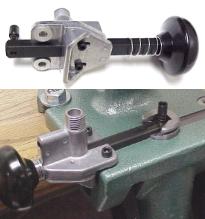 RCBS calls the item to the left the primer dispenser assembly. I believe that many reloaders might find it less then useful. That phrase is what’s known as a civil understatement.
RCBS machined a couple of threaded mount holes and surface flats into the cast iron base of the press, then they cut a precise groove between those holes, running the width of the press. The groove is intended to serve as a guide channel for a close fitting rectangular rod, that is intended to shuttle side to side carrying live primers into position, under a ready to be primed cartridge case. Unfortunately, RCBS decided to sandwich the rod between the cast iron base and a very imprecise aluminum casting, while securing and aligning everything with steel Allen head screws. The result is serious binding of all parts, even when following the directions exactly.
I do expect the shuttle assembly requires precise alignment for primer placement, and I understand the mechanics of the design and what RCBS was shooting for. I think aluminum was a poor choice of material, as it is prone to being distorted under fastener pressure. I was going to try some thin shim washers under the bosses that rest on the press surface, but by the time I ran through the balance of the priming system, I figured I’d stick with my off press APS setup and skip this whole deal.
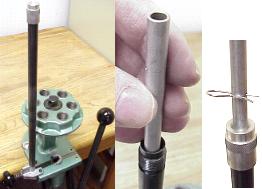 Okay, take a deep breath. The post sticking up like a left handed slot machine lever, is the priming safety tube. It screws into the top of the primer dispenser assembly. After removing the knurled aluminum tube cap, a primer tube of proper diameter (large or small primer) is inserted into the safety tube like a liner. At this point, a plastic tipped primer tube is used to peck and pick up primers from an RCBS Primer Tray-2, after the tray has been used to flip the primers over, anvil side down. When this primer tube is filled with the little buggers, a clip is inserted in the opposite end to prevent primers from falling out when the tube is inverted. Then the filled primer tube is placed primer anvil side down over the mouth of the safety tube, the clip is removed, and the primers fall to fill the primer tube, which is located inside of the safety tube. Got it?
Then I assume you grab a leather mallet and pound the crap out of the primer dispenser assembly, which will no doubt be wedged fast on the press. This may be RCBS’s diabolical plan to get people to switch over to their APS system. This is just a really bad assembly, on what looks to be a very good press. In fact, by comparison, the none APS shuttle priming system on the Ammo Master was a work of art.
 On a more positive note of thoughtful design – The press operating lever cants left or right of the press, depending which mount location is selected, and the priming system and spent primer catcher can be swapped side to side for left or right hand operation.
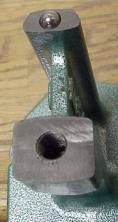 This is the section of the press frame that supports the turret. The turret head bolt passes through the turret head and threads into the center of the casting. The detent ball acts as a stop and bearing surface, popping into the detent recesses that are machined into the underside of the turret head, at each die centered position. This design requires a clearance under the turret head to allow this assembly to rotate properly.
All presses have slop, but typically this is side to side movement at the base and a fixed die will pull the cartridge into alignment with the press stroke. In this assembly, any flex in the turret head would move the die at an angle to the centerline of the case. I would think this could cause misalignment of seated bullets if the movement were excessive. I’m not sure to what degree, because I know the case will also float within the shell holder to assist in alignment.
I opened this article with the comment that I wasn’t sure where this press fit into the RCBS product line, this is what I meant. I am not sure what the quality expectations are for ammo assembled from this press, versus the other types of presses RCBS produces, and I am not sure how a turret press design stacks up against other press designs in general.
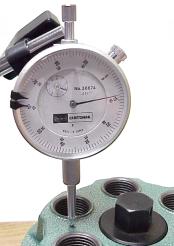 I thought I’d take some initial turret movement readings before running loads through the press, with the thought these readings would help place assembled cartridge bullet concentricity readings into some context. I located the indicator tip next to the front die location, with the turret pin facing forward. I pulled downward on the turret pin to load the turret head in this direction, then pushed up, then I let the turret head return to it’s natural position without any load applied.
The turret moved .004″ upward and .004″ downward under loading. I am interested to see if this rocking motion has any related effect on loaded ammo, or if the opposing motion cancels everything out. I’ll probably set up the indicator to take readings when the press is in actual operation, as the force I applied with the extended turret pin may be well in excess of any I will generate in the handloading process.
The press is being used to assemble the ammo that will be used to conclude the .257″ bore series. I should have results on both items very soon…honest.
Thanks,
Joe

Email Notification