Didn’t know the Bisley was offered in .22 WRM with a 9 ½” barrel? It is not in the Ruger catalog all in one place, but the parts are. The conversion parts are also available from Brownells and Numrich. Some assembly is required.

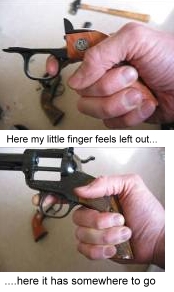 The traditional single action grip everybody else seems to like so much is a lousy fit for my hand (picture right). Well, maybe not everyone else. I have to think a guy named Bisley would agree with me. Anyway, I wanted a long-barreled Bisley, preferably powerful enough to knock over a turkey if he refused to come close enough to hit with the barrel, but not so powerful that it would create instant leftovers if it was too far away to be confident of a head shot. A .22 magnum would be about right. One caveat: I have not been turkey hunting with a handgun yet, but I had to start somewhere if I was going to “need” a new and unusual gun and advance my self-taught gunsmithing education at the same time. I discovered that Ruger makes all the parts for the gun I wanted, but will not sell them all in one package, not even if you call them and ask nicely. I had three options: (A) I could buy a Single Six Bisley, which is only offered with a 6 1/2 inch barrel, swap it out for a Single Six 9 ½ inch barrel, get a .22 magnum cylinder and see if it would work. (B) I could buy a Single Six Bisley, a 9 ½ inch Single Six, and swap out the necessary parts, leaving me with a 9 ½ inch Bisley .22 LR/.22 magnum convertible, and a 6 ½ inch Single Six, with a cylinder factory engraved “Bisley” to try to sell. After further study, I learned that plan B is plan A, so to speak. That is, cylinders and barrels are only available from Ruger as “exchange” parts, and they exchange parts only for the “gun they were designed for”. Dang lawyers, probably afraid some moron would put a .454 cylinder and barrel on a Bearcat, but this is not about the Alaskan. Once I was sure that everyone was against me, my contrarian streak was up and I became determined to do it my way.
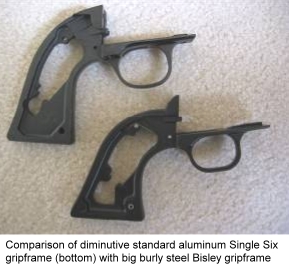 Here is how I implemented Plan C, to get my 9 ½ inch .22 magnum / .22 LR Bisley. The same process would apply if I wanted to do the same to a Blackhawk, or maybe a Super Blackhawk, to get a 10 ½ inch Super Bisley. When the SBH is offered in .460 S&W magnum, I’ll be ready. Looking at Ruger parts diagrams, I saw that the Ruger Bisley grip frames for the .22 and Blackhawk versions have the same part number. Not only does that mean an all-stainless homebuilt Bisley is possible, but I considered putting a stainless grip frame (available from Brownells’) on my blued revolver. I am pretty sure that this would look good, similar to the “pintos” S&W has put out from time to time. Another plus would be that I could skip the bluing. I had a strong suspicion that if I went the blued route, I would have to re-blue everything to get the parts to match, or settle for the colors being slightly off, sort of like the blued/painted aluminum factory finish on the regular Single Six. I also considered plating the grip frame with brass. This would provide a more “authentic” retro look, but I decided against it due to cost, having no idea how it would wear, and because flashy brass would not help bring those prospective turkeys any closer.
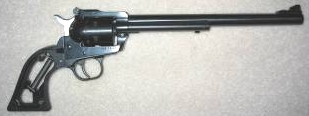 Nothing wrong with the new 9 ½ inch Single Six I took home as is, except for my preferences. Other than the grips, the grip frame, two screws, hammer, and trigger, the Bisley and the regular Single Six are the same. Also, the single six comes with an extra in .22 magnum cylinder, or in my case, the .22 LR cylinder is “extra”.
The parts diagrams and parts lists indicate that the Single Six and Bisley have different front sights, but the catalog photographs (top) and my experience indicate that they are the same. All of the above factory parts were available from Numrich, so I ordered them, except for the Bisley grips themselves. Whenever I buy a handgun, it comes with grips. I generally just use those. If I do replace them it is purely for functional reasons, not looks, honest. In this case though, I was starting with a clean slate. I could not see ponying up 35 bucks for the plain Ruger grips when a whole array of aftermarket grips was available starting at about 15 bucks more. I ordered checkered walnut grips offered online for $54 shipped.
The old grip frame came off just like the instructions said it would, and I finished disassembling the trigger and hammer assemblies per the Ruger instructions without any trouble. I expected the new grip frame to arrive in-the-white. To my surprise it was blued, but it was a bit oversized where it fits to the cylinder frame and had some rough spots in other places. The new hammer and trigger had about the same fit and finish as the old ones, except the Bisley trigger was entirely blued. I assembled all the parts to see how they would fit, and to make sure that I could.
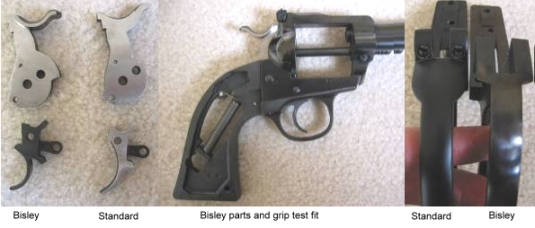
Joe’s instructions in the archived Bisley projects at www.Realguns.Com gave me more confidence than the Ruger manual. As I was securing the grip frame in place with all of the trigger and hammer parts captured where they belonged, the doorbell rang. It was the postal man with the grips. I finished screwing on the grip frame. As shown in the photo, the grip frame and cylinder frame mate up where they need to. The fit is a “drop-in” assembly as far as functionality goes, but the grip frame needs to be reduced and smoothed up a bit to match the sides and top of the cylinder frame. I never really noticed it before, but the Bisley grip frame gets a lot of its extra length at the top. As shown in the top perspective view, the backstrap comes up over the aft screws that hold it to the cylinder frame. The Bisley grip frame uses little Allen head screws under the grip halves. I was satisfied that everything would work, and that I could take it all apart again to file off the extra metal and smooth out the rough spots for final fitting.
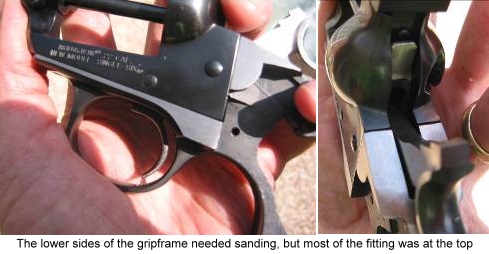
I filed down the high parts of the grip frame surrounding the hammer slot, and sanded down the sides a bit by sliding it back and forth on 220, 300, and then 600 grit sandpaper lying flat on a tabletop. I used Birchwood Casey ® Super Blue ™ in 6 coats, hitting it with 0000 steel wool between coats, until the color matched the rest of the grip frame. The whole grip frame is a little lighter than the cylinder frame and barrel, but the [mis]match is comparable to the original aluminum grip frame – blued cylinder frame [mis]match provided by the factory. Next time I talk with my local gunsmith, I will ask how much he would charge to properly re-blue everything to get a nice matching finish. Then I’ll probably forget all about it and move on to something else.
The first grips I ordered were serviceable, and fit without any trimming. The finish was disappointing, however. The web site said they were “LP checkered”, which may be true for all I know. The “checkering” seemed to be silk-screened or printed on. I still am not sure what “LP” means, maybe “laser printed” or “loser’s purchase”. At any rate, it seemed that with a little handling they would wear to be as smooth as yogurt on a bald Yorkshire. After looking more closely at the website I had ordered from, I noticed that in addition to the “LP checkered” grips, “cut checkered” grips were offered as well. Sounds better, I would have gone that route if I had been more observant the first time. Maybe it was my fault, but then again, “LP checkered” was not really checkered at all, so I was not prepared to do business again after being fooled once. Being careful not to touch them lest the “checkering” wear off, I sent them back. I ordered a pair of “hand checkered” grips from Lett, the same outfit that supplies grips to Ruger.
I figured as long as I had the thing apart, I might as well smooth up the working surfaces. Thanks again to Joe’s archive for the step-by-step procedure. I also toyed with the idea of putting in a free-spinning pawl that would allow the cylinder to spin both ways for reloading. The aftermarket free-spinning pawls look a lot like the stock pawl, except in one spot. It seemed to me that a guy could file off that spot on the factory pawl, which appears to be unhardened, and get a free-spinning pawl at no cost. This is pure speculation though, so don’t try it and come crying to me if it doesn’t work. I am not a gunsmith, but it seems that if you took too much metal off, or filed in the wrong place, you could create a safety problem. Abandoning the free-spinning pawl idea, I put the thing back together again. If loading proves to be too much of a pain, I can always go back and swap out the non-free-spinning pawl available from Brownell’s for about 35 bucks.
A Poor Man’s Trigger Job
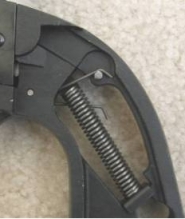 In the past, I had heard the pros and cons of a “poor man’s trigger job” discussed, but had never seen one in person, so I tried it to see what I could learn first hand. The idea is to slip one leg of the spring off of the pin it was designed for, giving a lighter pull. It does give a lighter pull. Pro; it costs nothing. Con; I am uneasy about how long the spring would last, and whether the spring pulling at an odd angle might cause wear to other parts. It might end up costing the same in the end as buying a lighter spring. It doesn’t make sense to me to abuse the spring like that when a proper light-weight spring cost only a few bucks anyway. At least now I know what side of the debate to be on. I put the spring back where it was designed to be.
Replacement Steel Ejector Rod Housing
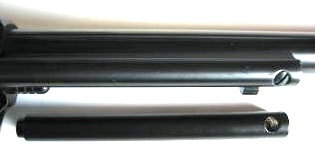 Of course, now that the aluminum grip frame was gone, the aluminum ejector rod housing had to go. I ordered a steel one from Brownell’s. I’d love to tell you what an accomplished gunsmith I am, painstakingly fitting and finishing customs parts. Fact is, I unscrewed the old one, screwed on the new one (top). The nicely blued replacement looks good, and it’s not purely a cosmetic improvement, the aluminum ejector rod housing seems susceptible to getting dinged, which would cause the ejector rod to hang up. The steel one leaves no doubt that it can stand up to everyday wear and tear.
The finished Product – A Single Six Bisley convertible .22 LR / .22 WRM, 9 1/2” and spare parts
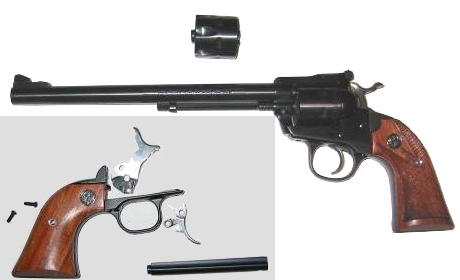
Once my Lett grips arrived, they fit reasonably well right out of the box. Not only that, but they had real checkering along with the Ruger logo. It might not show up in the photographs, but it wouldn’t hurt to sand down the grip frame in a few areas to get a better-than-factory fit. Definitely something I will do. However, since turkey season was almost upon me, I needed to get to the range to try out my new Super Single Six Bisley Turkey Stalker to find out its capabilities.
Accuracy is relative, but for me, this is darn good for 25 yards
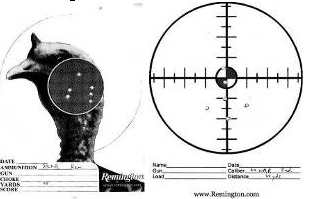 The adjustable sights will come in handy. Once I got her sighted in with the .22 LR cylinder, I switched to the .22 WRM. Windage was unchanged, but I had to come up a bit in elevation. I switched back and forth a few times to make sure; six clicks of difference in elevation between the two cylinders. The balance of the revolver was very good. I had been concerned that the long barrel might be a bit awkward, but it wasn’t. It points very naturally for me, and the long sight radius is a help for my not-getting-any-younger eyes. The next stage is to practice at longer distances to find out what my hunting limitations are. If I manage to bag a turkey, maybe I’ll write a follow-up to tell you about it.
|
Project Cost Breakdown As for the cost of the project, $579.78, not |
Material |
Cost |
|
Single Six |
335.58 |
|
|
Bisley grip frame |
120.50 |
|
|
2 grip frame screws |
2.50 |
|
|
Bisley hammer |
25.25 |
|
|
Bisley trigger |
14.95 |
|
|
Ejector rod housing |
25.00 |
|
|
Checkered grips |
56.00 |
|
|
Total |
579.78 |
Creative, story and photos by Forks LaPush – Appearing with his permission

Email Notification